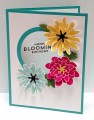
When I saw the sketch and theme, I knew immediately that I wanted to do a flower blossom with bees buzzing around it. I thought the card would be especially pretty if they were "suspended" above the garden, so I chose the "split panel" technique for which you can find Kim Williams great tutorial at:https://goo.gl/1fTfsm .
I estimated how long the window portion would be by placing my flowers and bees like I wanted them on a scrap piece of paper, then measuring how much vertical space they would require (3-1/8" for this card). Then added 1/2" to allow for two 1/4" overlaps for gluing the window onto the back side of the card front.
I ran the Hello Honey card base through my Big Shot embossing machine using the Darice Honeycomb folder. Only the card front was inside the folder, with the back portion laid out flat and trailing outside the folder.
I then cut a 3-1/8" section out of the middle of the embossed card front, and applied the super strong Tear & Tape along the two underside edges of the card front I was going to use so that the acetate could be taped in place.
HINT: First attach the TOP of the acetate while carefully aligning the sides of the acetate to match the sides of the back of the card. Then with the card closed, carefully position the smaller BOTTOM panel of the card front so it aligns with the bottom of the card back, then press it down to attach to the bottom edge of the acetate window. This should give you perfect alignment of the window.
The flower is three layers:
- the large pink base was stamped twice using Blushing Bride ink on the largest Flower Fair stamp. To ensure perfect alignment of the double stamping, I used my MISTI Stamping Tool,,, but it should work pretty well with the SU Stamp-a-ma-jig as well.
- the darker inside of the flower was stamped using the ray stamp from the same set using Cherry Cobbler ink - also stamped twice using my MISTI.
- the yellow center of the flower was stamped on Daffodil Delight cardstock using Crushed Curry ink.
All three flower pieces were die cut usin the SU Flower Fair Framelits dies.
As an added touch, I stamped and diecut a flower "backing" using Blushing Bride ink. This I used to hide the Mini Glue Dots on the backside of the acetate window. I also die cut a third large blossom and attached it to the card back so it aligned with the front flower when the card was closed. This allows for space to write your greening inside.
The bees were die cut using the Detailed Dragonfly Thinlits Dies. Twice with Basic Black cardstock for the bees' bodies, then twice with Daffodil Delight cardstock for the yellow bits to fill in the holes of the main bee bodies. To keep the yellow bits in place, I cut a thin strip of double-sided tape and attached to the back of the bees' bodies, then inserted the three yellow bits into their matching holes. I pressed firmly to ensure they stayed in their holes.
The bees and flower were attached to the acetate window using Mini Glue Dots.
If you want to add a sentiment to the front of the card, there is room to do so at the bottom of the card front by attaching a die cut label. I left my card without a front sentiment so that I could use the card for any special occasion.
While these instructions are rather long, the construction of the card was pretty straightforward and easy. I hope you make one of your own!
Date: Tuesday, April 11, 2017 GMT Views: 1071
Favorited:3