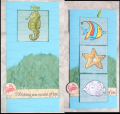
I made this for Beate's WSC #53.
It was a lovely looking sketch, but all the things I tried weren't working, I now need to make several cards to use up all the bits and pieces on my desk, LOL.
So in the end, I went with using the same technique I tried out yesterday.
I cut a piece of Bazzill and stamped the waves from Shore Thing using Memories Soft Grey. I stamped the seaweed on mulberry tissue using a Colorbox chalk ink. I stamped a strip of paper with the sand from Shore Thing using more Colorbox chalk, and then the sentiment using Colorbox pigment .
I stamped all the fish images using Versafine Onyx Black and coloured them with Twinkling H2Os, so as usual it's hard to take a good picture, sniff.
The blue square panels are BG Gypsy, again stamped with waves, and the edges sponged in the same green as the seaweed.
I used the little crab from Shore Thing too, I love him and the birds.
The hardware is Hero Arts.
Date: Sunday, June 22, 2008 GMT Views: 1845
Favorited:5
Registered: February 27, 2006 Location: Denham Springs, LA Posts: 74
Mon, Jun 23, 2008 @ 10:14 AM
I love the colors but can't figure out how this works? Do you pull the little tab at the front and that makes the others come out? Sorry I am kinda slow hehe
Kassiah
Check out my blog for some fun Blog Candy: http://kassiah.blogspot.com
Splitcoast Dirty Dozen Alumni SCS Gallery Moderator Splitcoast Challenge Hostess Teapot Tuesday TEAm
Registered: July 27, 2007 Location: Dublin, Ireland Posts: 131485
Mon, Jun 23, 2008 @ 12:09 PM
Quote:
I love the colors but can't figure out how this works? Do you pull the little tab at the front and that makes the others come out? Sorry I am kinda slow hehe
It's really 5 little squares, you lay 3 out in a row and lay two lengths of ribbon along them which will act like hinges. Then you fix the other two squares on top of the lower two. The litle tab bit is on the lowest of the 3 squares, but at the top of the square, NOT the bottom. Then you fix the back of the top one (still has the ribbon visible along it) to the card base, and fold the other two back up on it. The photo-turn holds the tab down so that the back of the middle square shows. Then when you release it, they drop down. Sorry, not very clear without pictures. I found the technique in a UK magazine, and TBH even with pictures it took a bit of working out!