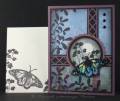
Measurements: The scalloped circle is 2 ½”, width of the narrow black panels are 11/16”, the bottom of panel #1 is 1 ½” from the black strip (it is a separate piece of paper from the top portion), the vertical narrow black is ¾” from the edge of the blue paper.
Hope that helps!
-I stamped the black on the designer paper and ink distressed the edges.
-The image panel is stamped in black and then I mask off for the moon with a ½” punched sticky note, sponged on weathered wood distress ink and then ink distressed the edges with black soot.
-The butterfly is colored with Twinkling H2oÂ’s and artist brush. I first attempted to cut the antenna as I often do put pulled one of them off so when that fails I just stamp that portion of the image on the panel and line the butterfly up to it. ItÂ’s attached the butterfly to the panel with tacky glue.
-Since I donÂ’t own a scalloped circle punch my friend Judy sent me some so itÂ’s inked up with a brayer to change the color and I go around the edge from the back side with a marker to hide the white. From the back side is if you slip and mark the cardstock it wonÂ’t show!
-Cuttlebug die cut is attached with tacky glue.
Talk about a card taking a mind of it’s own, my first thoughts were white and using the new MS scallop punch, then I saw this paper and it took over. A bird was the plan for the circle…OOPS – to big, plan two will be the flowers and butterfly! I do like the end product and may still try the original idea! The Cuttlebug die cut was always a part of the plan…just a different color!
The image layout is sort of a case from the 12x12 piece of designer paper I cut from. Which was a package from a dollar store. I think I'm the cheapest stamper on SCS!