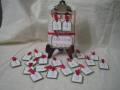
This was such a fun item to make! I used it as a door prize at my World Card Making Day Class- there were 18 prizes to chose from and this was the very first one picked! I used magnets for the numbers, thanks to an idea I saw here from another member- and wish I could remember who to give them credit for.
Date: Monday, October 8, 2007 GMT Views: 4739
Favorited:118
Registered: December 12, 2004 Location: Posts: 186
Tue, Oct 09, 2007 @ 6:48 AM
Oh my gosh, this is SOOO cute!!! I love advent calendars of all kinds, and this is a must for me to make! Yes, please share the details!!! Thanks for sharing!!
Registered: August 14, 2007 Location: Wisconsin Posts: 10172
Tue, Oct 09, 2007 @ 12:35 PM
Wow- all of your comments made me feel great!! Thanks for that!
It was so simple it isn't even funny. I got this clipboard for $1.00 in the clearance section at our local Michaels, but the Stampin' UP on board clipboard would work too, or I am sure Michaels has them other than just on clearance as well.
I don't have my measurements since this was already given as a door prize, but thats okay because your measurements will just need to be based on what size clipboard you end up finding.
I cut the striped paper from SU "dashing" dsp just big enough to cover the entire background of the clipboard, and used my corner rounder since my clipboard had rounded corners. And thats the piece that I built onto. Then cut the dotted paper from "dashing" 1/2 inch smaller on each side than the first piece, and cut the square in half to make the angled piece, and layered that next.
For the numbers and the words, I printed off my computer using the RGB codes for SU Real Red and SU Old Olive.
Used the small tag punch for the numbers, and the large tag punch for the mattes in Old Olive. I made two in each number 0-9 of these. At walmart I bought the "magnet buttons" as they call them. Glued two onto Very Vanilla Cardstock, used my ticket corner punch on that piece, and attached it over the dashing paper. Then on each of the numbered tags, I attached the Real Red Ribbon, and a magnet button on the back. NOW MAKE SURE when you attach the magnets onto the back of the tags that they are lined up correctly so that they will stick upright to the magnets that are attached onto the very vanilla cardstock. These types of magnets have both positive and negative on one side... so if you attach them wrong to the tags, some numbers may only be able to stick on upside down. that you dont want. I actually stuck the magnets together, then glued them like so onto the tags, so as to make sure they were the right direction. I hope that makes sense....
added Real Red Ribbon, and attached my "Days until christmas" sign (after matting it on Old Olive and using the ticket corner punch) onto the paper. Then I glued the finished piece onto the clipboard!
Viola!!!
Okay that was long- but I wanted to share ALL the details. lol.
very easy - just be mindful of how you put those magnets on.
------------------------------ Wife of 1, Mother to 2, Stamps 'til 3!