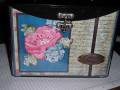
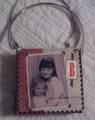
Hi Girls,
Saw this on SCS! I had to make one! It was only hard because the CKMag. directions were all wrong, and we had to find out the hard way with each step. Now that we have the kinks worked out, it will be easier. I get a ton of comments from strangers, and it's a nice conversation starter for SU!
Date: Thursday, August 31, 2006 GMT Views: 1143
Favorited:25
Registered: January 25, 2005 Location: North Dakota Posts: 603
Thu, Aug 31, 2006 @ 2:49 PM
Beautiful!! Would you pleazzz send me the template or the correct directions. I have plans for christmas gifts for these gorgeous little numbers. [email protected] Thankyou in advance. You did a wonderful job
------------------------------ *Robin* My Gallery I've Been Elfed!!!
Registered: April 27, 2003 Location: Lafayette, Louisiana Posts: 83
Fri, Sep 01, 2006 @ 7:15 AM
This is fantastic!! I'm starting up a new stamping group next month and would love to have your notes/instructions on this!!!!!!!!!!!!
------------------------------ Tracey Mizell
Baton Rouge, LA [email protected]
"In order to accomplish something you've never accomplished before, you have to do something you've never done before. You have to take it to the next level. You have to let go of your security blanket and take a chance."-Drew Brees, NO Saints
Registered: June 8, 2005 Location: Atlanta, Georgia Posts: 171
Mon, Sep 04, 2006 @ 7:03 AM
Scrapbooked Purse Directions
Scrapbook paper, stamps, ink, etc.
Pictures, we recommend originals, not home-printed copies
tagboard or light cardboard
access to a comb binding machine
4 � inch grommets
4 split rings, 1-inch
purse handle or � inch vinyl tubing, 22 inches
4 purse findings
grosgrain ribbon to match your pages
(in all, it came to under $10)
1. Design your pages. 8x8 for the front and back, 3x8 for the sides and bottom. You can use flat ribbon, and flat hodgepodge hardware, such as the paper clip pieces. Don�t forget to make inner lining pieces so the inside of your purse is pretty, too. (You can make the pieces larger, but 81/2 by 14 is the largest size of laminating sleeve at Kinko�s, unless you want to pay $5 each for the 11x17 pages.) With the regular dimensions, laminating is $5 at Kinko�s. A note: a friend used home-printed pictures on her bag, (on photo paper), and the lamination left streaks on the pictures. We can�t figure any other reason for this result, so you might want to avoid using home-printed copies. It did not look good.
2. Mount the pages on moderately heavy cardboard, like a cereal box or the cardboard that used to come in our catalog boxes (if you saved it, lucky you ) You should use your heaviest cardboard in the sides and bottom, they tend to buckle sooner. Only a little adhesive is necessary, as you�ll be laminating these.
3. Run super-clear scotch tape or packing tape around the perimeter of each piece before laminating them. You won�t be able to leave an edge of lamination, thus they won�t be watertight after the purse is finished. This step will help. The tape won�t show, as your binding will hide it.
4. Have your pages laminated at Kinko�s. Our store has you do it yourself, so we were able to crank up the heat on the machine to almost 9, and then ran them through multiple times to get a very good bond. This runs about $5.
5. Trim your pieces RIGHT AT THE EDGE of the cardstock, don�t leave ANY lamination hanging over. This will ensure that your holes get punched in the actual cardboard. The scotch tape should still hold out any water or spills.
6. Use a comb binding machine to punch the sides of the pieces. Kinko�s wanted $45 to punch ours with their spiral binding machine, which they said was half price, since we weren�t going to need the actual binding done. (So generous ) So we went to plan B, since my friend has a comb binding machine for homeschooling purposes. They run around $150. If you have access to a school or a large office, they should have one. Do NOT punch the tops of your pieces, just the sides and bottom, with the exception of the bottom piece, which gets punched on all four sides.
7. Use a 1/4 inch standard hole punch to make holes at the top of the sides to hold your 1/4 inch grommets for the handle. You�ll have to punch a few overlapping holes to make it fit. Hammer these in. I found these in the sewing notions section at Walmart, a pack of 15 was $1.77. You will have to hammer HARD, so prepare a good surface for this I also bought an eyelet setter for this , for about $1, in the same section.
8. Put your split rings through here. I found the 1 inch split rings in the jewelry section at Hobby Lobby, maybe $1 for 8. I thought the split rings looked better than the 3-ring binder clips suggested in the SS article, and they won�t pop open. But you can use either.
9. Attach a purse finding here. These are $.69 each at Hobby Lobby in the make-your-own handbag section. (Please someone tell me the real name of this ) They are also over in the yarn section in a pack of 4 for $2.99. They come in gold or silver. Look at the picture if you�re not sure of what these are.
10. Sew your purse together Any method works, we used SU grosgrain in an overhand stitch. Measure out pieces that are double the length you plan to cover. Just knot the beginning of the ribbon to the end when you come back around to secure it.
11. Attach your handle to the purse finding. You can buy a handle at Hobby Lobby for around $5, if you want to make a handbag. If you want to make a shoulder bag, buy � inch clear vinyl tubing at Home Depot, 20 feet for $4, plumbing dept. Cut (2) 11 inch pieces, one for each handle. I was NOT able to get those silly grommets into the handle, let me know if you find a way I just punched holes in the handle with the 1/4 inch punch, and hooked the purse finding through the holes. I can�t imagine it will wear out, it is very sturdy. However, since I couldn�t get the grommet through, I was unable to fill my handle with beads or hole punches, or anything but a length of brown grosgrain.
VOILA Your purse is done Don�t forget to stash some business cards inside to give to people who ask you about your purse
------------------------------
"The will of God will not lead you
where the grace of God cannot keep you."