For more photos have a look here (Instagram wildemoehre11): Links see below.
Today I want to show you my project and various experiments for another online class of the Altenew Academy within the Altenew Educator Certification Program. By the way, everyone can book the classes, no matter if you participate in this program or not.
I love monoprinting, so I was very happy to discover a class on this topic. In "Monoprinting made easy" Sara Naumann shows different techniques on gel plates with materials from Altenew, like stamp pads or refills of Altenew Artist Markers. This class contains simple techniques perfect for beginners. I was really excited about one technique and knew right away that it was the one I wanted to do my project with.
Material:
- I used both: Gelli Plates and Gel Press Plates and am very happy with both brands.
- Furthermore, you need "Tissue Paper". Shortly before Christmas I received a package in which white tissue paper was used as a filler. I immediately repurposed this paper; however, the paper was very crumpled. I used it anyway and found that the wrinkles create an additional effect.
- Altenew Pigment Ink "Antique Goldâ
- Altenew Dye Inks and I also used the Altenew Watercolor Brush Markers
- Stamps that are flat or not too delicate
- Black ink pad (I used Versafine Clair Nocturne)
- Double sided tape, glue stick, etc.
Technique:
Using black Versafine, I stamped various flowers from the Altenew stamp set "Floral Shadow" on white cardstock.
After that I dabbed the whole Gelli Plate with the Altenew Pigment Ink "Antique Gold" stamp pad.
In the video, a dye ink stamp pad was pressed onto a smooth surface like an acrylic block, mixed with water, and this mixture was splattered onto the gold Gelli surface with a brush. I tried the Watercolor Brush Markers instead and that worked well too.
Then I placed the tissue paper over the Gelli Plate and rubbed my hand over it to soak up the colors, peeled the tissue paper back and let it dry.
On the white cardstock with the black flowers I adhered double sided adhesive foil and on top of it the colored tissue paper. Sara Naumann recommended a glue stick in the video instead of the double-sided adhesive foil, because you might see it through the tissue paper. But I find the adhesive foil super and have not had any problems.
The gold pigment stamp ink makes the black flowers look golden brown and where the splatters of color are the tissue paper becomes more translucent. This creates exciting effects and the wrinkles give additional texture.
I experimented with all sorts of things. Instead of using the gold Pigment Ink, I also tried Distress Oxides. I also created the splashes with Metallic Watercolors. Sometimes I stamped the cardstock with flowers, sometimes with letter stamps, sometimes I didn't stamp at all, but just glued the colored tissue paper to the white cardstock. Unfortunately, the shimmer of the gold cannot be seen well in the photos, but it shines wonderfully.
To finish the card, I attached some flowers from the "Floral Shadow" stamp set in a Stamping Platform and applied metallic watercolors, such as Altenew Metallic Watercolors or Twinklings H2O, directly onto the stamps with a brush, pressed them onto white cardstock and then die cutted them. If the watercolor on the stamps is too dry, spray lightly with water and stamp again. Basically, with this technique, I would always spray the stamps with water after removing the first cardstock, because it often makes a wonderful second impression, and sometimes even a usable third impression.
This is the "project card" I am submitting for this online class.
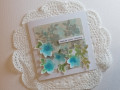
Here is the card created with the second impression of the flowers. Wonderfully delicate. Mounted on white cardstock die cut with the "Watercolor Stripes Cover" from Altenew. The stickers are from Studio Light "Time to Relax".
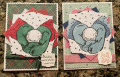
For this card I used a Carabelle script stamp as background. On top I glued two branches die cut with the Altenew Die Set "Hanging Garden". I filled in the berries with blue Mirror Cardstock. The Altenew die âhelloâ from the set "Hello and Hugs" was die cut twice and glued slightly offset on top of each other.
On the next card I didn't stamp the background; I just used the colored tissue paper. The phrase is from the Altenew set "Just for you". The flowers from the Altenew set "Simple Roses" are stamped in black, colored with Blending Brushes and Distress Oxides and then die cut. https://www.instagram.com/p/CJ9aMZJp...d=5pg2g4m9nnkn
If you have some tissue paper or something similar on hand, try it out. It is really enjoyable.
Kind regards
Gabriele
Date: Tuesday, January 12, 2021 GMT Views: 254
Favorited:2