|
2020BLITZ5 Diamond Candy Gift Box
|
|
 Photo Details
|
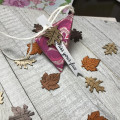
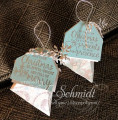
 | | Since we don't have a Christmas tree, and have no other good place to hang an ornament, I decided to make this a gift box. I plan to put a box-worth of Junior Mints in it and give it to my SIL for Christmas. So I had to make it larger than in the tutorial. I decided on a 5" width.
Because my cardstock would have to be 15-1/4" long, I had to get creative. I cut one piece of bristol to 5-1/2x10-1/4", allowing for 1/4" glue tabs on one end & each side. I cut a second piece the same width, but only 10" long, since I didn't need a second glue tab on the end.
I stamped both pieces with the candy stamps, using Distress Oxide inks. The images I chose are purely line-art, but I wanted to fill them in. So after I stamped a few pieces, I used a damp paintbrush to spread the color. I filled in the whole of the chocolate drops, & the stripes on the peppermint candies. I stamped a few more, painted, and repeated that until I'd stamped my pattern. After I had finished stamping & coloring, I glued the pieces together. I drew a light pencil line 5-1/4" from one short end of the longer piece, & applied glue beyond that line. Then I lined up the end of the second piece against that line, so there was a 5" overlap, to create the center square with no obvious seam lines. Finally I set that aside for a couple of hours to let the glue dry completely.
I used my score board & a ball stylus to do the score lines on the bristol. It wasn't particularly easy, especially on the double-thick section, but I managed!  Assembling the box was remarkably easy. Because I wanted to make this a box and not a closed-up ornament, I folded along the score lines to see how it went together first. Then I added strong double-sided tape to 2 of the flaps, and adhered the sections together. I left the flaps along the lid with no adhesive. Assembling the box was remarkably easy. Because I wanted to make this a box and not a closed-up ornament, I folded along the score lines to see how it went together first. Then I added strong double-sided tape to 2 of the flaps, and adhered the sections together. I left the flaps along the lid with no adhesive.
This is when I ran into a problem. My box would not stay closed, even without anything in it. So I thought for a while, & finally decided to try using buttons to make a closure like you find on string envelopes. I held a button up on the point of the box top, & pierced holes through the paper to line up with the button's holes. I stitched the button to the bristol, leaving the string slightly loose. I tied a knot on the inside, and cut the tails. I cut another long piece of string, & tied it tightly around where I'd just stitched, between the button & box top. I knotted that, and then repeated the process to stitch on the other 2 buttons, minus adding the tie string around them. I glued small squares of bristol over the string knots on the inside of the box to conceal them and keep them from catching on anything. Now, I can just wrap the string I tied under the first button around the other 2, and back around the first. It works like a charm! |
|
Date: Thursday, November 19, 2020 GMT
Views: 1633
Favorited: 2
|
|
Additional Info
|
|
Keywords: 2020BLITZ5 gift box
|
|
Stamps: Repeat Impressions "Chocolate Drop" & "Peppermint Candy"
|
|
Paper: Strathmore Smooth Bristol paper
|
|
Paper Size: 5x5"
|
|
Ink: Ground Espresso & Candied Apple Distress Oxide inks
|
|
Accessories: Buttons
|
|
|
|
Difficulty (1-Easy 5-Advanced): 3
|
|