This tutorial by Sam Calcott inspired me to make this card for my SIL's upcoming birthday. I just love the over-the-top, standout effect! And, while it took me probably 4-5 hours total, it's not that hard to put together.
First, I googled "gift box clipart." I found a site, GetColoringPages.com, that had several line art images of gift boxes, that are free to use. I downloaded a total of 7 different images, though I ended up using only 5 of those. I opened them in Photoshop, and resized them to be 1" on the longest measurement. I thought at first I'd only need about 8, so I put them all on a blank "canvas" in Photoshop, flipping a few horizontally for variation, and printed them onto a scrap of watercolor paper. I also stamped the cake onto watercolor paper, and colored everything with my Inktense pencils and a damp paintbrush. I cut the cake out with the coordinating die, & fussy cut the gift boxes.
I created my card base from Bazzill Sour Lemon cardstock, following the tutorial. I added my cake & 2 gift boxes to strips of acetate, and adhered them to the back of the top flap of one of my card base pieces. (The acetate strips just allow the images to pop up and "float.") I arranged the rest of my gift boxes around the cake, & decided I needed a few more to fill in the middle space. So I went back to the computer, sized a couple of the boxes to 3/4" on the longest side, and printed a total of 3. (I had duplicated one and flipped it). I colored & cut them out, and adhered them to the card base.
I die cut the banner from white cardstock, & then used scraps of pink, orange, & pale blue cardstocks to cut the pennants. I trimmed off the extra bits from the pennants, and glued each in place on the white banner. I cut a panel of mint cardstock to 5-1/2" square, and glued the banner "string" on that, leaving the pennants "loose."
I die cut the happy & birthday from a scrap of white glitter cardstock that I had backed with Stick It adhesive. I adhered them to my mint panel. I managed to lose the tittle for the "i," so I cut a tiny piece of glitter cardstock, taped it over that part of the die, & cut it again. I just used a dot of liquid glue to adhere it in place.
I die cut 3 balloons from holographic silver star cardstock & purple shimmer cardstock. I cut the strings from the same white glitter cardstock as the words. I glued all those in place with liquid glue, then added the final gift box.
I matted that inner panel with a 5-3/4" square of teal cardstock, and adhered it to my yellow card base panel. Finally, I adhered the 2 card base panels together with double-sided tape inside the flap where all my presents & cake were adhered.
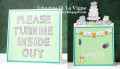
I die cut the letters to spell out "Please turn me inside out" with the "Quinn's ABCs" dies. I stamped on them with the coordinating stamps, and positioned & glued them to another square of mint cardstock. I matted that with teal, & adhered it to the front of my card base. I would say the bulk of the time to create this card was coloring & fussy cutting images, and doing the stamped & die cut letters on the front. As I said, it was an easy card to put together, thanks in large part to Sam's excellent tutorial. Hopefully my SIL will keep this for the rest of her life!
Date: Thursday, September 10, 2020 GMT Views: 457
Favorited:2