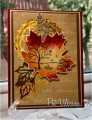
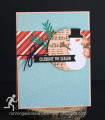
I hadn't had a chance to use my new Stampin' Up! (SU) "Under the Mistletoe" Designer Series Paper (DSP) yet, so when I saw the sketch, I challenged myself to create my card using its pretty holiday papers.
I knew I wanted a poinsettia on the "belt", so went to my saved files of SVG cutting files and found a beautiful SVGcuts.com free poinsettia file. It's super easy to size and cut out with my ScanNCut digital cutting machine! All you need to assemble the cutout pieces is a piece of craft wire to thread through the center after you have hand folded the center of the leaves and petals. I topped my flower with a half-pearl that I had colored gold with a Zig oil-based marker.
The "belt" was created from the holiday plaid DSP paper, and it's edges rounded with a punch. The red mat for the belt was cut just a little larger than the belt and also rounded.
The sentiment from SU "Happy Scenes" stamp set was stamped in red, then die cut using the SU "Bunch of Banners" Framelits Dies. Since the die was longer than I needed, I placed the longer edge out beyond the cutting plate so only a short piece would actually cut, then turned the die around and did the same to cut the end shorter. Had to do this twice since the die cuts both the center and the "mat" because I wanted a gold mat. There's a very good video tutorial how to do this by Kristina Werner on YouTube at . The technique I used starts at 2-minutes into the video.
The hardest part in making this card was the partial die cut for the sentiment and matting. But that's not even tough following the tutorial. So I am rating the difficulty of this card as a "2" out of a possible "5". You can do this card using a floral die of your own, so no need to use a digital cutting machine if you don't have one.
Date: Sunday, May 3, 2020 GMT Views: 537
Favorited:3