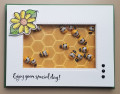
This card was made for a combo shaker card and sketch challenge. I knew I wanted to do a honeybee shaker card, but didn't have any on hand. Of course Amazon had some darling wooden ones I fell in love with, but when they arrived I was extra challenged by how thick they were!
This called for some crafty thinking! It took three (3) layers of yellow craft foam to create a shaker window deep enough to let the little bees fly. Of course, this means hand delivery... bit it's so darn cute!!! For details on how to make shaker cards, there is an excellent video tutorial at https://lostinpaper.com/2019/07/19/h...gimme-5-video/ . The first part is some talented Copic coloring, but the video on the shaker card starts at 6:10.
The back ground of my shaker card was created by inking my honeycomb embossing folder on the raised side (the side with the logo) with Stampin' Up! (SU) Hello Honey ink, then running a lighter piece of yellow cardstock through my Big Shot. I love how this created a darker yellow "hole" in the honeycomb, and gave a 3D look to the comb.
The front of the card is a thick white cardstock that I die-cut a window using a stitched rectangle die. I wanted the definition of the stitches to be sharp, so re-ran the cardstock with the die using a rubber embossing pad (die cutting face down on the pad) to make even deeper stitched impressions on the paper. Be sure to stamp your sentiment on this front piece before proceeding with building your shaker card "sandwich".
I use double-sided Scor-Tape to attach a scrap piece of acetate from packaging onto the backside of the white window piece. The deep for the bees to fly about in was created by die cutting the same window in three separate pieces of yellow craft foam (making sure the foam pieces were a little bit smaller than the white window piece), then stacking them on the back of the white piece and gluing with Tombow glue.
The next step was to lay each of the honeybees so their tops faced the acetate inside the craft foam well, then glue the embossed honeycomb piece on top of this sandwich show the inked pattern would show through the window.
The entire sandwich was then glued to the dark green card base.
The daisy in the upper left corner was stamped with Memento Onyx Black ink, then hand colored with Copic markers. I could have fussy cut the flower out, but using my Brother ScanNCut CM350 is so much easier!!! I cut it out with a 0.04" white margin around it, then mounted using some of the little foam tape dots I had removed from the backs of the wooden honeybees.
The last step was to attach the three black enamel dots per the sketch.
I love how the card turned out, but as mentioned earlier, I will be hand delivering this sweetie. Otherwise, I'm going to have to put it in a large mailing envelope and put three stamps on it!!!
I am rating the difficulty level as a "3" out of a possible "5" simply because of all the steps. No one step is difficult, but they all add up if your are a beginning crafter. But I felt it was well worth the time and effort.
Date: Monday, April 20, 2020 GMT Views: 721
Favorited:2