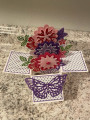
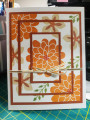
This card was made for someone special who is undergoing chemotherapy treatments. Just something to brighter her day. I had run across a free digital cut file in SVG format for an iris card, so wanted to try it out. Sandra's video tutorial can be found at: The SVG cutting file is at: https://www.dropbox.com/s/b8kwbvs782...ed%29.svg?dl=0 However, she offers two other variations of the cut file at the bottom of Sandra's YouTube video.
I used the Stampin' Up! (SU) heavy Whisper White cardstock to cut out the iris mechanism, and the small brads Sandra recommended. I wished I had used even smaller brads to make the iris mechanism less bulky. I ended up having to use two layers of adhesive foam tape when attaching it to my card base to leave enough space for the mechanism to turn easily. There are iris dies sold by Lawn Fawn that you can purchase, but they are a bit spendy at $39.
The inside of the iris flower is a stitched circle I die-cut and stamped a sentiment from the retired SU stamp set called "Sincere Salutations". I cut and stamped it after assembling the card so that I would be sure to drop it in the center of the opening perfectly.
The center of the flower is the iris mechanism itself. After assembling the mechanism, but before attaching ti to the card front, I used my SU Stamparatus stamp positioning tool to stamp both the background (in SU Calypso Coral) and then the flower center rays (using SU Tangerine Tango) repeatedly. Since the three iris parts are uneven, it took several stampings to get good coverage. The flower attached to the card front was stamped on a piece of white cardstock, then die-cut using the matching die from SU "Flower Fair" dies. I then die-cut the center of the flower out using SU "Stitched Shapes" dies. The ring around the opening was also cut from a second flower I had stamped identical to the first, using two "Stitched Shapes" dies.
The final step was to create an arrow shape to put on the "handle" so the recipient would know to move it to open the flower iris. I created this using my CM350 digital cutting machine, then glued it to the handle. I trimmed off part of the handle to make sure it would not extend beyond the card edges, so that it would fit in an A2 (4.25"x5") envelope.
I am rating the difficulty of this card as a "4" out of a possible "5". Assembling the iris mechanism can be a bit tricky, but the video helps a lot. If you decide to purchase the iris dies from Lawn Fawn, here is a great video from Jennifer McGuire showing how to use them to create beautiful iris cards: https://www.jennifermcguireink.com/2...-giveaway
Date: Monday, February 24, 2020 GMT Views: 570
Favorited:2