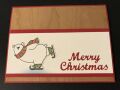
I made this card for Send a Smile 4 Kids. I wanted the image to face the opposite way, since I felt it worked better for my design. So I flipped it horizontally in Photoshop, and printed it onto a piece of watercolor paper. Only then I noticed that the music notes were backwards--I hadn't thought of that little detail when I flipped the image. So I reopened the file in Photoshop (thank heavens I'd saved it!). I selected each note with the marquee tool, then flipped them horizontally, so they were in the proper orientation. Then I reprinted it on the back of my watercolor panel. I was glad my paper had two sides! LOL
I colored the image with my Inktense pencils. I used a damp paintbrush to pick up the color from the pencil, and then applied it to the paper. I find this gives me the most control over color intensity & blending.
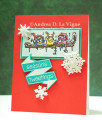
I stamped & heat embossed the main banner piece onto teal cardstock. Next I stamped the greeting & heat embossed it. To make sure I got the solid pieces on the banner stamped properly, I went ahead and die cut it. I stamped the middle & ends and heat embossed them.
I matted my image panel with a darker teal cardstock, & trimmed it to a 1/16" mat. I used the same teal as the greeting cardstock for the outer mat, and adhered it to a red panel that I'd mounted to a white card base. I added my greeting with foam tape, using a little liquid glue where it overlapped the image panel, to keep the height even. I glued on 3 snowflake buttons (I'd previously cut off the button shanks) with Ranger Multi Medium Matte. And that finished this card!
Date: Thursday, November 28, 2019 GMT Views: 277
Favorited:2
Stamps: Bugaboo "Winter Birds on a Limb" digital image; Lawn Fawn "Winter Sparrows"; Avery Elle "Build a Banner"
Paper: 140 lb. watercolor paper; red, teal
Paper Size: A2
Ink: Versamark
Accessories: Avery Elle "Build a Banner" coordinating dies; snowflake buttons; computer with Photoshop & printer; Inktense pencils; Ranger White Super Fine Detail embossing powder