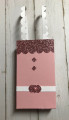
These weren't too hard to pull together overall, thanks to the wonderful tutorial! I did change things up just a bit. I made the collar wrap around the whole box on each. Unfortunately, I didn't account for the extra length needed for the bends around the corners, so my collars ended up a bit short. (I wanted the ends to meet.) I wasn't about to die cut them again, since I'd had to do partial die cutting to make the pieces longer to begin with, and didn't want to mess with it a second time. So, to disguise them being too short, I tied a bow for each box with satin ribbon, and glued that on to make it look like a "tie" of sorts. I personally think that makes it look even more like a collar. Problem solved!
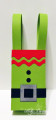
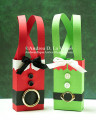
I die cut a buckle for the "elf" (green) box from gold mirror cardstock. I cut a strip of black cardstock for a belt to 1/2" wide to fit through the buckle. I threaded the buckle onto the belt, & glued the belt in place. For the Santa box, I used a real metal buckle that I had left over from a gift box project last year. I made the belt wider, since it was a 1" wide buckle, and glued everything in place.
Rather than punched paper, I used real buttons. Very tiny buttons. I threaded them with embroidery floss--to make them look stitched on--and knotted it on the back of each. I used Ranger Multi Medium Matte to glue them in place. If I were to do this again, I would glue the buttons in place before assembling the box, and then poke holes through the cardstock, so I could stitch the buttons on that way. The knotted floss on the back of each button added just enough bulk to make it a pain in the you-know-what to get them to stay stuck while the glue dried! Especially since my fingers got glue on them which made them sticky, so I kept pulling the buttons off when I was trying to hold them in place. But I prevailed, and I like how they came out!
Date: Friday, November 15, 2019 GMT Views: 1484
Favorited:4


 Problem solved!