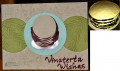
I stamped the ornament on smooth bristol paper, and heat embossed with copper embossinng powder. I colored it with my Tombow & Zig Clean Color brush markers. I used a light grey marker to shade the edges of the ornament.
I don't have a coordinating die for the ornament image, so I had to fussy cut it. To get the pop out pieces the same size as the ornament, I cut a piece of white cardstock larger than the ornament. I scored & folded it in half, then put repositionable adhesive on the inside to keep it closed. I adhered the ornament piece to that with more repositionable adhesive, and cut through all 3 layers with my scissors. After I finished cutting, I separated the layers. I scored & folded the 2 back layers, and glued them to the back of my ornament with liquid glue.
I adhered a panel of burgundy cardstock to my white card base. I used an oval die to cut through both layers on the front. I stamped my greeting, and heat embossed with white powder. I added the ornament per the instructions, and that finished this card. I did have to fold the ornament just slightly to get it to pop in & out of the oval opening, but that works fine!
Date: Tuesday, November 12, 2019 GMT Views: 234
Favorited:3