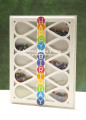
I had seen this tutorial by Sandy Allnock when she first did it. (I was surprised to learn that was just over four years ago now!) My counselor's birthday is coming up, and I wanted to make her a special card. Sandy called this a "rain shaker maze card." Basically, the colored seed beads are in individual pockets for the shaker portion. The glass micro beads run up & down a track as you tip the card from side to side & top to bottom. It's kind of the same effect sound-wise as a rainstick. I figured my counselor would appreciate the meditative aspect of this.
I did the greeting letters first, using "Owen's ABC's." I stamped them in rainbow colors--in rainbow order--to give an even more festive vibe to my card. I used a 1/2" circle punch to punch them out after I stamped them onto white cardstock. Then I set those aside.
I die cut a panel of white cardstock with the "Petal Plate" die. This die actually cuts a panel 4x5.25", which worked out perfectly in my case, as it would allow the dimensional shaker part to fit well in an A2 envelope still. I backed that panel with a piece of Grafix DuraLar acetate. Then things went south.
To give my beads more room to move, I decided to die cut 2 layers of fun foam (foam tape will not work for this design), rather than the one that Sandy used. Because I didn't back either with Stick It (another supply she used), I ended up with no good way to adhere them together so they sealed. I ended up getting a tube of E6000 glue, which worked--after a fashion. I'm not sure if the glue caused the foam to distort a bit, or if it was just from die cutting, but the foam pieces would not line up perfectly. I kept going, but ended up having to chuck that, when it wouldn't line up behind the cardstock die cut panel. :(
I tried a couple more things to get my 2 layers of foam, including adhering cardstock to each layer--before die cutting--with Stick It. I hoped that would keep it from distorting, which it did. But apparently, when I stuck the 2 foam/cardstock pieces together, they didn't seal well. I also tried gluing with liquid glue that to a panel of cardstock that I'd cut for the back of the shaker. (Sandy had adhered her front panel to the foam first.) In the end, that didn't seal, so after putting my beads in their spots & adhering the front panel to the foam, I tested it and yep--beads EVERYWHERE! :( :(
I was determined to make this work, though, so I started over completely. I managed to salvage the acetate, but basically had to chuck everything else. (I had already glued the letters on the shaker front panel--with permanent liquid glue--and they just weren't spaced right. So that had to go, too.) This time, I went with just one layer of foam, adhered with Stick It, added the front die cut panel to the die cut foam first, put in my beads, then backed the shaker with another piece of clear scrap plastic from some die packaging. I added double-sided tape around the sides & down the middle of the back of the plastic piece, and adhered that to a card panel that I'd mounted to a white card base. Just goes to show, sometimes it pays to follow directions to the letter!
To attach the greeting letters, I used a trick I've seen Kelly Latevola do. I added a small bit of Tombow Mono Multi glue to the back of each letter, and let that dry. Then I lightly tacked them down the center of my shaker panel, so I could move them as needed until I had them positioned properly. Then, I pulled up just one letter at a time, added Perfect Paper Adhesive Matte liquid glue to the back, and carefully set it back in place. I did have to have the top & bottom letters hang off the edges a bit, but I think it all worked out OK in the end. And THAT finished this card! All told, I probably spent a total of 3-1/2 to 4 hours working on it. But, only about 1-1/2 hours doing it right. :P I do like how it came out in the end, though, and hopefully my counselor will, too.
Date: Sunday, October 27, 2019 GMT Views: 469
Favorited:3