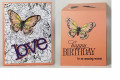
Jennifer's tutorial is excellent, so I won't duplicate her instructions here. My two card bases (with one end of both trimmed 1/8" off) are from the retired Stampin' Up! (SU) Groovy Guava cardstock.
I cut the butterfly out of a piece of SU's "Botanical Butterfly" designer series paper using the scanning and cutting feature of my ScanNCut digital cutting machine. I considered going ahead and cutting the butterfly from the black & white butterfly paper using the ScanNCut as well, but chickened out and used an X-acto knife, and cut the hole thru the B&W paper after it had been glued to the card front. It's more ragged than I like, so next time I'll use the digital cutter.
The card is a tri-fold card, so the photo shows the front, and what the first inside panel looks like. The first inside panel flips down to give you LOTS of room to write a message (two panels worth!!!).
The "love" on the front was cut using Carta Bella die set twice (Groovy Guava and Elegant Eggplant) then gluing them slightly offset to make the sentiment stand out against the busy background.
The butterfly inside was matched up exactly with the butterfly cutout on the front, then attached with adhesive foam tape to make it stand up to protrude slightly above the card front when it's closed.
The sentiment inside the card is from SU's "Happy Birthday Everyone" stamp set. It was stamped in black.
If you have a die that matches whichever outline you want to have (such as a butterfly), you can stamp your shape, color it, then die cut it out. Jennifer suggests hand trimming the white border left by the die so that the stamped image slips easy in and out of the front die cut.
I really like this technique, and plan to use it on some Christmas cards! I think it would be cute with an ornament, or pine trees sticking through the front.
I am rating the difficulty of this card as a "3" out of a possible "5". If you have a stamp and matching die, then it would be a "2".
Date: Saturday, October 26, 2019 GMT Views: 940
Favorited:2