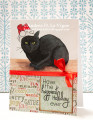
A couple of years ago, my mom reconnected via Facebook with several of her former students, whom she had taught over 40 years ago. One of them I've become friends with on Facebook as well. He loves cats, so I made this Christmas card especially to send to him.
I cut a panel of vellum bristol paper to size, and printed the kitty image (which I'd sized in Photoshop) on that. I'm not sure if one of the feral cats he cares for is black, but I figured I'd go with a black cat anyway! I googled photos of black cats, mostly to get an idea for shading/highlighting his coat. I colored the hat first with my colored pencils, then moved on to the cat. I used 2 shades of light teal blue plus a dark (90%) cool grey and black. I began with the blues, to establish the highlights, then went in with the grey & black pencils to blend & shade. And I hated it. It was very streaky, and, while I'd been going for the look of fur, it looked awful. :( So I figured--with nothing really to lose--I'd blend the whole coat with Gamsol on a blending stump. And that worked! It smoothed out the colors just right, and all it needed was a little touch here and there with the blue & black pencils. I also used 2 shades of lime green for the eyes, and went over the catchlights in the eyes with a white gel pen, just to help them pop. I used my T-square ruler and a light brown pencil to draw a faint line for the background, then colored below that with the same pencil. I added shading with a darker brown, and blended everything with Gamsol. I added a touch of really dark shading right under the cat, and called it done. I didn't feel any need to color the rest of the background. In the end, I REALLY love how this came out!!! I almost hate to send it. LOL
I cut a panel of patterned paper from "Cozy Christmas" for the bottom of the card front. I used a scrap of cardstock to adhere to the backs of the image & patterned paper panels, so I could treat them as one piece. I also cut a piece of another snowflake paper from the same pad, and printed my greeting onto that. I inked the edges with Vintage Photo, just to help it stand out from the background a bit. After I adhered my greeting panel, I wrapped a piece of 1/4" wide red satin ribbon around the seam between the upper & lower pieces. Finally, I made a "faux bow," following the instructions I learned in . I adhered my card front to a white card base, and that was it!
Date: Monday, December 17, 2018 GMT Views: 339
Favorited:2
Registered: June 4, 2009 Location: Deatsville, Alabama Posts: 83747
Tue, Dec 18, 2018 @ 3:18 AM
Awesome coloring and super fun Christmas card!
------------------------------ Nancy Williams - Hope your day is Spirit-filled and ink-filled (in that order)!DRS Designs-DT, Punchkateerforever, Dirty Dozen Alumni