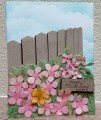
Since JAI324 provided a photo of a garden fence with pink flowers blooming abundantly (and one single yellow blossom), I decided to take the challenge literally and re-create the picture. I started with the cloudy background using a scallop die cut template I already had on hand, and sponged it with Soft Skyl
I think next stamped the Hardwood design using River Rock ink onto Crumb Cake cardstock. I intentionally cut each board from wide to thin to create perspective. The boards were glued onto a rectangle of Chocolate Chip cardstock. I used the Banner Punch to create the points on top of each board. Pretty straightforward so far... but then the INSANITY takes over!!!
I die cut 12 flowers using the Botanical Builder set (5 from Pink Pirouette, 6 from Blushing Bride, and 1 from So Saffron). I brushed the petal edges of the 11 pink blossoms against the Pretty in Pink ink pad, and the yellow blossom against the Crushed Curry ink pad. I added a "center" to each blossom by laying them down on top of the ink pad, then pressing gently with the handle of my Paper Piercing Tool to create irregular flower centers.
I began by cutting out MULTITUDINOUS leaves using the long curving branch die from Botanical Builders. I die cut so many times I lost count using both shades of green. I started by gluing down leaves around the edges of the area, then used Mini Glue Dots rolled into a ball to attach all 12 blossoms, plus the 6 tiny pink blossoms (smaller in back to continue the perspective of distance). The next to last, and most time consuming step, was to die cut "leaves" using that long Botanical Builder die over, and over, and over until I hid all the white space around the flowers. What I recommend is that if you attempt something like this is to put green background paper down FIRST, before attaching flowers and leaves. I also adddd a die cut fern leaf, but it's coverage was too sparse to use very many of them. All the leaves were attached using Tombow Glue.
The sentiment was stamped on a scrap of the fence using Early Espresso. The sign was backed with Chocolate Chip to give it some depth, and attached with Stampin' Dimensionals.
Yes, it took FOREVER to do, and if I were to try something similar in the future I'd DEFINITELY put a green panel as the flowerbed background to cut down on how many leaves I needed to carefully place with my tweezers. You live and your learn :-D
Date: Thursday, August 11, 2016 GMT Views: 2687
Favorited:4
Registered: February 9, 2008 Location: Canberra, Australia Posts: 29
Thu, Aug 11, 2016 @ 6:06 PM
Oh my goodness! Your card is divine, and well worth all that time and effort (you have the patience of a Saint by the way)! I see what you mean about putting a green background down first....I'd love to re-create something similar so great tip, thanks! And thanks so much for sharing your gorgeous creation with us at Just Add Ink this week. Patrice x
Registered: September 24, 2011 Location: Posts: 88
Sun, Aug 14, 2016 @ 2:18 AM
Oh wow! This is such a beautiful labour of love Donnaks! Your attention to detail in covering your fence with greenery as well as the pretty flowers is amazing! Thanks for sharing with us at Just Add Ink this week , Jan :-)