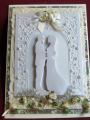
How to make a Hinge Card: For Card Base cut an 8 ½” x 11” cardstock in ½ so you have 2 - 8 ½” x 5 ½” pieces. I used Spellbinders Grand Large Labels Dies for the White card base. Cut 1 piece using Grand Large Labels #5. On the 2nd piece - score the 5 ½” side at ½” and fold on the line. Lay the folded edge of the cardstock on the Die so it doesn't quite meet the cutting edge and cut. This creates the hinge. Use “Red Line Tape” on the hinge and adhere the 2 pieces together so the hinge is on the inside. I like my hinge to be on the bottom of the card so that I can cover it when I add the layers.
The following directions include both the front and inside of the card.
Layer 1: I used Grand Large Labels Die #4. Cut 2 pieces of white cardstock. With the paper still in the die use your blending tool to lightly add Pacific Point Blue to the embossing. Tape Grand Large Labels die #4 to the colored cardstock. Emboss - do not cut. Trace around he outside edge of Die #4. Hand cut out along the traced lines. Use a corner rounder or cut corners with a scissors. Adhere embossed white piece to the blue. Repeat for inside of card. Add a piece of ribbon to both panels and adhere 1 to the inside. Use Dimensionals to add the panel to the front of the card.
Layer 2: Die cut 2 Pieces of White Cardstock using Die #2. Add inside verse on 1 of the white pieces in “Pacific Point Blue. Tape Grand Large Labels die #2 to the colored cardstock. Emboss - do not cut. Trace around he outside edge of Die #2. Hand cut out along the traced lines. Cut corners as you did for Layer 1.
Flowers & buds: Stamp and cut “Delicate Asters” on Starburst Lichen Metallic paper using “Pacific Point Ink”. For each flower you need to cut 1 - #1 and 2 - #2. Use Spectrum Blue Colored Pencil to add a vein down the center of each petal and to color the tips. Add Spring Green at the base of each petal. Shape with your flower forming toolkit. Glue together using Hot Glue. For the buds you need 2 - #1. Color as you did the flower. Form so the color is on the outside. Flower Centers - Punch 2 Punch Bunch Small Suns. Form into tight cups. Hot glue together for Aster centers and glue in place.
Leaves: Stamp Delicate Asters Leaf onto Lime Green Cardstock using Green ink. Cut out using the matching dies. Use “Spectrum Blue Colored Pencil” to add a little color on the veins. Using a make-up applicator and Pacific Point Ink, lightly add color to the edges of the leaves.
Stamp the large and small Delicate Twining Asters PreCut Set on Lime Green Cardstock using Green Ink. Add a little color using Spectrum Blue and Spring Green pencils. Cut out by hand. Using a make up a make-up applicator and Pacific Point Ink, lightly add color to the edges of the leaves. Add Asters and buds. Adhere to inside and front of card as shown.
Tag: Fancy Tags 3 - Oval. Stamp greeting on white and cut. Stamp tag again on Pacific Point and cut out. Cut the blue tag in ½ and adhere to the back of the white tag so you have a border. Add glitter to the flourish on ends of tag. Adhere to card front using Dimensionals.
Date: Friday, October 18, 2013 GMT Views: 1106
Favorited:7
Accessories: Heartfelt Creations Delicate Asters PreCut Set, Delicate Asters Dies and Delicate Twining Asters PreCut Set. Spellbinders Grand Large Labels, Impressability and Fancy Tags 3; Spectrum Blue, Spring Green and Mineral Green Colored Pencils; Dimensionals; Rib