• login
  • join
  • about
  • help
 
  • Home
  • Gallery
  • Forum
  • Tutorials
  • Store Directory
  • Blogs
Splitcoast Gallery
 
Home     Company Galleries     Stampin Up! Galleries     Occasions Galleries     Upload a Card    


In the Gallery

Register

Today's Uploads

Search the gallery

Advanced Search

Around the Site

Join the Fan Club

Join a Group

Member List

Contact Us

Store Directory

Get the Weekly
Inkling
newsletter


Previous Issues

Get Social

Splitcoaststampers on InstagramLike Splitcoaststampers on FacebookFollow Splitcoaststampers on TwitterPit Splitcoaststampers on Pinterest

Sponsored Ads

Home » SU Mini Catalogs » Creative Crew Challenge Galleries » Creative Crew Gallery - March 2012
« Previous Image ·> Slide Show ·Next Image »

Stamped Wooden Star Ornament CCREW0312CF
Added to Favorite

Photo Details
Poster: mandypandy

 Here is the project that I made for the Creative Crew challenge to use items from page 216 of the catalog (wood sheets, magnet sheets, cork etc.). I had just bought these wood sheets to try this idea out so I thought it would be perfect to share!

This is one of those ideas where it almost works out exactly as I had planned out in my head.

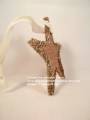
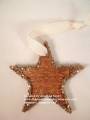
I used the Stars #2 die and cut 3 stars, 2 wood and one from the thin cardboard that comes in the DSP.

I stamped on both wood stars with the Fine Flourish stamp in Early Espresso ink. Then I gave each star a light coat of Crystal Effects to seal them. The ink actually bled a bit from the CE but I like the worn look it give the pattern.

After they were dry I used Tombow multi glue to sandwich the 2 wood stars on either side of the cardboard one. I stacked a few of my larger clear mount blocks on top while they dried to make sure all the points adhered.

Next I wrapped Sticky Strip all the way around the star making sure to press the Sticky Strip down into the angles. I took off the backing and then covered the Sticky Strip with a healthy dose of Glass Glitter. I pressed the Glass Glitter in with my fingers and filled in any bare spots.

I used the Crop-a-dile to make the hole at the top for the hanger. The CAD cut through these 3 layers like butter!

I added a Very Vanilla length of 3/8" taffeta ribbon through the hole for the hanger.

I plan to make a lot more of these to give as teacher gifts next Christmas! Trying to get ahead of the game!

Thanks for looking! Come play along with us this month.

Date: Wednesday, February 29, 2012 GMT
Views: 1142
Favorited: 3
Additional Info
Keywords: suo Creative Crew CreativeCrew CCREW0312CF star ornament wood sheets Christmas Christmas ornament glass glitter Fine Flourish
Stamps: Fine Flourish
Paper: thin cardboard, wood sheets
Ink: Early Espresso
Accessories: Glass Glitter, Sticky Strip, Crop-a-dile, Crystal Effects, taffeta ribbon, Stars #2 die,

CCREW0312S
«
Stamped_Wo
«
Stamped_Wo
Embossed_E
»
Embossed_E
»

Author
Thread Post A Reply 
Jeanstamping


Creative Crew SU Design Team Alumni


Registered: April 20, 2006
Location: Maine
Posts: 920
Thu, Mar 01, 2012 @ 5:57 AM

I love it when I can get a head start on Christmas. Great idea, great project!

------------------------------
Jeannine Tarrio, Manager, Stampin' Up! Independent Demonstrator
blog: http://www.JeanStamps.com
This user is offline
Click here to see this users profile Click here to Send this user a Private Message Find more posts by this user Visit this user's gallery Report Post
GWTW Junkie


Creative Crew SU Design Team Alumni


Registered: September 20, 2005
Location: nowhere near the red earth of Tara
Posts: 18813
Thu, Mar 01, 2012 @ 4:45 PM

clever girl!!

------------------------------
Lyssa Griffin Zwolanek, Gold Elite Song of My Heart Stampers 14-time incentive trip earner
This user is offline
Click here to see this users profile Click here to Send this user a Private Message Find more posts by this user Visit this user's gallery Report Post
Beedubya


Creative Crew SU Design Team Alumni


Registered: November 12, 2007
Location: Chibougamau, QC
Posts: 6462
Fri, Mar 02, 2012 @ 7:00 AM

AWESOME! This turned out great!! It almost looks like the wood is burned for the pattern! Very cool effect. TFS!

------------------------------
Brandi
The Squareheaded Stamper
This user is offline
Click here to see this users profile Click here to Send this user a Private Message Find more posts by this user Visit this user's gallery Report Post


Switch to full site

home |  gallery |  forums |  resources |  news |  store directory  |   about
contact us  |   calendar   |  advertise

Visit our platinum partners:
My Sweet Petunia   |  Verve  |   The Cat‘s Pajamas

© 2013-2026 MH Sub I, LLC dba Internet Brands.

Use of this Web site constitutes acceptance of the Splitcoaststampers.com

Terms of Use, Rules, Privacy Policy, and Cookie Policy.

Manage Preferences Your Privacy Choices


mandypandy
View Public Profile
Send a private message to mandypandy
Send email to mandypandy
Visit mandypandy's Gallery
Find More Posts by mandypandy
Add mandypandy to Your Buddy List
Jeanstamping
View Public Profile
Send a private message to Jeanstamping
Send email to Jeanstamping
Visit Jeanstamping's Gallery
Find More Posts by Jeanstamping
Add Jeanstamping to Your Buddy List
GWTW Junkie
View Public Profile
Send a private message to GWTW Junkie
Send email to GWTW Junkie
Visit GWTW Junkie's homepage!
Visit GWTW Junkie's Gallery
Find More Posts by GWTW Junkie
Add GWTW Junkie to Your Buddy List
Beedubya
View Public Profile
Send a private message to Beedubya
Send email to Beedubya
Visit Beedubya's homepage!
Visit Beedubya's Gallery
Find More Posts by Beedubya
Add Beedubya to Your Buddy List