Splitcoaststampers.com - the world's #1 papercrafting community
You're currently viewing Splitcoaststampers as a GUEST. We pride ourselves on being great hosts, but guests have limited access to some of our incredible artwork, our lively forums and other super cool features of the site! You can join our incredible papercrafting community at NO COST. So what are you waiting for?
I tried something new to try and make the stained glass technique easier. It�s going to change your life and probably start several revolutions. In this example, I will explain the technique using the black and gold butterfly I made, but it would work equally well with any intricate die.
1. Cut out a Basic Black butterfly outline using the largest Butterfly Framelit image. Discard the tiny pieces.
2. Place the black butterfly outline on a solid black piece of cardstock.
3. Trace a rough pencil line around the outer edge of the butterfly.
4. Remove the black butterfly.
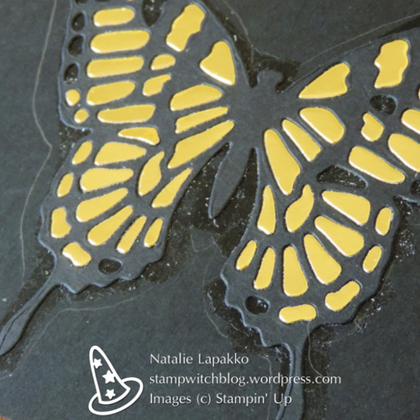
5. Fill in the pencil outline completely with snail adhesive. Cover every millimeter. You can see the pencil and adhesive best in Figure 2, below.
6. Place the black butterfly outline back on the solid cardstock. Press down so it sticks to the adhesive.
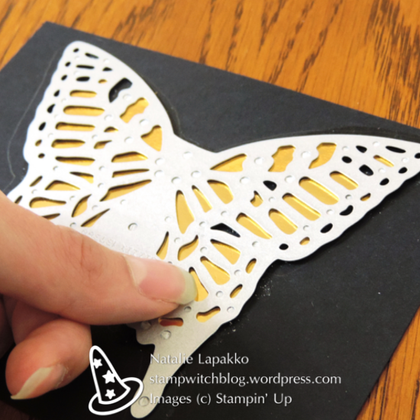
7. Cut out another of the large Butterfly Framelits images, this time in gold. Try to keep all the little pieces inside the die. Do NOT poke them out!
8. Place the entire die with all the piece in it directly on top of your black butterfly outline. Line it up carefully.
9. With a small tool, poke the little hole pieces out of the die, all the way down until they stick to the adhesive on the background paper. See Figure 1 below. Figure Figure 1: Pushing pieces through the die. 10. If your tool is sharp, press gently so it doesn�t poke little holes in your butterfly pieces. Go slowly. Check that all the pieces were poked down.
11. Slowly remove the die. Slowly peel off the gold outline, making sure it doesn�t peel off any of the small pieces with it.
12. Voila! The small pieces will be stuck exactly where they are supposed to be. Burnish the small pieces to make sure they stick to the adhesive really well. Figure Figure 2: Pieces will stick to the adhesive on the background paper. 13. Cut off the excess background paper by following the edge of the black butterfly outline. Add the finished stained glass piece to a card, like those below: Figure Figure 3: Finished card example 1 (Blog post) Figure 4: Finished card example 2 (Blog post) Figure 5: Finished card example 3 (Blog post)
For additional details, directions, and measurements for the individual card examples, see the individual posts on my blog.
I tried this with glitter paper this weekend and it turned out really well!
For glitter paper, it is better for your dies if you cut the shapes on the back side of the paper (the non-glittery side). For this technique, that means you have to actually take the die cut glitter paper out of the die in order to stick it to your project, since the paper facing the wrong direction. This was much easier than I expected. Not a single piece fell out. The glitter paper seems to like to hold onto it's pieces really well.
You also have to adhere the black piece backwards, so the shape matches the glitter paper (You can't turn one backward without turning the other one!).
In this close up, you can see that the edges of the glitter paper look a little raised from the black background. This is a little different than the normal stained glass, where the pieces look like they are sunken in. It's different, but I like it!
My friend and I like to follow the Monarch Watch. Your post was interesting! One year we attended a monarch tag and release program at a local conservation recreation building. It was fun and interesting.
What's snail adhesive, and why is the black butterfly white in the first photo? And why isn't my mind working? Answer: it's morning.
OT! (Kathy, neat you're into the Monarch Watch. We have butterfly counts and other programs here. I also follow the hummingbird migration to know when to put feeders out in the Spring.)
1. Snail adhesive is tape runner. I used tombow tape runner but you could use an ATG or fast fuse or any types of tape runners.2. The butterfly isn't white. Have a cup of coffee, then look again. That is the die you are seeing! LOL
3. You need another cup of coffee or some chocolate! LOL
Wish you lived closer cause I bought diet Pepsi for my sister because I had a party for DH's birthday Sunday and she didn't drink it all. No one else drinks it and I forgot to tell her to take it home with her. Oh rats...her daughter brought little fella trick or treating and I could've sent it home with her last night. Missed opportunities, the norm for me!
And the die is silver, but I can see how it might look white. I have that die, so I was able to copy her instructions easily.
You have that die and that brain. : ) And you don't want to drive 4-ish hours just to give me Diet Pepsi? What is the world coming to.
That is if I actually understand the process now. I'm not placing any bets on me though. So if I have it wrong, I'm just casually wander away as if no one noticed.
No, I don't have that kind of brain, but glad original poster does! I have mind that cases well! Original thoughts are not my forte. I guess that's why I love people who share instructions, tutorials, videos, etc so much!
Oh, I did think I had an easier way to do this, but as I began to form it in my brain, I realized my way would not work, I was thinking of using double sided adhesive paper on black and then cutting the butterfly out of the black, but duh....the little black pieces would be taped down to that too.....
I was looking at the birch tree die again, and while filling in the background could look cool, I like the dimensionality of having paper showing behind it, like in the website samples. So you lose the layers where you look through the holes in a die cut, and get a more solid one. Just a difference.
I hear you about CASEing - I do that a lot for boxes. Change the stamp/paper/etc., but designing the box? So not my forte. My forte is more eating KitKats for breakfast.
It's a good thing you're here to answer everyone's questions, Kathy! I was scrolling through and preparing to type up responses and you answered all the questions for me! Good luck getting rid of that Diet Pepsi... or I suppose you could save it for next time. No one has to know you didn't get it fresh!
bjeans, I'm glad you didn't run out of candy, that would have been a Halloween disaster! I'm always afraid of running out and then get waaaay too much.
Oh my gosh, what a fantastic idea!! I've done this by poking out each piece from a die and then gluing the individual pieces into the outline. It's like putting together a thousand-piece puzzle, and of course some of the pieces seem to fly away. It can take hours to do depending on how intricate a die is used. I've got to try out your way.
I love doing inlay so I am always thrilled to find any tips on it! Thank you! Those filler bits can definitely get lost! And so true about glitter paper, esp if it is heavy grade. another good tip!
Natalie, just wanted you to know your tutorial is mentioned in the weekly inkling newsletter today! If you don't receive that you can go to the home page, scroll to the bottom and click on weekly newsletters. In that newsletter look to the right. It will say something about a members tutorial. I just checked and they haven't posted it there yet, so keep checking back. I saw it early because I get them emailed to me.