Splitcoaststampers.com - the world's #1 papercrafting community
You're currently viewing Splitcoaststampers as a GUEST. We pride ourselves on being great hosts, but guests have limited access to some of our incredible artwork, our lively forums and other super cool features of the site! You can join our incredible papercrafting community at NO COST. So what are you waiting for?
I was just at my LSS and noticed that there was a black now in Ken Oliver's line. Anyone used it? I am curious as the Nuance black or the other watercolor powder whose name escapes me at the moment- their black shows different colors in the black when one spritzes it.
Wondering if Color Burst in black has that property?
Yes, I've seen some amazing cards here on SCS using the black color burst, and I'll be danged if I can find the samples in my bookmarks. If memory serves, it was either Loll Thompson or Bonnie Klass.
The sample using the black so stunning I went out and found some in EBay and put on my watch list. It has bursts of other colors and if I hadn't been told it was black, I would not have guessed that was what it was.
Hopefully someone will pop on and give some links. I'll keep looking!
Yes, it was the Brushos that had different colors in it. I don't have the brushos, just the Color Burst and I was hoping the black color burst would do the same as the Brushos.
Ok, after being reminded about how awesome the Brushi black is, I went ahead and ordered it....in fact, ordered a set of 12 Brushos that included the black. Call me easily influenced, I finally weakened to the siren song of the Brushos.
...and I also ordered a super large non stick craft mat to minimize the mess. :lol:
Boss, well done with ordering the mat! I can tell you that the powders are very fine, and you would be amazed how far they can spread, especially if you sprinkle them first then spritz with water!
I don't know if you've seen the users advice, but don't remove the lids. Just pierce a few holes in the tops, turn them into a sort of shaker pot.
I also added a little sticker to each lid. as you can see, coloured with a little of the Brushos. I got fed up with having to pick up every pot to find the one I wanted,
THANK YOU for this timely reminder and also for the close-up photo of your box of Brushos. I see that you have 3 tiny holes in the top of each jar, rather than a single hole like I have seen before. Reason? And what did you use to make the holes - maybe a stiletto? Do you need to remove the lid the first time to make the holes, or did you do it while it was attached to the jar?
You can see I have LOTS of questions, because I am well aware of the "float factor" with Color Bursts. I have a table with purple speckles to prove it! :shock:
Lol, Boss, I have exactly the same! My table is 3 feet wide, and has another table behind it in an 'L' shape, and I had paint speckles on that one.
Right, answers then. The three holes rather than one was because I found that the powders have differing grain sizes- some colours have finer grains than others. I found it easier to get powder out with more holes.
Second, I just used a darning needle- my goto 'paper piercer'! rofl. A normal paper piercer would work just as well.
No, the lids are still sealed- I had heard so many stories of spilt powder, I was too scared to remove them, in case I had an attack of the clumsies.
Thanks for the useful info. I was hoping you would say you left the lids on when you made the holes because I was dreading the chance for disaster clean/up if the jars had to be lid-less for even a few seconds!. ;). I have many favorite darning needles that I keep handy, so I will use one of them rather than a stiletto.
I just got notice from Amazon that my Brushos shipped and I should have them in hand tomorrow. :cool:
Awesome. They really are a lot of fun, and you get some amazing backgrounds just from playing. I also found it helped to tape the watercolour paper down around the edges, as even that does curl slightly when wet, so everything runs to the ends.
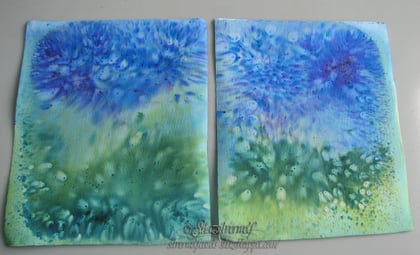
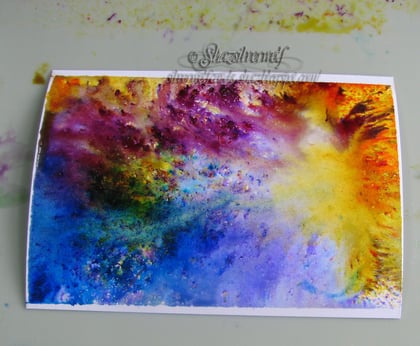
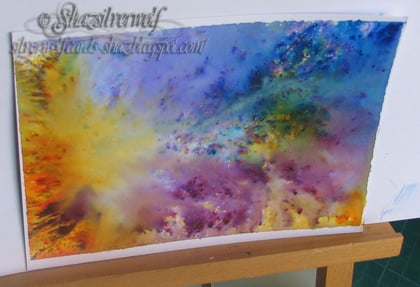
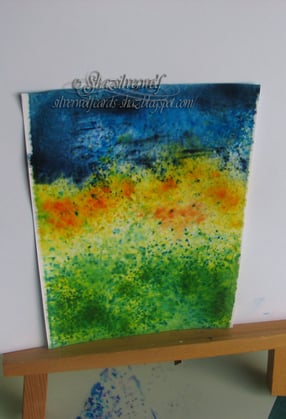
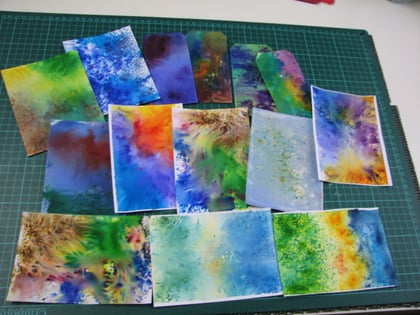
These two were done on some canvas sheet I'd cut down.
This was my first batch.
The less powder you add, the paler the colours will be, and vice versa. there is also a white, which should help tone them down too.
This was my first batch.
The less powder you add, the paler the colours will be, and vice versa. there is also a white, which should help tone them down too.
Totally awesome samples!!! Thanks for sharing all the photos and providing inspiration pieces for when I start experimenting. 😎 I see a corner on one of your sheets that would be perfect for some fall leaves....
I recently decanted all mine (Brushos, mostly) into little squeezable bottles because I found I wasn't getting enough control with just shaking. I find I have more confidence in using them now I can get the powder more exactly where I want it. Anyhow, one of the things was that it became obvious which colours I used most because they are now visibly emptier than the others. And I think I had never ever used the black, so I used it last weekend and love how it came out: DTGD16jbgreendawn What's The Buzz?
Have fun, Susy. That black will be great for Halloween cards, not far away now!
It was Loll Thompson who posted a wonderful YouTube video using black Brushos with a stencil.
The key for me was her use of Mixed Media paper. I had had horrible results with watercolor paper but her demo card was so beautiful that I broke down and grabbed a pad of Strathmore Mixed Media paper. Low and behold, the Brushos behaved and my results were more than acceptable. Can't wait to use them on some Christmas designs.
The key for me was her use of Mixed Media paper. I had had horrible results with watercolor paper but her demo card was so beautiful that I broke down and grabbed a pad of Strathmore Mixed Media paper. Low and behold, the Brushos behaved and my results were more than acceptable. Can't wait to use them on some Christmas designs.
Thank you for sharing the link to the video. This IS the sample card I saw @ couldn't locate.
And special thanks for mentioning the tip about using mixed media paper instead of watercolor. I will add a post-it note to the top of my Brushos box with that info. I am hoping to carve out some time tomorrow to play with them using my new extra large craft mat (24x36). So glad you posted this in time to save me from using the wrong CS! Mucho thanks! 🙂
I also put all my brushos in small bottles. Bought on eBay. Very easy to sprinkle. But sadly - I have not used my brushos much. This thread reminds me to get them out and use them!
__________________ Creativity is intelligence having fun. - Albert Einstein
I recently decanted all mine (Brushos, mostly) into little squeezable bottles because I found I wasn't getting enough control with just shaking. I find I have more confidence in using them now I can get the powder more exactly where I want it. Anyhow, one of the things was that it became obvious which colours I used most because they are now visibly emptier than the others. And I think I had never ever used the black, so I used it last weekend and love how it came out: DTGD16jbgreendawn What's The Buzz?
Have fun, Susy. That black will be great for Halloween cards, not far away now!
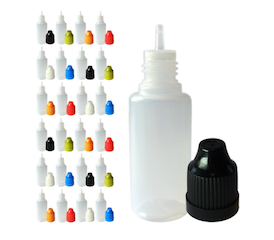
Sabrina - what bottles did you put your Brushos into? I've been looking around for the "perfect" container for mine and haven't really found it yet. I want something squeezable with the teeny little dropper tip and a screw cap just like the Color Bursts. A clear bottle would be awesome so I can see how much powder is in there.
I had a chance to buy the Colorburst Lamp Black. It is black, just black. I'm disappointed. Don't do what I did. thinking it would break down into various colors like Brusho. There is no favorable comparison for Colorburst black instead of Brusho black.
I had a chance to buy the Colorburst Lamp Black. It is black, just black. I'm disappointed. Don't do what I did. thinking it would break down into various colors like Brusho. There is no favorable comparison for Colorburst black instead of Brusho black.
Good info to know. Thanks for sharing that with us. Sorry that you had to be the one to discover the difference between the two brands. 😩
I had a chance to buy the Colorburst Lamp Black. It is black, just black. I'm disappointed. Don't do what I did. thinking it would break down into various colors like Brusho. There is no favorable comparison for Colorburst black instead of Brusho black.
Yes, thanks for posting. Hopefully you will still find a bit of black from the colorburst is useful! Thanks for letting me know.
Holly, I got something like this second time round: 15ml Squeezy Plastic Dropper Bottle x 20 with BLACK Cap (Travel/Cosmetic/Sample) | eBay. You might find them cheaper shopping around on eBay or Amazon, since my link is a UK one. If they come in different sizes, 15ml is what to go for. They're more or less like a Stickles bottle, but with a safety cap you have to press down to unscrew. However, I found the opening so small that I had to buy a tiny funnel to make the powder transfer less messy.First time round, I had got some where the nozzle screwed onto the bottle, so the opening was wider and I didn't need a funnel, but by the time I got round to ordering more, they simply weren't available anywhere.
Being thoroughly lazy and unwilling to face the inevitable mess of transferring Brusho powder into another container, I applaud everyone with more chutzpah than I who do it!
My work-around, shamelessly copied from several YouTube videos, was simply to punch 2 additional small holes in the top of the Brusho original container. This provided more product within a controlled delivery area with less guessing where the crystals would land.
Also noted that a little pre-shake of the container after it sat idle for a few days seemed to "fluff up" the crystals and give better results.
Being thoroughly lazy and unwilling to face the inevitable mess of transferring Brusho powder into another container, I applaud everyone with more chutzpah than I who do it!
I bought the containers and the funnel and the first one that I transferred was a total mess - red brusho everywhere so I stopped immediately LOL before I had irreparable damage.
I'm reconsidering the hole/push pin in the lid method. I would like the extra control of the bottles, but I'm tellin' ya, I had a real mess in play..........
But I still have not given up on the container/funnel system....I just have to figure out if I can do it without the mess.
P.S. I am NOT the most patient person in the world, so that may have contributed to my less-than-successful transfer of the red brusho LOL
__________________ "May your mind whirl joyful cartwheels of creativity." - Jonathan Lockwood Huie.
I bought the containers and the funnel and the first one that I transferred was a total mess - red brusho everywhere so I stopped immediately LOL before I had irreparable damage.
I'm reconsidering the hole/push pin in the lid method. I would like the extra control of the bottles, but I'm tellin' ya, I had a real mess in play..........
But I still have not given up on the container/funnel system....I just have to figure out if I can do it without the mess.
P.S. I am NOT the most patient person in the world, so that may have contributed to my less-than-successful transfer of the red brusho LOL
Ha! I did OK without too much mess when I did it indoors.
But....it was a lovely hot sunny day, so I took some outside and did them sitting on a (luckily washable) rug in the garden. When DH got home, he thought I had either got severe sunburn or scalded myself because my leg was bright red :mrgreen:.
It's hard to describe in words what I found worked for me, I kept tapping the side of the bottle gently so that the funnel swirled around a little bit in it, and that way if I poured the powder slowly it kept on flowing. I'm much happier with the level of control the bottles give, myself. I had tried extra holes in some of the original containers but it still didn't give me the control I wanted.
Ken just shared this picture of a stenciled picture using Lamp Black - looks like there is a little variation in there but not like there is in the Brusho.
Ha! I did OK without too much mess when I did it indoors.
But....it was a lovely hot sunny day, so I took some outside and did them sitting on a (luckily washable) rug in the garden. When DH got home, he thought I had either got severe sunburn or scalded myself because my leg was bright red :mrgreen:.
It's hard to describe in words what I found worked for me, I kept tapping the side of the bottle gently so that the funnel swirled around a little bit in it, and that way if I poured the powder slowly it kept on flowing. I'm much happier with the level of control the bottles give, myself. I had tried extra holes in some of the original containers but it still didn't give me the control I wanted.
LOL re: your bright red leg. Outside when it is not windy is a great idea. It never occurred to me to do this out in the yard - DOH to me haha......
And your filling tips have convinced me to give the bottles another try for sure.
Thanks for the virtual nudge, Cook, it worked
__________________ "May your mind whirl joyful cartwheels of creativity." - Jonathan Lockwood Huie.
LOL re: your bright red leg. Outside when it is not windy is a great idea. It never occurred to me to do this out in the yard - DOH to me haha......
And your filling tips have convinced me to give the bottles another try for sure.
Thanks for the virtual nudge, Cook, it worked
Red leg? I know ME, and I would have been red from head to toe!!!!��
Totally scared of opening the lids on these containers. It ordered jumbo push pins (the have larger head to grab) and they arrived today. Tomorrow, if there is NO wind, I will sit outside and make 3 holes in the top of each container (thanks crlfl for the idea and photo!) and hope like the dickens that the bottom of the push pin covers the holes. I like the idea of more than one hole, but go into hyperventilation with the thought of letting these puppies escape their little prison. Frankly, I'm quaking at the thought of the whole push pin operation, but necessity rules, so I will knuckle down and do it! ;-)
I will report back here on the results, unless I am immersed in clean-up...
__________________ Susy
Last edited by Boss; 08-23-2016 at 06:48 PM..
Reason: Mis-spelling
If you want an solid black try Keda Wood dye. I bought this kit on Amazon and the colors are super bright and most are true to their colors. The Royal Blue has some red in it. I also combined colors to expand my range. I use them just like Brushos, Bisters, etc. Attached is a color chart.
After reading Dina's blog post and Sabrina's enabling below, I took the plunge and bought Brushos and these bottles.
I tried a really small funnel and made a big mess! Checked my kitchen funnels and discovered the smallest funnel fit into the mouth of the bottle perfectly, less messy by far. Fortunately, I wore a black apron and transferred the powder over my craft mat. I used my mess to create bg papers, lots of bgs Like Sabrina, I tapped and swirled to get the powders into the bottles. Now, I need to get busy and use those bgs.
PS The bottles are transparent rather than clear. I love the colored caps. I used Sharpies/Bics to get the caps closer to the actual color of the powder.
It wasn't noticeably windy or even breezy the day I did it - it was just so hot that I was sweating, LOL.
And I hear you on using the "waste", Carla.
I had very little spillage apart from outside, but I hated to lose what was left in the original containers (daft, I know), so I put a few drops of water in each and created some backgrounds by flicking with a brush and stamping with the container itself...
Love your card! And I'm daft too so I'll be using those specks. I started to use latex gloves but then I was just getting powder on the gloves and didn't want to mix the powders or waste them! Hmmm, I don't think I've emptied my trash. I should put them on and make some handprints on paper. I should have done hand and finger prints with my messy hands. Except for some turquoise under a couple of fingernails, I cleaned up okay!