Splitcoaststampers.com - the world's #1 papercrafting community
You're currently viewing Splitcoaststampers as a GUEST. We pride ourselves on being great hosts, but guests have limited access to some of our incredible artwork, our lively forums and other super cool features of the site! You can join our incredible papercrafting community at NO COST. So what are you waiting for?
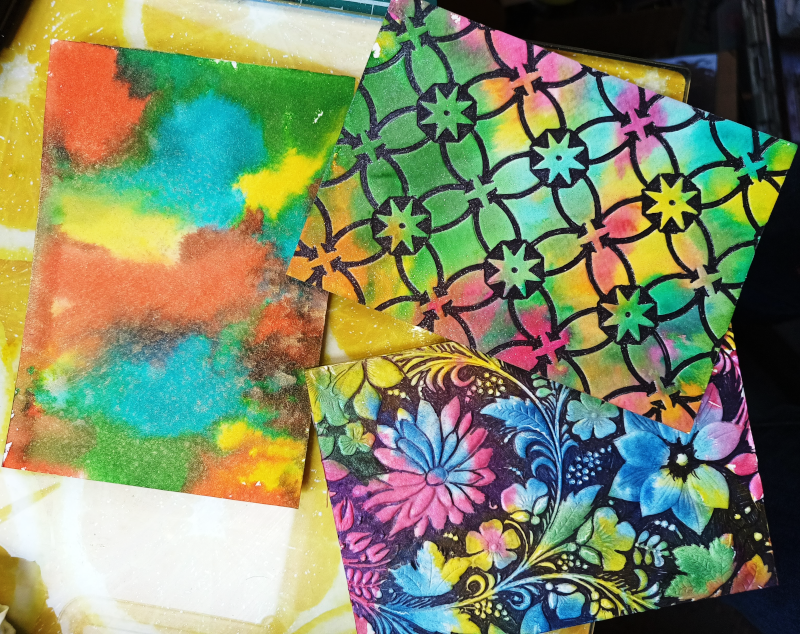
TLC949 - Embossing Folders with Watercolor - 05/01/2023
Happy May Day to you all. I suppose I should have looked for a flower technique. But I was so impressed with a beautiful birthday card I received from Debbie that I wanted to give the technique a try. She sent me the link to the tutorial she used, so I'll add the video. It IS time-consuming, sorry. But you could just do a little ATC size panel, and it would look fab mounted on a white base. See my third sample.
In the interests of experimentation I tried using a non 3-D folder, and while less dramatic it worked perfectly well. In fact when I looked at my 3D collection I didn't seem to have a lot that were suitable unless I had even more time for all the black colouring. Maybe one day...
I tried both regular watercolours and re-inkers, and found the re-inkers to be more vibrant but that might depend on what sort of watercolours you used.
I also tried a Spectrum Noir clear glitter pen (so anything like Wink of Stella etc) instead of the gold spray, and that gave a great shimmer effect.
In the video Sandi mentioned that it was hard on the Sharpie nibs, but I can't honestly say I found that, even though I gave a pretty good spray with the gold mine were fine afterwards.
** Do give some thought to the folder you use. My dandelion one was definitely NOT the best choice because it was sort of multi-level, and the little seedheads are so fine. Debbie said she felt that there was a little bit too much black space in hers, but I think it was just perfect.
But I have to say, the effect of the black Sharpie over the coloured and spritzed background is quite dramatic and well worth trying, if only on a small scale. I was looking at the card Debbie sent me and wondering what heavily pigmented colours she must have used to colour over the black embossing, till she shared the technique.
My photo shows a floral background with Twinkling H2Os and 3D ef, a geometric background with re-inkers and regular ef, and an unembossed background which I went on to use with a doily folder.
I promise that my challenge for next month is much less time-consuming apart from a little drying time. But you will need a couple of coffee filters, so put them on your shopping list or beg a couple from a coffee-making friend.
Remember to use the keyword TLC949 when you are uploading. It's helpful if you come back and leave a link on this thread, especially in case you made a typo and people may not find your card.
If you're not sure how to link your card on the thread here, here's how:
1. Open 2 windows or tabs: one window for your card and one for this thread. 2. In this thread, click on reply and type anything you want to show before the link. 3. Go to your card window. Highlight the address for your card. (It says www. splitcoaststampers.com/gallery/showphoto..... and so on) 4. Click EDIT. Click COPY 5. Go back to this thread. Click PASTE.
It wasn't till after I'd filled in all the black that it finally dawned on me that this technique is meant to be done with the 3-D folders Still it's an interesting look with a 2-D folder, too . . ..
I love this. I, also watched a video from Laurel Beard on folders. I learn something new every time from this site and here. Thank you for sharing your beautiful selves.