Splitcoaststampers.com - the world's #1 papercrafting community
You're currently viewing Splitcoaststampers as a GUEST. We pride ourselves on being great hosts, but guests have limited access to some of our incredible artwork, our lively forums and other super cool features of the site! You can join our incredible papercrafting community at NO COST. So what are you waiting for?
Happy Monday, everybody. I hope that those who are enjoying the Memorial Day holiday weekend have been having a lovely time.
I have been seeing these Impossible Cards popping up all over the place, and they are super-simple to make so I hope you'll try something new today. I know this won't be new to everyone as I've seen a good few in the gallery, but hopefully you haven't all got as far as trying it. I know I spotted Jen mention that it was on her list.
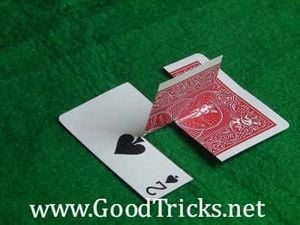
This is based on a playing card trick called the Hypercard Illusion - if you use the cuts and twist you get to see the back of the card and the front of the card as shown in the photo before. So someone had the great idea of translating this into the crafty card world.
*** As per Dina's post #15 she has created a Technique Spotlight gallery for the Impossible Card as it will be featuring in the Inkling this week, so when uploading your new creations for this challenge, please choose Technique Spotlight from the first drop-down menu and Impossible Card from the second. We really appreciate this: those Technique Spotlight galleries are great inspiration resources.
The shortest video I could find :mrgreen: - it shows you all you need to know. It's simply cut, score and twist, then decorate.
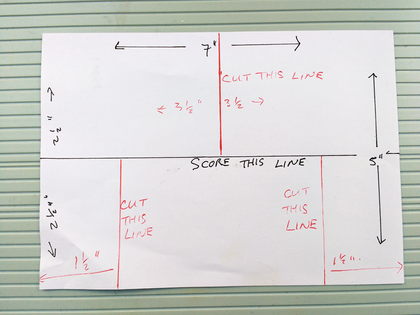
The most popular size out there seems to be 5" x 7", but me, except for my favourite square format, I tend to like things to be A2 (or metric A6) so here are alternative measurements for you:
5" x 7" : Start with a 5 x 7 base, score along the centre (2 1/2" mark).
On the top half, draw a line down the centre to the score, and cut this.
On the bottom half, draw lines 1 1/2" in from each side, from the score line to the bottom, and cut these.
A2: Start with an A2 piece of card. Score along the centre (2 1/8" mark).
On the top half, your line is in the centre, so at 2 3/4": cut down to the score line.
Cut at 1" from each edge, from the score line to the base.
Metric A6: Start with an A6 piece of card. Score along the centre (5.25 cm mark). On the top half, cut a line down at 7.5 cm down to the score line. On the bottom half, cut at 3cm in from each edge, from the score down to the bottom.
And so on - once you've made one and see how it works I'm sure you will understand how to vary the proportions to whatever works best for you. For example, the cuts on the bottom can be wider or narrower and don't even have to be the same distance from the outer edge as each other, although the truest optical illusion is maintained with the above measurements. The one constant (so long as you wish to be able to mail it in an envelope to suit your original base size), is that the score line runs along the centre, although even that can be varied if you're happy to make your own custom envelope.
If you add an extra bridging strip for stability, as I have sent in most examples and have shown in my sample, you won't be able to fold it back into its original planes, but will have to mail it ready twisted.
Remember to use the keyword TLC692 when you are uploading. It's helpful (to the hostesses for sure!) if you come back and leave a link on this thread .
If you're not sure how to link your card on the thread here, here's how:
1. Open 2 windows or tabs: one window for your card and one for this thread. 2. In this thread, click on reply and type anything you want to show before the link. 3. Go to your card window. Highlight the address for your card. (It says www. splitcoaststampers.com/gallery/showphoto..... and so on)
I forgot to mention...if you add a panel on the centre piece that is taller (tent topper style, as I did for my sample because I wanted to try mynew stamp) you will need a custom envelope. But if you stick to matting and layering on the centre piece, it will fit in a standard envelope.
I made one of these a few weeks ago here, and found that it's very helpful if you make a template. The one I made is the A2 size, so it'll be fun to do this again!!
__________________ Karen ~ Thanks for stopping by my gallery. Proud Fan Club Member - FS525, QFTD49 Life is better in a beach town!
So I started out with a 5"x 7" a7 card and it was OK and then... nothing I have colored already ( did this after dark) would fit on my pop up part so, I whacked off a half an inch off both ends of the length of the card and then added a square to the pop up so the card is 6" x (more than 6" lol)
so, I think I am going to try this again as a square card.
__________________ My Blog- Trusting in the Lord for Everything Proverbs 3:5-6 Trust in the Lord with all your heart and lean not on your own understanding. In all your ways acknowledge Him and He will make your path straight. My Stampin' Up WebsiteMy Gallery, BRAK New Member Mentor. New Grandmother to Mia Lou. 1st Grandchild.
Funny, I actually have this on the tutorial calendar for this week! I don't have the video done yet, but there is a gallery for the technique - if you want to add your card in the dropdowns, that would be great!
__________________ Lisa Featured Stamper #671 Love sending BRAK cards. Dirty Dozen Alumni.CC927 Favorite Virtual Stamp Night April 19 - 20 Come Join in the Fun Here