Splitcoaststampers.com - the world's #1 papercrafting community
You're currently viewing Splitcoaststampers as a GUEST. We pride ourselves on being great hosts, but guests have limited access to some of our incredible artwork, our lively forums and other super cool features of the site! You can join our incredible papercrafting community at NO COST. So what are you waiting for?
How do you store your distress ink applicators? I thought I would purchase the little circles and holder and then Velcro them to the bottom of each ink pad. But I am not sure that is the best way to store them.
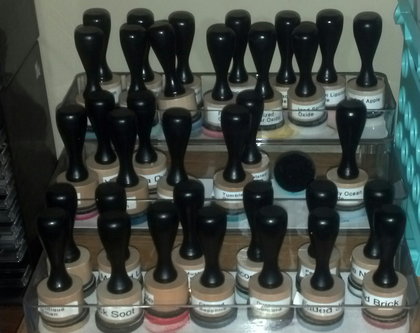
I store the round foam blending applicators to the bottom of each pad. With mini cubes Velcro isn't needed; they fit nicely. When I had larger Distress inks I used Velcro. I have six of the wood blending tools they attach to, so have enough without needing to switch foam circles while working. I rarely need more than four; I don't know how I got two extras.
That said, I may switch and attach the foam circles with Velcro to the Distress chart that I laminated. I think (?) Tim Holtz demo'ed them that way. This chart: https://rangerink.com/pdf/organize/D...t_DEC_2015.pdf
Very cool! I no longer have an electronic machine and cutting out trays seems a little rough, but what a great idea for some!
BTW, I pulled the foam pads off of the back of my D. Oxides for better stacking, and put them in plastic inserts that go into the Tim Holtz tins. I have too many tins since I no longer put cubes of any type in them, so just put two inserts in a tin with the foams. It's temporary storage but easy to use. The inserts are pulled out onto my desk when using Oxides. They're in ROYGBIV order Oxides are in in the Edna bags (for now), so easy to grab.
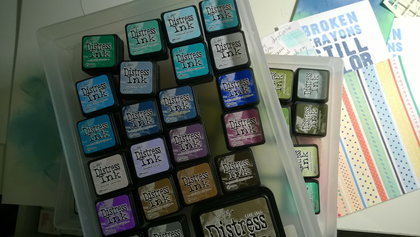
Here's what I did: I purchased some containers at Walmart that seemed the size to hold one set of the Distress Oxide Inks-flat, with a lid. I lined up my Oxide Inks inside this container-flat, & basically dropped in the refills, so they are with the pads all the time. No problem in finding them in the future or taking a long time figuring out what color I need from a large bundle. (You could add the color swatches in that same container for those inks, inside a sleeve protector, if you choose to. I keep mine in a notebook.) AND I have a sheet of Coin Holders in that container, that hold my sponges for that containers inks. Each is labeled with the color for that sponge. Hope this gives you some more ideas on storing those sponges & inks! ;)
I printed Jennifer McGuire ink Chart for Distress Oxideon white cardstock . Instead of cutting it up I left the sheet whole and attached a Velcro dot to it. Then I putting one ink blending circle on each dot. I have five handles so I just pick off which ever dots I am using and put them back easily when I am done. I store the ink pads in a drawer and the two sheets I printed lay on top neatly
Here's what I did: I purchased some containers at Walmart that seemed the size to hold one set of the Distress Oxide Inks-flat, with a lid. I lined up my Oxide Inks inside this container-flat, & basically dropped in the refills, so they are with the pads all the time. No problem in finding them in the future or taking a long time figuring out what color I need from a large bundle. (You could add the color swatches in that same container for those inks, inside a sleeve protector, if you choose to. I keep mine in a notebook.) AND I have a sheet of Coin Holders in that container, that hold my sponges for that containers inks. Each is labeled with the color for that sponge. Hope this gives you some more ideas on storing those sponges & inks! ;)
The coin holder pocket idea is genius!!! Thank you for that. I have a bunch of those and it would be much neater and easier to remove the sponges from those then from my current holder; my fingers always get dirty and spread the color to other sponges.
Thank you for sharing!!
to store my foam mini applicators I went to the dollar store and purchased 3 X 5 clear zip bags. (any size will do though) I went on ranger and downloaded Tim Holtz's Distress Ink colours sheet that prints like strips that you cut apart and adhere to the edge of the Distress inkpad. I taped the name of the colour to each bag and put the mini applicator in the bag and zipped them up. I put the 61 little bags in a photo box that I purchased at Michaels and labeled the box. I find it so quick and easy to finger through the bags to find the colour I want to use and I find it keeps the colour on the foam from getting all over everything. I keep the mini tools in the box also so I always know where they are.
I have a blending tool for each color! Lol .Now, that works for me because I have only 34 (15 are oxides). But I don't like changing out the sponges each time. I bought a clear plastic spice rack with three levels and they stand in that in alphabetical order.
I have a blending tool for each color! Lol .Now, that works for me because I have only 34 (15 are oxides). But I don't like changing out the sponges each time. I bought a clear plastic spice rack with three levels and they stand in that in alphabetical order.
I came across this video and am going to try out this storage system. It takes care of the cubes and applicators! I don't like the little storage tins.
For mini Distress ink cubes I just pop the blending foams into the bottom of each cube. Velcro isn't needed. They're kept in these inexpensive Container Store stackable organizers.
I like that they're not divided so I can push inks around. This was handy when adding inks since they're roughly in ROYGBIV order and I could just scoot them around rather than having to pick up a gillion cubes in order to add one in front of them. (For those old enough, remember those little flat puzzles where you shifted the number tiles around to put them in order? Like that.)
They stack 2 or 3 high in Alex drawers, and you can see in the photo I have a half box sitting on top of a whole box to be able to remove it or slide it to get to what's below it.
(I don't like hinged boxes in general since if I want to put a box in front/to the side of my craft mat, when open it takes up double the space.)
Here's what I did: I purchased some containers at Walmart that seemed the size to hold one set of the Distress Oxide Inks-flat, with a lid. I lined up my Oxide Inks inside this container-flat, & basically dropped in the refills, so they are with the pads all the time. No problem in finding them in the future or taking a long time figuring out what color I need from a large bundle. (You could add the color swatches in that same container for those inks, inside a sleeve protector, if you choose to. I keep mine in a notebook.) AND I have a sheet of Coin Holders in that container, that hold my sponges for that containers inks. Each is labeled with the color for that sponge. Hope this gives you some more ideas on storing those sponges & inks! ;)
This is very similar to what I was considering... I actually bought pages designed to hold slides. The page could be stored in a handy binder for quick access at home, but removed to add to the bin of ink pads when transporting to a crop. Now, I�m wondering if the coin holder pages are better? Can you post a photo or a link to the coin pages? Also, I�ve been looking for just the right storage bins and haven�t settled on one yet - that�s why this project hasn�t been started. Can you please also share which bin you are using and if you really like it for this purpose? Thanks in advance!
For some reason, using the "Go Advanced" doesn't allow me to add pictures like others.... So, I am going to try to load a picture to my gallery for you. The Coin Holders were purchased from Hobby Lobby. The container is a Sterilite Container: 15 1/4"L x 11 1/2"W x 3 1/4"H (38.7cm x 29.2cm x 8.3cm). It is a 7.2 Qt./5.9L The number on the side is 1716 Clear.
I bought a container in the beads and jewels section at Walmart. The minis fit perfectly, however, it is very hard to get them out. There's no finger room. So I'm using clamshell cases I had left when I converted to the new SU cases.
For some reason, using the "Go Advanced" doesn't allow me to add pictures like others.... So, I am going to try to load a picture to my gallery for you. The Coin Holders were purchased from Hobby Lobby. The container is a Sterilite Container: 15 1/4"L x 11 1/2"W x 3 1/4"H (38.7cm x 29.2cm x 8.3cm). It is a 7.2 Qt./5.9L The number on the side is 1716 Clear.