Splitcoaststampers.com - the world's #1 papercrafting community
You're currently viewing Splitcoaststampers as a GUEST. We pride ourselves on being great hosts, but guests have limited access to some of our incredible artwork, our lively forums and other super cool features of the site! You can join our incredible papercrafting community at NO COST. So what are you waiting for?
Actually, I did have DH put a little piece of the foamboard across it near the front; it leans ever so slightly backwards to keep the pens from slipping forward.
Glad y'all like it; I just love it. In fact, I put him to work today making me another unit with the 8 pipe lengths left over. I'm going to put my Microns, Prisma markers, Tombows and such in it. I'd thought about one for my Primsa Pencils, but I like them stored tip up vertically so I can see the colors. I currently have them in cute coffee mugs I got at the thrift store for like a quarter a piece and really like them like that.
If yer DH's have any questions, let me know and I'll ask mine. I'm more than happy to "share the wealth", LOL
I have looked high and low for the perfect copic storage solution. I own 240 markers and some extras, give or take. I've had them stored all kinds of ways as the collection has grown and never felt pleased. I like the AMuse enamel buckets, but it took two and I wanted them all in one place. I also need to be able to transport them back and forth to teach as well as use them at home. So... I made this tote.
Now, I'm NO seamstress, but I can sew a straight line. I got some quilted fabric, a zipper and straps to make handles, drew out a rough pattern and sewed this last Friday night. The bottom and sides are reinforced with plastic I re-purposed from a Cropper Hopper paper holder. It took three hours. Not too bad, I think. Sewed the zipper backwards, but it works just fine. On the inside, I used some re-purposed Cropper Hopper photo holders, cut the sides off and made stand up marker cases. Everything fits in there perfectly and there is room to grow. There is about three inches left on the top and I have a clear tray that fits in there nicely to store more goodies before closing it all up.
I hope this will inspire you to make your own storage that totally suits you. Often I find myself retro-fitting some other product to suit me. Not this time. I'm thrilled. Happy Coloring.
I was very much inspired by the Creative Memories tote Sally shared. Total supply cost for this project was $15 using a Joann's coupon.
ACK! I caved. I've outgrown this already! It's still perfect for transporting most of my markers.... BUT (and there always seems to be a BUT) I moved to the Studio 3 Color Cubbies. Just waiting for them to arrive. The growing collection will be happy there and I'll have to be selective on which ones I transport around. Sigh! But a happy dance for what I think is going to be the FINAL solution. ;) Much thanks to Sharon and the whole host of enablers in here for inspiring the purchase. Tee hee!
__________________ Lisa Hetrick, Indigojade Art Website + Blog
Illustrator Gina K Designs
Actually, I did have DH put a little piece of the foamboard across it near the front; it leans ever so slightly backwards to keep the pens from slipping forward.
Glad y'all like it; I just love it. In fact, I put him to work today making me another unit with the 8 pipe lengths left over. I'm going to put my Microns, Prisma markers, Tombows and such in it. I'd thought about one for my Primsa Pencils, but I like them stored tip up vertically so I can see the colors. I currently have them in cute coffee mugs I got at the thrift store for like a quarter a piece and really like them like that.
If yer DH's have any questions, let me know and I'll ask mine. I'm more than happy to "share the wealth", LOL
So do I understand you that he cut the downspout with a craft knife, not a saw? How did he smooth the edges so they weren't sharp? Thanks,
I love all the different ideas I have seen here. I am very detailed and like to have my Copics in color families and by number. I follow the Copic Color chart. That helps me know what I have and shading is easy because the colors are right next to each other. The boxes are the acrylic ones with individual slots for each marker. I got two of mine from Oozak for about 8 dollars each and the other from Jerry's Artarama for the same price. They sit right in front of me under my computer monitor as I use them daily!
__________________ Peggy SCS Color Challenge DT/Crazy4Challenges DT
Blog: Artfulljourney
Attachment 182695This is something I pondered for a while. I finally decided I wanted horizontal storage because I can see the ends better (I'm a little short on one end, LOL) so it's easier than having to look down on vertical pens.
Also, didn't want to spend a ton of $$ because I'd rather spend it on supplies. I saw where another poster had used round ABS pipe and was going to go that way but then I thought of downspout. It's more rectangular (with round corners), so there wouldn't be so much wasted space, and it's thinner so it wouldn't be so heavy.
A 10' length cost just under $10. I had DH cut it into lengths about 5.5 inches long, so the ends of the markers would stick out, making them easier to pull out. That gave us 23 "cups". We got a piece of foam board for about $3 or so, and DH cut it for a backer and a "bottomer" for want of a better word. A can of plastic adhesive (it's potent, use in a well ventilated area!)
Here's a couple pix of the finished product, there are 15 cups with room for more if I need them in the future. I've been using it for a week or so and love it more every day. I've asked DH to use the other 8 to make another unit for my other markers and pens.
FABULOUS!!!!!! I just showed this to my hubby. I think a trip to the home improvement store is in the near future.
I have been really busy cleaning up my craft area. I had been lazy and not putting things away plus, I have been shopping, shopping and not organizing anything. I decided to clean up and put away all my new stuff.
Anyway, I posted earlier (in #157) that I really like the Copic containers as I liked the markers in Copic Chart order. I picked up a basket from Michael's that is perfect and holds all three of my containers. I put a bit of "anti-slip" under them and now I can carry them anywhere in the house (instead of making multiple trips).
As promised....these pics are of the basket loaded.
I put thin red tape around each marker. My favorite craft store (Be Creative in Pitt Meadows) has her's marked so she knows they belong to the store.
I have been to classes and stores where students/shoppers bring their own markers and I did this to identify they are mine and not get confused with someone else if in a group setting.
So do I understand you that he cut the downspout with a craft knife, not a saw? How did he smooth the edges so they weren't sharp? Thanks,
Debbie
Actually, he cut the down spout with a chop saw. The cut edges weren't terribly sharp or rough but if they had been, a little sanding block would have taken care of it easily. The PVC is sturdy but is not difficult to work with at all.
Attachment 182695This is something I pondered for a while. I finally decided I wanted horizontal storage because I can see the ends better (I'm a little short on one end, LOL) so it's easier than having to look down on vertical pens.
Also, didn't want to spend a ton of $$ because I'd rather spend it on supplies. I saw where another poster had used round ABS pipe and was going to go that way but then I thought of downspout. It's more rectangular (with round corners), so there wouldn't be so much wasted space, and it's thinner so it wouldn't be so heavy.
A 10' length cost just under $10. I had DH cut it into lengths about 5.5 inches long, so the ends of the markers would stick out, making them easier to pull out. That gave us 23 "cups". We got a piece of foam board for about $3 or so, and DH cut it for a backer and a "bottomer" for want of a better word. A can of plastic adhesive (it's potent, use in a well ventilated area!)
Here's a couple pix of the finished product, there are 15 cups with room for more if I need them in the future. I've been using it for a week or so and love it more every day. I've asked DH to use the other 8 to make another unit for my other markers and pens.
This is a great idea and I love it!! I have been looking for a cheap option for storing my Copics. For the same reason you mentioned, saving for supplies instead. Thanks so much for sharing!
I put thin red tape around each marker. My favorite craft store (Be Creative in Pitt Meadows) has her's marked so she knows they belong to the store.
I have been to classes and stores where students/shoppers bring their own markers and I did this to identify they are mine and not get confused with someone else if in a group setting.
My 100+ Copics fit with plenty of room. I keep my markers in my studio, but when I'm coloring things like Christmas cards, I like to take them to the living room. I'll have to put some more dividers in there since I like them organized by color and number, but for $11.99, it works for me. And it's PINK! They have other colors, too.
Yep!!! TWO things now in my disaster of a craft room that are actually organized!!!! LOL My inkpads and now my Copics..........of course the rest of my room is a major MESS!! LOL
At long last, I'm able to add a bit to my beloved Copic collection. Yay!
I've used the same system shown in Lee's first post of the thread, ever since my early beginnings with the world of Copics.
Alas, I've searched the net repeatedly recently ... and they're just no longer available.
At long last, I'm able to add a bit to my beloved Copic collection. Yay!
I've used the same system shown in Lee's first post of the thread, ever since my early beginnings with the world of Copics.
Alas, I've searched the net repeatedly recently ... and they're just no longer available.
Oh no!! Really?? 'Cuz I also have added a LOT of new Copics and I need another one!!!! :lol:
ACK! I caved. I've outgrown this already! It's still perfect for transporting most of my markers.... BUT (and there always seems to be a BUT) I moved to the Studio 3 Color Cubbies. Just waiting for them to arrive. The growing collection will be happy there and I'll have to be selective on which ones I transport around. Sigh! But a happy dance for what I think is going to be the FINAL solution. ;) Much thanks to Sharon and the whole host of enablers in here for inspiring the purchase. Tee hee!
I've got 4 Studio 3 copic cubbies waiting for me across the border in the US!!! I expect to get them Monday or Tuesday!! I can't wait!!! I think it will be my final solution too!! I've got a lot.................;)
Oh no!! Really?? 'Cuz I also have added a LOT of new Copics and I need another one!!!! :lol:
If you take out the bottom drawer and store all the browns and grays in that space, you should be able to get just about every sketch marker made in the unit.
I'm only short a few grays and flourescents to complete the sketch set and they all fit for me. Except the new set of 12 of the super light, lights. Those I keep in the box they came in. ;)
I have SIX of those units empty in my studio just waiting for DH to hang them on the wall for me. :rolleyes:
Ohhh my studio 3 copic cubbies arrived today - I got 4 of them -and they are pretty much full!! Worth every penny!!! Now they are easily accesible!! Now - if I can just get my ribbon etc etc organized -and finished de junking!! sigh!
My 100+ Copics fit with plenty of room. I keep my markers in my studio, but when I'm coloring things like Christmas cards, I like to take them to the living room. I'll have to put some more dividers in there since I like them organized by color and number, but for $11.99, it works for me. And it's PINK! They have other colors, too.
Location: In my stamping room,of course (Summerlin, NV)
Posts: 718
Likes: 0
Received 0 Likes
on
0 Posts
My Copic Storage using the drain spouts...
I used Michelle's idea and sent hubby to home depot for some "plastic" downspout. Then we went and got some paint so it will look pretty in my room. I'm still looking for a way to finish off the look, and I'll be adding a 5th column, but here is my version...
Michelle my hubby, my copic addiction and my wallet thank you!!
__________________
Tangii Proud SCS Fan Club Member Come visit my blog The Inking Spot
I'm going the plastic downspout way, I will be using it two ways. I have the embellishment center and I hate having to put my ribbon spools on those rods. So going to use the downspout for ribbon storage. Then some for the copic storage.
__________________ Penny ~ Scrappin' Moments Blog Goals ~ Jan 2011 Double-Layouts 5/4 ~ Blog Posts 1/2 ~ Quilts 1/1 ~ 60/60 Shower Invites
Woohoo, Tangii! It looks great. Mine's still plain white, but once DH has the garage converted for me, I'll put together a color scheme and "do" something with it. I did have him put the remaining pieces together for my other markers; I just love how easy to use, light and functional they are.
And Penny, would love to see some pix when you get yours done...can't quite envision how it could be useful for ribbon storage but it certainly sounds promising.
Hubby's building me one..........it will take a while, but when he's done I'll post a pic. He's making it out of wood and using a drill press to make individual marker slots and it will hang up on the wall next to the inkpad holder he made me! I can't wait!!! For now I'm using a fair size plastic container turned on it's side since I have 284 Copics with just a few more to collect!!!! Yaaay!!!!
Woohoo, Tangii! It looks great. Mine's still plain white, but once DH has the garage converted for me, I'll put together a color scheme and "do" something with it. I did have him put the remaining pieces together for my other markers; I just love how easy to use, light and functional they are.
And Penny, would love to see some pix when you get yours done...can't quite envision how it could be useful for ribbon storage but it certainly sounds promising.
You can see the rain gutter on the wall with the ribbon in it. Will be so much easier to use I think then putting it on a rod. This way you can take the ribbon to where you are working. I hate guessing how much I'm going to need and cutting it off the spool. Also I have found the ribbon tends to unwind when its on the rod. It can be a real pain constantly rewinding the ribbons. The rain gutter looks like a fantastic way to store ribbon. Can make any length needed and can also paint to match room. (Though white is my secondary color in my room, so don't have to paint).
__________________ Penny ~ Scrappin' Moments Blog Goals ~ Jan 2011 Double-Layouts 5/4 ~ Blog Posts 1/2 ~ Quilts 1/1 ~ 60/60 Shower Invites
You can see the rain gutter on the wall with the ribbon in it. Will be so much easier to use I think then putting it on a rod. This way you can take the ribbon to where you are working. I hate guessing how much I'm going to need and cutting it off the spool. Also I have found the ribbon tends to unwind when its on the rod. It can be a real pain constantly rewinding the ribbons. The rain gutter looks like a fantastic way to store ribbon. Can make any length needed and can also paint to match room. (Though white is my secondary color in my room, so don't have to paint).
OHHHHHHHH WOWWWWWWWWWWWWW!!!!!!!!! Color me amazed and jealous!!!! :lol:
I didn't pay this price I found them at Odd Lots for $3.50 a set and bought three sets. They will all stack together and I can take them with me without worrying about losing them.
Just thought you might like to see what my wonderful husband has made me -all in secret. The unit is made out of MDF, stained and varnished, and each layer has green baize on the bottom so I can put it on a table without scratching it.
That was so sweet of him. He did a beautiful job. I like the idea of the trays. You are a lucky girl
Anyway, I posted earlier (in #157) that I really like the Copic containers as I liked the markers in Copic Chart order. I picked up a basket from Michael's that is perfect and holds all three of my containers. I put a bit of "anti-slip" under them and now I can carry them anywhere in the house (instead of making multiple trips).
Cat[/QUOTE]
Love this Cat,
I couldn't quite get the picture of the basket in my head it is nice to see it. I thought it would be taller and not work so well. Thanks for sharing.
I went with the Target bucket...I bought red,,,the only color with out a bent carrying handle.....but my favorite so that was ok....I am going to put a layer of foam in the bottom of each divided space to keep the markers from rattling and it will also boost them up so they are easy to pick up.
I plan to decorate the bucket/carry thingy with ribbons in my favorite patriotic themes.
__________________ c-mouse-If you can't say nuttin nice--don't say nuttin at all. Thumper. Pansy
Card Sketch Challenge 1-227 done only 396+ to go to be caught up!!!!!
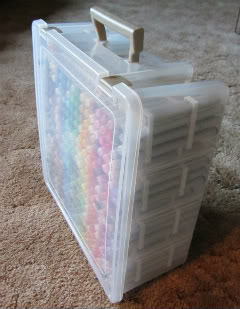
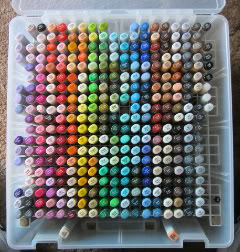
I saw this somewhere else but cannot remember where so if the person that made this is reading this, thank you! I love this storage option. I just got it done today. It is an Art Bin organizer and grid that goes over a flourescent light fixture. I have room for 22 more markers. I need the flourescent colors and one gray and I will have them all!! WOOO HOOOOO!!!!