Splitcoaststampers.com - the world's #1 papercrafting community
You're currently viewing Splitcoaststampers as a GUEST. We pride ourselves on being great hosts, but guests have limited access to some of our incredible artwork, our lively forums and other super cool features of the site! You can join our incredible papercrafting community at NO COST. So what are you waiting for?
I have my su paper trimmer hanging on the wall. That way it doesn't take up desk space and I can actually cut my paper right on the wall. I love fun tips so if you have any how about sharing them?
__________________ Kathy FS852 SCS Member #241,587
I'm now storing my stamps and dies together and in alphabetical order. Another tip: I have an alphabet die that cuts out all of the letters with one die. I bought a box with 32 compartments. When I need a certain color letter I die cut that one die and all the leftover letters have their own compartment. So if I need white letters, I just look through each compartment and I may not have to cut anymore because of all the extras. I also glued the letter on top of each compartment. I will try to get a picture and add to this post.
__________________ Kathy FS852 SCS Member #241,587
The following 12 users liked this post by muscrat:
I LOVE this question and am following this thread to see what all awesomeness everyone shares!
Thanks so much for asking this of our crafty geniuses here at SCS!
__________________ Hugs & blessings, ~Chrissy
Jeremiah 29:11 Splitcoast Dirty Dozen Alumni | Proud FanClub member since 2017
My Gallery | My Blog "The wind of Heaven is that which blows between a horse's ears."
The following 2 users liked this post by DancesWithHooves:
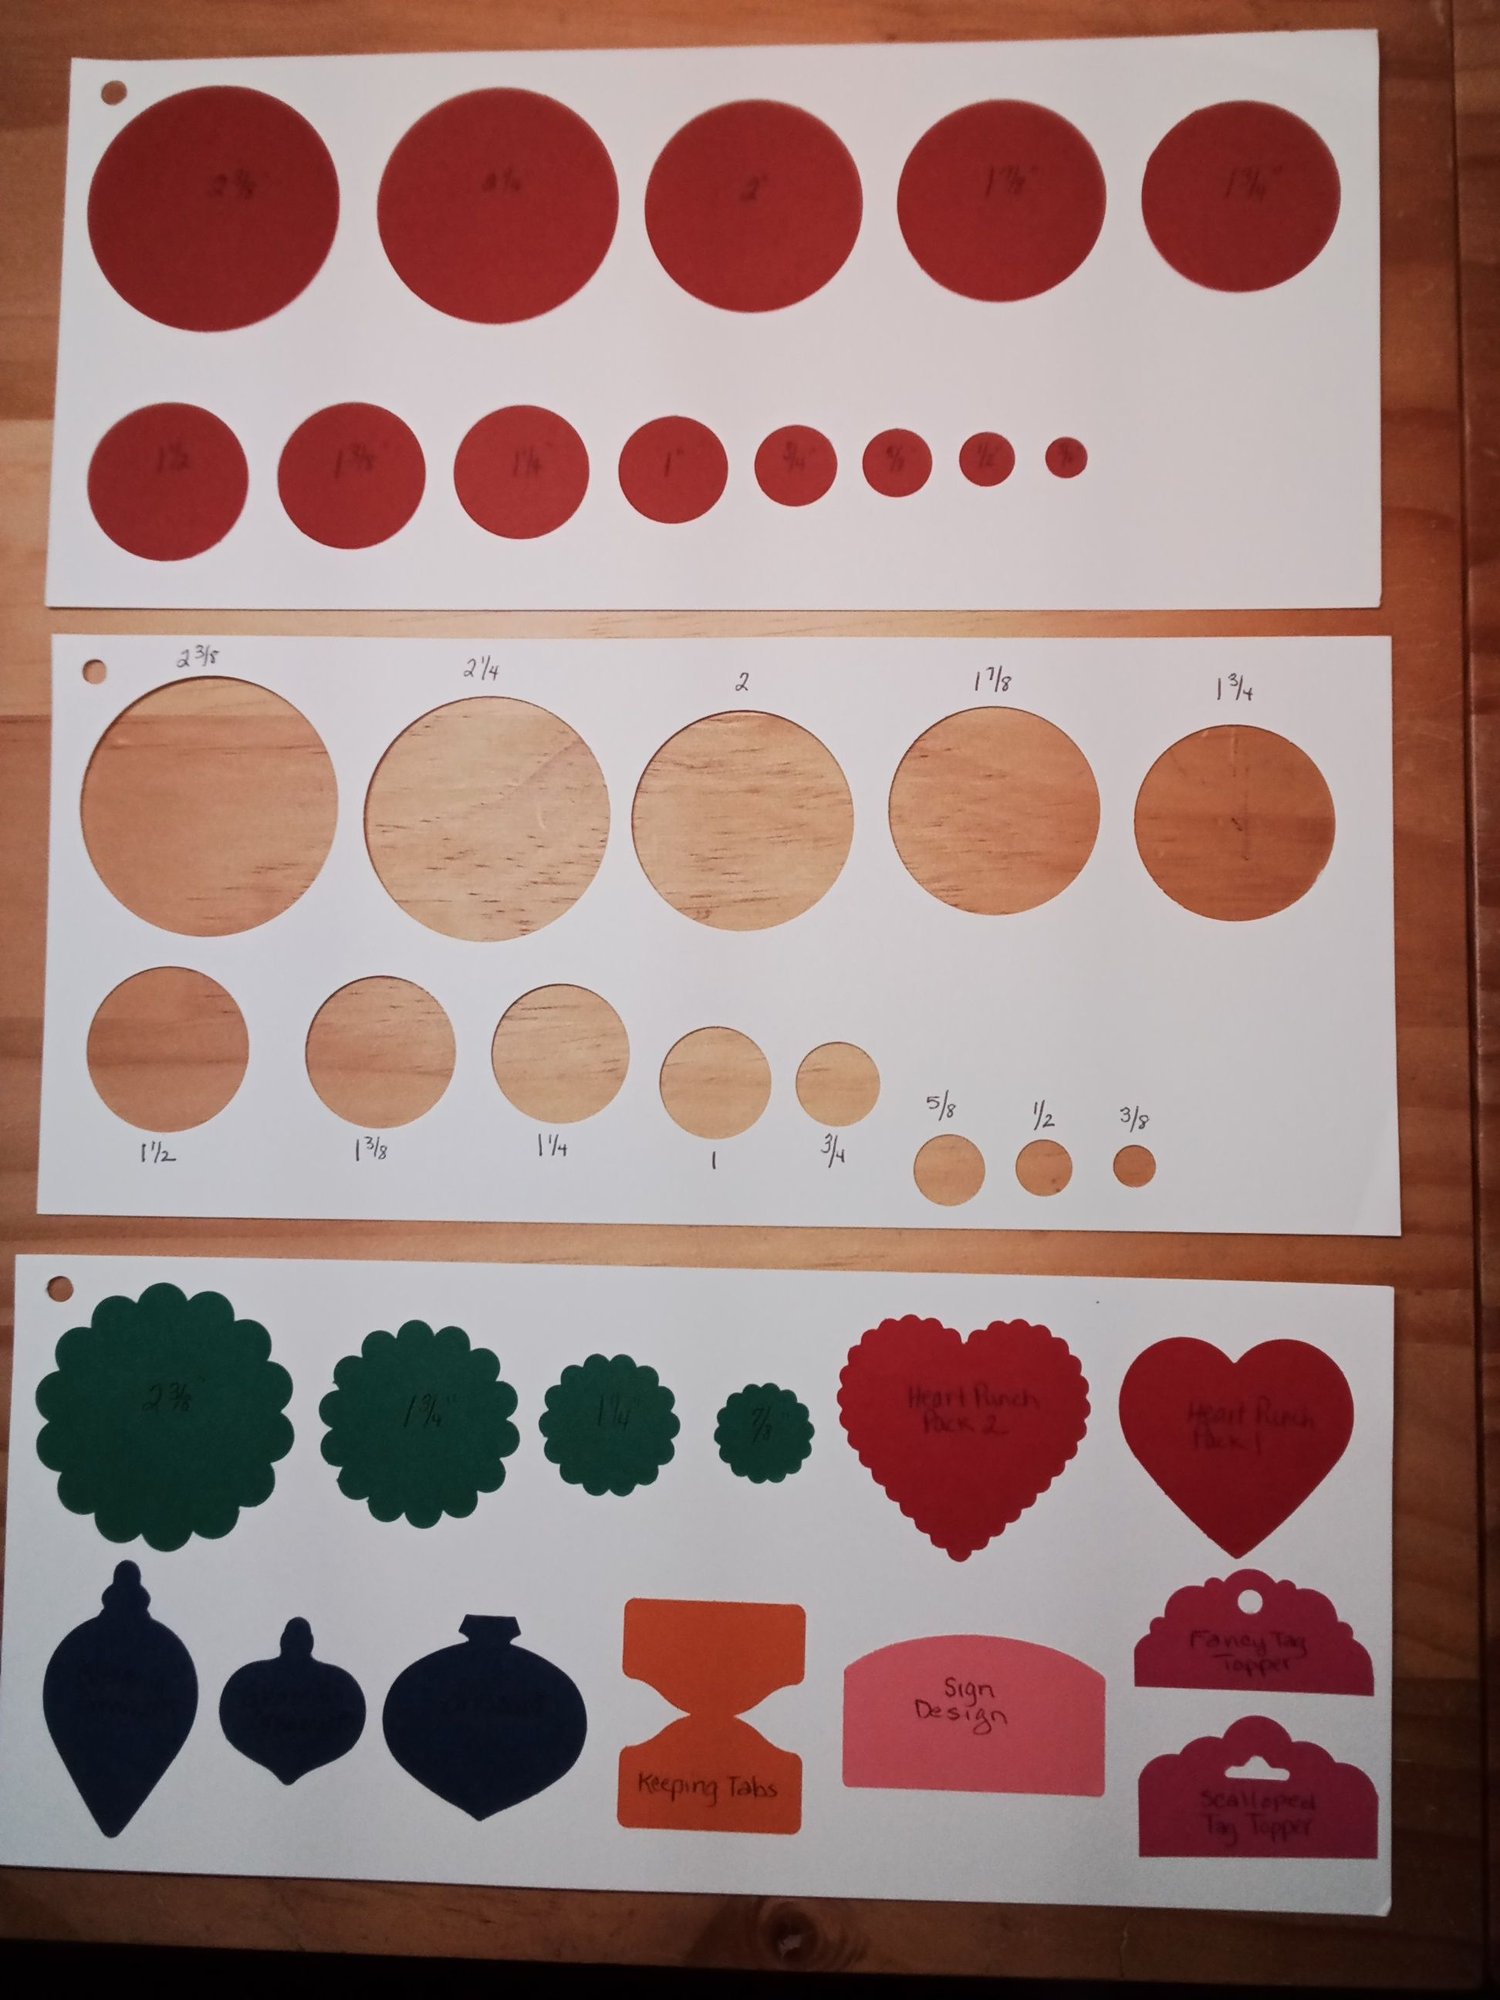
I have a lot of punches, including many circle punches. Many times I would like to know how they layer so I have punched a circle from each of the circle punches and glued them fast to a 6x12 sheet of paper. I have written what size the circles are on each one. Sometimes I just want to see if a circle will fit over another or which will layer well so I cut a second 6x12 sheet of paper and just punched the holes out. I will post a picture in a minute so you can see what I'm talking about
__________________ Kathy FS852 SCS Member #241,587
Last edited by muscrat; 05-11-2026 at 02:22 PM..
The following 11 users liked this post by muscrat:
I have stopped using dimensionals or dimensional glue of any sort — I just glue card scraps to the back of anything I want raised up. It’s very flexible (one layer for a tiny lift, two or more if you want more clearance from the base) and it’s free since we all have card scraps! It’s probably more environmentally friendly too since dimensionals are a foam sheet and that’s probably a plastic rather than any sort of natural rubber. You don’t need to worry about having perfect squares/circles/hexagons, just snip small bits off a scrap.
I use a double sided sticky mat in my Misti to hold paper while using red rubber stamps. Mine is from Altenew for their Stamp Wheel. I cut it down to fit. Sometimes my red rubber stamps are large and a magnet will not fit and this helps as I do not need a magnet. Next I hope to purchase a photopolymer mat to hold the paper for the photopolymer stamps.
I have stopped using dimensionals or dimensional glue of any sort — I just glue card scraps to the back of anything I want raised up. It’s very flexible (one layer for a tiny lift, two or more if you want more clearance from the base) and it’s free since we all have card scraps! It’s probably more environmentally friendly too since dimensionals are a foam sheet and that’s probably a plastic rather than any sort of natural rubber. You don’t need to worry about having perfect squares/circles/hexagons, just snip small bits off a scrap.
what a great idea!
__________________ Shellie G
Aspire to be a better person than you were yesterday
The following 3 users liked this post by beaddict:
Joanne that’s a great tip, I have so many scrap pieces it would be good way to use them up.
Ive just looked on Amazon for a sticky mat for my stamp platform so thanks Lisa, sometimes the magnets get in the way.
Joanne that’s a great tip, I have so many scrap pieces it would be good way to use them up.
Ive just looked on Amazon for a sticky mat for my stamp platform so thanks Lisa, sometimes the magnets get in the way.
I hope it works well for you. I tried purchasing one for photopolymer stamps from a knock off company and it was wasted money. I do love using my sticky mat as it being double sided , I have it stuck down to the Misti. It has a release sheet that I remove to place the foam piece back.
This may be old news, but I found that the die-cutting bubble wrap trick works great with embossing folders, too. I have some 3-D folders that just didn’t work with my little Texture Boutique embosser. I added a layer of bubble wrap and got fab results!
__________________ Karen
“I gotta go where it’s warm!”
Jimmy Buffett
The following 6 users liked this post by CardCountess:
This may be old news, but I found that the die-cutting bubble wrap trick works great with embossing folders, too. I have some 3-D folders that just didn’t work with my little Texture Boutique embosser. I added a layer of bubble wrap and got fab results!
The "trick," which is amazingly useful, is to add a piece of bubble wrap when you are trying to get the thickness right for die-cutting. It seems to work better than trying every piece of paper/cardstock/cardboard you own trying to get the die to cut properly. I guess the squishiness is what makes the difference. I just use the the little mini, hand-crank Sidekick die-cutter, and the bubblewrap really helps with the more intricate dies.
I find that the small bubble-wrap works best...the kind that is used to line mailing envelopes.
__________________ Karen
“I gotta go where it’s warm!”
Jimmy Buffett
The following 8 users liked this post by CardCountess:
I coordinate a fair-size papercrafting group in our community. Those who are not most confident with our projects are always a little upset when they mess up. My standing comment is, "It's OK. It's only paper!" We are supposed to enjoy our crafting, not stressing!
(very few mess-ups cannot be repurposed for something else.)
The "trick," which is amazingly useful, is to add a piece of bubble wrap when you are trying to get the thickness right for die-cutting. It seems to work better than trying every piece of paper/cardstock/cardboard you own trying to get the die to cut properly. I guess the squishiness is what makes the difference. I just use the the little mini, hand-crank Sidekick die-cutter, and the bubblewrap really helps with the more intricate dies.
I find that the small bubble-wrap works best...the kind that is used to line mailing envelopes.
I use cut up Amazon bubble mailers! They work great!
My crafting tip: Never leave your finished card to dry near an open window when you're ten floors up. When you go off to run errands and the wind picks up later in the day, you gonna looooose dat card.:lol:
The following 6 users liked this post by Here and There:
Like Joanne, I've always used card scraps (from used cards, so even more environmentally friendly) to achieve 3D, as I hate foam pads with a vengeance! If you cut out a rough shape (draw round the item and cut inside the line) then you support the whole piece, rather than foam pads which don't and mean it can get squished in the mail.
My tip is using clothes pins when gluing. Position your (matted) piece on the card blank and put clothes pins either side, just south of the centre, to hold it in place. Glue the top half of the piece and press into place, move the clothes pins up over the glued area and glue the bottom half. Perfect positioning!
Lynda
The following 2 users liked this post by lyndaejane:
I just read this today, from Cyndy (mcponczek) - when you get a set of dies, photo copy all the dies in the set and keep the copy with the envelope/case. If you forget to put a die back in the case, or if you use multiple dies for a card, the photocopy will be there so you know for sure which die goes in which set. Thank you Cyndy...
My crafting tip: Never leave your finished card to dry near an open window when you're ten floors up. When you go off to run errands and the wind picks up later in the day, you gonna looooose dat card.:lol:
Oh no! And along the same lines, never leave your card near an open ink pad! I've had to start over more than once!
__________________ Kathy FS852 SCS Member #241,587
If you have a cat, put your threads, floss, twine, etc., away. I was inking thread, twine, and it was white but I wanted it to be another color. I think this was before knowing about alcohol inks, so it was basically dye ink. It was out drying on my work table. I came back the next day and it was nowhere to be found. The cat took it. She either hid it well or she ate it. I learned quickly to put it away or put it way higher than she was going to jump.
If you have a cat, put your threads, floss, twine, etc., away. I was inking thread, twine, and it was white but I wanted it to be another color. I think this was before knowing about alcohol inks, so it was basically dye ink. It was out drying on my work table. I came back the next day and it was nowhere to be found. The cat took it. She either hid it well or she ate it. I learned quickly to put it away or put it way higher than she was going to jump.
Good point! My friend's cat ate some ribbon but passed it safely! That could get tangled inside the body can cause some major damage.
__________________ Kathy FS852 SCS Member #241,587
Magnets are my favorite way to hold things together, while waiting for glue to dry.
I can't always pack up projects before stepping away from my stamping station, so I flip everything upside down, to protect against dust (which starts accumulating after a day and a half ).
My flush wire cutters got accidentally magnetized, which helps *a ton* when separating dies and clipping off those tiny, sharp metal bits.
Joanne- I LOVE the paper scraps-as-dimensionals idea! I had saved red rubber stamp scraps (from older rubber stamp sets I'd purchased from SU) but that gets to be a hassle. I DO have plenty of paper scraps!
Lisa - ExCELLENT! I'd never heard of the bubble wrap idea!
__________________ Hugs & blessings, ~Chrissy
Jeremiah 29:11 Splitcoast Dirty Dozen Alumni | Proud FanClub member since 2017
My Gallery | My Blog "The wind of Heaven is that which blows between a horse's ears."
The following 3 users liked this post by DancesWithHooves:
I have many sizes of circle punches, square punches and others. I bought one of those hanging shoe racks and I have it hanging in the hallway not far from where I have most of my craft stuff. I punched out a sample of each punch and wrote what size it was and stapled it to a pocket and put the corresponding punch in that pocket. This picture isn't the best but it's hard to take a picture if you need to be far back and there's a wall there! Some pockets have more than one punch in them. For example down near the bottom left I have some circles that were small so I put them together in the same pocket.
__________________ Kathy FS852 SCS Member #241,587
I am having a hard time picturing that...Can you possibly share a picture? :-)
Originally Posted by muscrat
I have my su paper trimmer hanging on the wall. That way it doesn't take up desk space and I can actually cut my paper right on the wall. I love fun tips so if you have any how about sharing them?
Does your Alphabet have a matching Number Die? If so, what brand? SU's does not have a matching Number Die and I am always wanting to add matching Numbers to my Words on Cards. :-)
Originally Posted by muscrat
I love when things are easily accessible!
I'm now storing my stamps and dies together and in alphabetical order. Another tip: I have an alphabet die that cuts out all of the letters with one die. I bought a box with 32 compartments. When I need a certain color letter I die cut that one die and all the leftover letters have their own compartment. So if I need white letters, I just look through each compartment and I may not have to cut anymore because of all the extras. I also glued the letter on top of each compartment. I will try to get a picture and add to this post.
I am having a hard time picturing that...Can you possibly share a picture? :-)
I added a picture to that previous post. Are you able to see it? If not, I'll add it again.
The alphabet die I was using was SU's mini alphabet die. It doesn't include numbers. That's one thing SU is light on. They don't have any current number choices. The set called Alphabet A La Mode has numbers and letters but it's not in the book anymore. I'm not sure if it might be on the clearance rack or not. I don't look there frequently. I have written SU to see if they might consider numbers to match the size of the party alphabet dies. They said they will pass the info along, which is what they always say to my ideas or suggestions.
__________________ Kathy FS852 SCS Member #241,587
I use a wooden lid storage rack (for the lids of pots and pans) to store my paper trimmers, Stamparatus, scoring board and light pad. An extra slot or two is usually taken up with a large clear zip lock envelope with everything I'm using for a current project.
The following 4 users liked this post by Here and There:
My tip is related to stamping but not directly - it's about mailing the cards we spend so much time making. My dad likes to woodwork and he made me a wooden lap desk where the lid/writing surface is a hinged lid. The lid opens to reveal storage and that's where I keep cards and envelopes of all kinds, pens, address book, stamps, and a glue stick and tape to seal the envelopes.
This lap desk is in our living room where it's very convenient to access. I mail 15-20 cards a week and the lap desk my dad made is a huge reason why - it's made it so easy to do so!
__________________ Nicole
The following 4 users liked this post by cnsteele:
When stamping sentiments and not sure what color I like best, I stamp it in several different colors and then the ones I don't use go into a plastic box marked sentiments. Then when I'm in need of a sentiment, I pull that box out and find just what I need!
__________________ Kathy FS852 SCS Member #241,587
Here is my Tip. I don't remember where I heard it from. Since the Glue Dots Rolls have changed where the dots are now on the inside which I feel is very inconvenient, tie a piece of ribbon around the roll to easily attach the Glue Dots to a project. This has been of immense help to me. :-)