Splitcoaststampers.com - the world's #1 papercrafting community
You're currently viewing Splitcoaststampers as a GUEST. We pride ourselves on being great hosts, but guests have limited access to some of our incredible artwork, our lively forums and other super cool features of the site! You can join our incredible papercrafting community at NO COST. So what are you waiting for?
I only got one (a red one) in the set I bought. The plastic ones all seem to be the same according to the ad. The metal one would probably tear paper as it is quite sharp and made for hard surfaces. That little tool has saved many a card! If you use it with Un-do it would be even better, but usually I'm in too big of a hurry to get out the bottle and just grab the tool and have at it. If I have trouble, though, I will use the Un-do as that usually works all by itself. Good luck!
Grid paper is a good idea but if you don't have any, here's another idea. Draw a faint pencil line to line up the top edge or bottom edge whichever is more comfortable for you. You can also put a point on each side on the line so you can make sure it is even on the sides. Use an art eraser to erase the line that shows after you affix the panel to the base. Of course, you will have to determine where to place the line (i.e. 1/8 inch down is common) but you have to do that with grid paper also. The person who said to stand up is right. It definitely helps when you're eyeballing placement. When I eyeball placement, I make sure there is the same amount of space on each side of the panel in relation to the base. Then I make sure the top looks even. It usually works pretty well. It takes practice just like sewing a 5/8" seam.
I suffered with this for years. But I found several ways to make it fairly easy to make the panels straight. My SU demonstrator removes things stuck down with tape by using dental floss. Just run it between your top and bottom layers. I have used this idea on occasion.
But my favorite way to do it is to lay the top on the card base in the place you need it. No tape or glue yet When you have it where you want it to be make sure to hold it down in the middle. Lift one side and use a tape runner under that side. Stick that down and do the other side . I find that gluing on just the two sides works well. You can always use a little glue under the other sides if you insist but I find just the two sides works well.
And Un-Du works great. Smells bad when you use it but the smell doesn't affect the card at all after it dries.
I measure everything with a ruler. Measure, measure and measure again! Then everything lines up. No eyeballing for me. Die cuts help a well. I also have used photo splints to adhere my panels. They stick god, but also gives me some wiggle room when attaching to my card base.
Another time my layering ruler has come to the rescue. I needed to die cut a square from the front of my card. Since this was a movable card, it had to be perfectly centered. Therefore I used a ruler and measured in 7/8" in from each side and marked it with a pencil. I taped down the die, using the marks and when I cut it, it was off enough that the center piece had to be placed with the original sides together, which meant it was not centered, or any side could be matched up. Light bulb! Use the layering ruler, lay the die up against it as if it were a piece of cardstock, and voila! Perfectly centered---and so much easier.
Jennifer McGuire will use double-sided tape, but then she will add some liquid adhesive to give a moment to get it in the right spot. I forget what kind it is, maybe Gina K Connect? Anyway, since there isn't a lot of the liquid glue, it doesn't wrinkle, plus you have the holding power of the DST.
Well, I'm glad to see that from all the responses here, that I'm in good company with this little problem. It really is a tricky maneuver, isn't it? After looking at the price of the various tools, I think I will bookmark them for now, and go with papercrafter40's method. For some reason, I always place the panel on from left to right, and then end up trimming off the right side, duh! It makes much more sense to end up trimming off the bottom. Thanks for all the help guys!
I pretty much like the glue on the tape idea. Seems quick and easy. I had heard of it but didn’t know if it would affect the sticking properties of the tape. I guess that’s not a problem if you don’t overdo it.
This is like one I got, but mine came in a set with a metal tool to be used on hard surfaces like tile or glass. You can see it further down the site, made by the same company.
holy cow! I have one of these from 20 years ago and I needed another as I have worn down the lead edge but I never knew the name of it! I am SO happy you posted this!! I use it for taking off stubborn labels w goo gone, etc. Like when you get rid of medicine bottles.
I usually eyeball it, but instead of standing up and looking down, I use 2 other "tricks". One, I hold the panel base and card upright in front of me with both hands and use my fingers to center it (ala GinaK). I use either ATG or foam tape, so doing it in the air I end up using a light pressure and then press it down firmly on the table when I make sure its aligned properly. Like others have mentioned, I aim to align the corners at the fold so that if the card base or panel were not cut precisely I can trim off the open end. Two, I make a point to turn the card base and topper upside down, whether with the above method or while on the table. Your eyes get too distracted by the details of the card when its right side up and pull your focus from aligning it centered. Viewing the 2 parts upside down makes it easier to see what looks wonky. That applies to adding borders, ribbons, and other embellishments that you want to be even. I even do that with scrapbook pages, though I used to rely heavily on my clear centering ruler before I saw a video (can't remember who now) that used the upside down trick. If all the suggestions fail, you can try a glass (or two) of wine while crafting and you won't care so much anymore!!! :-)
karenpagedave, I can see where the upside down trick would come in handy. And after a couple of glasses of wine, I may be upside down too. :lol: Wheeee!
That's the one I was talking about! Thanks for posting the link.
I am trying to justify the price...$40 in Canada. By any chance is it deep enough to double as a wood stamp positioner. I have an old wood L-shaped positioner I had made at a framing shop which is well used. It's 6 inches each side. I would like to get an acrylic one like in the picture.
I am trying to justify the price...$40 in Canada. By any chance is it deep enough to double as a wood stamp positioner. I have an old wood L-shaped positioner I had made at a framing shop which is well used. It's 6 inches each side. I would like to get an acrylic one like in the picture.
I have that exact stamp positioner. It's the only one I have as all my stamps are wood mounted and will stay that way. I use it a lot, but since I always mount my stamps on the blocks very precisely, I can usually do a pretty good job by eying it. It feel more authentic and hand made to me.
Thanks for responding Jeanne...I was actually wondering if the Kool Tac paper positionser would work as a wood stamp positioner as well like the one I pictured above? It would help justify spending $40 for the Kool Tac if it had multiple uses.
Is it deep enough to catch the wood edge of the stamp?
Barb
Stand, aim and pray. And use green mono multi glue for wiggle room
__________________ The quickest way for a parent to get a child's attention is to sit down and look comfortable. Practice safe eating always use condiments
Sorry Jeanne I thought you had one from your response to JRWilkinson on Jan 19 7:19 AM. You must have meant something else. I don't know why I didn't pick her posting to quote. I'll try again. Thanks for telling me about your acrylic stamp positioner...I might have to get one of those anyway.
Barb
You just make sure you have the same overlap on both sides of a corner and tuck your top layer into the angle of the ruler.
I am trying to justify the price...$40 in Canada for the Kool Tac. By any chance is it deep enough to double as a wood mounted stamp positioner. Would it catch the edge of a wood mounted stamp?
Sorry Jeanne I thought you had one from your response to JRWilkinson on Jan 19 7:19 AM. You must have meant something else. I don't know why I didn't pick her posting to quote. I'll try again. Thanks for telling me about your acrylic stamp positioner...I might have to get one of those anyway.
Barb
I do have a Kool Tac tool, but it is not a stamp positioner, It is a layering guide. That being said, If you had some acrylic sheets (you can sometimes get them cheaply or free as scraps), it could maybe used as a stamp positioner. Sorry, if that was the tool you were talking about, I do have it, but never thought about using it as a positioner. I'm going to give it a try and see if it works for that. I love double-duty tools, too.
I am trying to justify the price...$40 in Canada for the Kool Tac. By any chance is it deep enough to double as a wood mounted stamp positioner. Would it catch the edge of a wood mounted stamp?
Barb
Barb,
I just gave this a try, and unfortunately the tools is barely deep enough to catch the straight edge of the stamp without the acrylic plate. I even tried a piece of transparency, but the rubber is what hits the edge of the tool first---especially on the curved edge of the wood. I don't think it would be a practical use since positioning is such a precise maneuver. Darn, I was hoping...
Jeanne,
Thank you very much for trying the Kool Tac as a Stamp Positoner for me.
Sad, it doesn't work for that. Oh well, I think I want it anyway for paper positioning. I guess I will have to get one of the acrylic stamp positioners too. I love tools that make my tasks easier. You should see my kitchen tools...LOL! I'm a gadget junkie!
I've wasted a lot of money on things that aren't as "whiz bang" as they were supposed to be. I'm trying to be more discerning now.
Thanks again,
Barb
You are so welcome. I'm just so happy I could help someone after being helped so much by people here.
I recently saw Jennifer McGuire use a t-square ruler to line up her cards, etc. and I thought this would help you line up any item you want to place in the perfect position. A few light pencil marks on the sides would help you with centering or use a centering ruler. Then use the t-square ruler for lining up the horizontal. Maybe after doing this enough times your eyes will be able to "see" if something is centered. I guess some people can't eyeball it maybe because of their eye sight. I have mono vision so I'm not sure if that helps me or not but I do pretty well eyeballing it. I know some people can't sew a straight line either. Don't stress over precision. Or on the other hand, put things at an obvious angle - it's a design element then. By the way, we're not perfect but getting things close is usually good enough for most people. If your elements are slightly off, no one receiving the card will even notice so why stress out over it.
Knew I had seen this somewhere, and found it when looking for something else. Here is a positioner that will do both wood mount and unmounted stamps. There are several good videos, but I only checked out the ones that dealt with wood mount stamps, as that's all I have.
That positioner looks interesting. I wonder why they didn't go with the magnetic base? I'm also revisiting my desire to have a clear acrylic L-shaped positioner. Theirs is wood like my one made out of wood from a frame shop, which has worked fine for many years. It works for wood mounted stamps and clear stamps on acrylic blocks equally well. I can reink and double stamp if needed too.
SORRY, I got diverted when I saw the "cool" Kool Tac tool, but that is not about positioning paper layers as this thread's subject really is. Ooops!
I mostly eyeball my positioning of paper but sometimes think it would be easier to do with a tool and think that Kool Tac tool might be the answer. I have the perfect layer rulers which I use and like and also the perfect layers square which I also like to use when I need to cut right angles with an x-acto blade. It can be used to position trim and labels etc. at right angles to an edge, but only one edge. Does anyone else think the Kool Tac might be a good investment???
Also my "two cents" on my metal Scotty Peeler...it has been well used for many years. I use it carefully on paper so I don't tear it. That with some heat usually does the trick to remove stuck on things. Tip: start with the heat of a hair dryer...I have melted a few things with the embossing heat gun. :(
The Tombow glue works well for me and no lumpiness. Allows readjusting.
Just yesterday I tried.....again with scoretape.......using a new method that really worked.
I line up and adhere one of 4 sides. Then with tool, remove paper strip from other 3 sides. It was perfect!
I agree with grid paper to lay your card base on to make sure it is straight. Also standing is a must. I’ve never thought to use a ruler but that is genius! Especially if your base is on a grid it would be easy to lay a ruler along one side and be sure it is straight since you can line the ruler up along the grid lines as well.
Being right handed, I tend to start on the left, fold side of the base. I often use the index finger of my left hand to act as a guide to brace the edge of my layer against while eyeballing the top and bottom edges. Once all three of those margins look equal I will gently lay the left side down slowly “closing” the layer like a door, keeping my left index finger in place so the layer doesn’t shift as I go.
I prefer double sided tape as well. Mostly use the Scotch brand dotted tape runner or sometimes my AGT gun. As long as I don’t press down firmly anywhere I do have a little wiggle room with the dotted tape. I can pull it up and readjust. Less so with the AGT tape but I have done it.
Lastly, there is always UnDo. A liquid product that comes in a bottle with a small spatula like piece at the top. You can apply this to your paper and use the spatula piece to pry the layers apart without damage. It is a little smelly, but will dry completely and allow you to reattach the layers after everything dries. The smell goes away completely I find after about 24 hours.
Regarding the dst, which is always my preferred adhesive for layers, I was once shown a method many years ago. The demo peeled back the backing tape on all four sides, just partway along, folding it so that the backing paper stuck out from the edges. Then she placed it down, to line up, pressed the peeled part of the tape down, and pulled off the remaining backing paper. I also use a ruler to line up either along the spine of the card, or by lining it up with my glass mat. I like the TH ruler for this, as it has so many line markings on it.
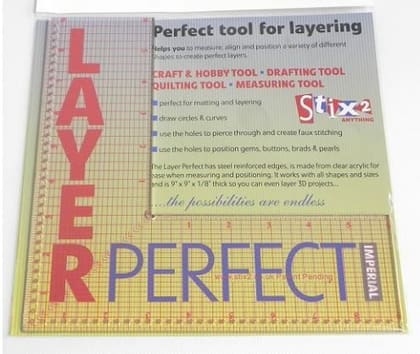
There is also a tool from a company called Stix2, a large corner ruler, that has markings along both axis that is a great tool for this too. Comes in Metric and Imperial.
I use the Layer Perfect and have been pleased with it, but mostly I "eyeball" and do pretty good. I find if I'm having lots of trouble, it's because I didn't get it into my cutter straight.
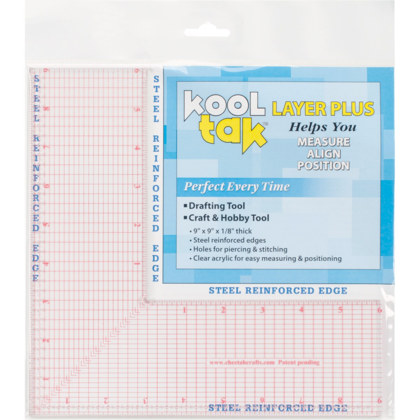
I am scratching my head here. I ordered the Kool Tac from Amazon.ca and it looks identical to the Stix 2 one that Shaz shows. They both show different Patent Pending information on the ruler. The Stix 2 is hard to see in the photo though. They both are from the UK I think. Weird! I am still waiting for delivery but hope I will make good use of it....at Can $40 it is a bit of a splurge for me without a try before I buy test run. I am glad to hear that some of you like it.
Agreed, it looks identical. Wonder if it's the same company under a different name over there? I like it a lot, I find that having two edges to line up straight makes a big difference. I also sometimes put a little repositional snail tape on the back of the layer, then I can use the ruler to get it straight and press down, then flip the ruler to make sure the opposite side is equal.
From time-to-time I've considered ordering the Kool Tool ... but have always clenched on the payment part of ordering. :rolleyes: Good to see comments by some KT users.