Splitcoaststampers.com - the world's #1 papercrafting community
You're currently viewing Splitcoaststampers as a GUEST. We pride ourselves on being great hosts, but guests have limited access to some of our incredible artwork, our lively forums and other super cool features of the site! You can join our incredible papercrafting community at NO COST. So what are you waiting for?
Don't throw that away-- tips for reusing packaging
For anyone who fell off the wagon or just went hog wild, like me, buying dies and stamps or simply have a pile of packaging, here are some ideas for using every bit in your crafting:
(1) Clear mylar packaging can double as a card protector. Many have a hang tab so you can display your cards too.
(2) Backing sheet- some are really cute designs and can be used as card backgrounds, die cut and painted, or used as a shim for die cutting sandwiches. I recently purchased some Prima doily dies and they come on this beautiful heavy kraft cardstock that can be die cut easily and painted or inked. I made some gorgeous Asian lanterns. I might even try the doily die.
(3) Hard clear plastic clamshell that house some dies or embossing folders are perfect to be cut down into acetate windows for shaker cards, cut into strips for pop up tabs, or in any way one uses acetate. Same is true for the acetate sheets that house stickers, embellishments, and stamp sets.
(4) If you bought Sizzix embossing folders in a hard plastic pillow box, you likely had a hard white rectangular foam piece inside. This is foam the perfect size and density to use as an ink or chalk applicator over embossed cardstock. It doesn't absorb much ink, so most of the ink is on the paper, where you want it. Also, the plastic pillow box can be reused to mail cards with embellishments or for gift packaging.
What are your favorite recycling tips for stamping/crafting?
The plastic bag from frozen foods makes for great home grown stencils. It's the right weight and pliabiliity. I use the dies that I want, cut them out, then use Aileen's TOO around the edges. Once it's dry, it's a great stencil that lasts and lasts. I store them on recycled plastic that's more rigid, right alongside the die. (I have my dies in a large cloth bin, stored front facing (kind of like a file system), with masks tucked behind them.
__________________ If you don't want your tax dollars to help the poor, then stop saying you want a country based on Christian values, because you don't. ~ Jimmy Carter
Last edited by jeaniebean55; 09-23-2016 at 04:54 PM..
Oh dear! I hope I didn't scare folk away from your awesome thread. The wonderful Frugal Crafter, Lindsay Weirich, is who started me on the path of stopping, thinking and rustling through my recycle bin on a pretty regular basis. It's so fun when that creative spirit hits and you see treasure in that there trash.
__________________ If you don't want your tax dollars to help the poor, then stop saying you want a country based on Christian values, because you don't. ~ Jimmy Carter
Oh dear! I hope I didn't scare folk away from your awesome thread. The wonderful Frugal Crafter, Lindsay Weirich, is who started me on the path of stopping, thinking and rustling through my recycle bin on a pretty regular basis. It's so fun when that creative spirit hits and you see treasure in that there trash.
Not at all-- I loved your tip! I must try the frozen food bags. I tried plastic from a notebook cover to cut a stencil, but my dies couldn't cut through, more like indented it.
Here's another: embossing or die cutting tea bag wrappers with aluminum lining (cutting on the aluminum side) or the aluminum top to vacuum sealed canisters (e.g. coffee).
Oh, and instead of tossing file folders at work, I cut off the label (especially if confidential), cut it down to manageable size and die cut tags. Has the same look and feel. I use a Nellie Snellen tag die, but any punch or template would work. I've even used the file folders to create faux leather. It makes a good cover. It's thick and takes ink and paint brilliantly. If you spray liberally with water, it will emboss beautifully too.
ooooh, love the tag idea! ... and before you turn those file folders into tags ... you can cut a bunch of the folders down to make mini sized 'magazine folders' for storing/gifting cards with enough left over to still make tags. They're fun to decorate and look so nice lined up on a mini bookshelf made out of, what else? but a recycled shipping box cut diagonally and decorated (we all have a ton of DP paper and washi tape, right?)
I wish I knew how to share the template I used. It's the kind that has a taller back than front, and I made it to fit both A2 and A7 cards.
If you buy frozen juice concentrate that comes in a plastic container, those containers, stacked in a box, are great for organizing Copic markers. They also are great for organizing all sorts of crafty tools.
another happy camper here with embossing foil from container lids. throw in a few ink drops and a light touch with a dauber and it makes for some fun play time and beautiful cards.
__________________ If you don't want your tax dollars to help the poor, then stop saying you want a country based on Christian values, because you don't. ~ Jimmy Carter
Last edited by jeaniebean55; 09-24-2016 at 11:39 AM..
Not at all-- I loved your tip! I must try the frozen food bags. I tried plastic from a notebook cover to cut a stencil, but my dies couldn't cut through, more like indented it.
Here's another: embossing or die cutting tea bag wrappers with aluminum lining (cutting on the aluminum side) or the aluminum top to vacuum sealed canisters (e.g. coffee).
Oh, and instead of tossing file folders at work, I cut off the label (especially if confidential), cut it down to manageable size and die cut tags. Has the same look and feel. I use a Nellie Snellen tag die, but any punch or template would work. I've even used the file folders to create faux leather. It makes a good cover. It's thick and takes ink and paint brilliantly. If you spray liberally with water, it will emboss beautifully too.
Cheers,
Doreen
I love General Foods International Coffee. I've been saving the foil seals to them for years. They used to be a gold color, with writing on it; now they're silver with no writing. I always thought I'd cut snowflakes or something out of them.
ooooh, love the tag idea! ... and before you turn those file folders into tags ... you can cut a bunch of the folders down to make mini sized 'magazine folders' for storing/gifting cards with enough left over to still make tags. They're fun to decorate and look so nice lined up on a mini bookshelf made out of, what else? but a recycled shipping box cut diagonally and decorated (we all have a ton of DP paper and washi tape, right?)
I wish I knew how to share the template I used. It's the kind that has a taller back than front, and I made it to fit both A2 and A7 cards.
If you buy frozen juice concentrate that comes in a plastic container, those containers, stacked in a box, are great for organizing Copic markers. They also are great for organizing all sorts of crafty tools.
another happy camper here with embossing foil from container lids. throw in a few ink drops and a light touch with a dauber and it makes for some fun play time and beautiful cards.
Not sure if this is what you had in mind but There's a tutorial here...
Well, that's a pretty cute mini mag folder, isn't it Kathy? The one I came up with is a little larger (so either A2 or A7 cards can fit) and made from old file folders. I used an old cardboard mag file I'd inherited, tore it down to see how to construct mine. The fold in the file folder is one of the back corners, whole thing measures 8" tall in back, 2 1/4" in front, 1 3/4" wide, 5 1/2" deep.
It's frustrating not being able to share a template. If I knew how, I would, cuz it's a really simple pattern.
__________________ If you don't want your tax dollars to help the poor, then stop saying you want a country based on Christian values, because you don't. ~ Jimmy Carter
Love this thread, lots of great ideas! I too just went hog wild with some purchases. My frugal recycling "justifies" my purchases so I tell myself :rolleyes:
1) Foil lids from containers: yogurt lids are great for die cutting and embossing and take alcohol inks very well; peanut butter and nut lids for faux mirrors, chrome bumpers, some candy has really pretty foil wrappers too
2) Net produce bags are lost of fun: fishing nets, hammocks, hat netting, brayer over to create patterns
3) Hard acrylic from packaging also works well for Faux Glass Flowers Tutorial, the lighter acrylic backing stamps is great for windows
4) Security envelopes have great patterns inside
I love to recycle tissue boxes. They work well in place of patterned paper when making cards. Can be die cut, punched and painted.
I also buy aluminum baking pans when I make baked gifts. One of the sizes I like using is the size of large take out containers. These come with silver foil card board lids that I rarely use. They can be die cut. A I find the thick cardboard can easily be split inyo two layers. The foil one can then be embossed . Looks just like expensive foil cardstock
I love General Foods International Coffee. I've been saving the foil seals to them for years. They used to be a gold color, with writing on it; now they're silver with no writing. I always thought I'd cut snowflakes or something out of them.
Will they hold an emboss? I wonder what they would look like as holiday ornaments with various embossed designs.
__________________ If you don't want your tax dollars to help the poor, then stop saying you want a country based on Christian values, because you don't. ~ Jimmy Carter
Coffee sleeves are good for adding texture. I tear off the side with the store logo etc and use the bare cardboard. The acetate from packaging makes a good pallette for scribbled markers or reinker. It can also be used for stamp positioning or to stamp a sentiment on and use to try out placement on your card. I've used the glossy black that comes behind ef's for sentiment die cuts. There are all kinds of tutorials using brown bags including last week's Mixability Challenge which I have been itching to try. I have often reused tags from clothing or large Goodwill tags since I usually layer on extra paper anyway. Newspaper can be fun to work with too especially for 3D items since it is so lightweight. I love Kleenex boxes with such pretty patterns. I don't always use the patterned side since it's kind of shiny but it is a good weight for diecuts or sometimes I just recreate the look.
Love this thread, lots of great ideas! I too just went hog wild with some purchases. My frugal recycling "justifies" my purchases so I tell myself :rolleyes:
1) Foil lids from containers: yogurt lids are great for die cutting and embossing and take alcohol inks very well; peanut butter and nut lids for faux mirrors, chrome bumpers, some candy has really pretty foil wrappers too
2) Net produce bags are lost of fun: fishing nets, hammocks, hat netting, brayer over to create patterns
3) Hard acrylic from packaging also works well for Faux Glass Flowers Tutorial, the lighter acrylic backing stamps is great for windows
4) Security envelopes have great patterns inside
I look forward to seeing more ideas!
Oooh, love the net idea! I buy Trader Joes limes in green netting all the time and it has an awsome texture and color. It could work for a military theme.
Speaking of TJ's, I used their tall peach/mango jars for organizing pens, colored pencils (perfect size) ribbon and paper flowers. I spray painted the lids a pretty color. I imagine you could glue or make a hole and screw in a glass knob.
Clear plastic egg cartons can be cut down into individual cups and used in making paper flowers to maintain its shape when drying. The cups even stack. McGill or Sizzix sold something very similar.
Speaking of egg cartons, the paper/cardboard ones make pretty paper. The pulp can be used in paper casting/molding.
Speaking of egg cartons, the paper/cardboard ones make pretty paper. The pulp can be used in paper casting/molding.
Or even making your own paper, which is fun to do, and makes for amazing card fronts.
I've been saving my leftover white CS in a separate bag and use that for paper casting for Christmas ornaments. Bought a Goodwill blender just for making paper and this girl is good to go! ;)
Look at what this mad hobby is leading to! lol!
__________________ If you don't want your tax dollars to help the poor, then stop saying you want a country based on Christian values, because you don't. ~ Jimmy Carter
Pop tops from cans (colored ones from Monster drinks) make awesome embellishments.
Framelits will cut through soda cans and the pieces can be embossed
Use thick plastic packaging cut into squares or rctangles w your trimmer then use them with the stamp a ma jig so you can stamp the image in staZon then leave it in the case with the stamps. No cleaning and re-stamping!
3) Hard acrylic from packaging also works well for Faux Glass Flowers Tutorial, the lighter acrylic backing stamps is great for windows
I bet you could make beautiful sequins with the faux glass flowers technique and a sequins die like this
I haven't tried it (don't have the die, but now I think I need it, lol!) but I imagine it'd make more sense to color the material first and then cut the die. Seems like there's a lot of playing around potential there!
One of the tea brands I use puts their tea bags in clear plastic bags, which has made for great storing of lots of little bits in my craft room (die cut hearts, flowers, leaves, etc). These hand made sequins would store nicely in those repurposed tea bag bags, wouldn't they?
__________________ If you don't want your tax dollars to help the poor, then stop saying you want a country based on Christian values, because you don't. ~ Jimmy Carter
Last edited by jeaniebean55; 09-28-2016 at 06:14 AM..
I bet you could make beautiful sequins with the faux glass flowers technique and a sequins die like this
I haven't tried it (don't have the die, but now I think I need it, lol!) but I imagine it'd make more sense to color the material first and then cut the die. Seems like there's a lot of playing around potential there!?
I didn't know there was a sequin die! I may try a paper punch. I have a lot of sequins already, leftovers from the 70s. My mom and I made a lot of felt Christmas ornaments, tree skirts back then. And yes, I still have a lot of felt too!
I've been saving a lot of soda pop tops, which can be colored with a marker by the way. You can thread ribbon through them. We even used them for Santa's belt buckle on a card that our group did one year.
Also, the netting someone mentioned, I have found several colors, don't remember where they all came from, but the red is from the baby Belle cheeses.
they are fun on a ocean/sea themed card. a hammock, and to cover the outer covering of a hot air balloon.
__________________ Ginny , A friend is one of the nicest things you can have, and one of the best things you can be. -Douglas Pagels
I have been redoing my craft room and have purged a lot of things I was saving to recycle and reuse. I realized today that it wasn't such a bad thing. It was taking up space I didn't have to dedicate to it and I will probably be resaving again soon.
Some great shares here and I think I need to go buy those sequin dies! LOL
If you have plastic lids from containers like salsa or butter, you can die cut them use them as stencils with mediums like acrylics or modeling paste or masks for clouds!
Great ideas! I am making some beautiful collage papers from my paper towels used to dab off my brushes when painting. Once they get pretty full of paint I spread them out and let them dry. Then I can add more color with powdered watercolor and a spritz of water and let dry again. I am currently using these to cover the boards (which are recycled backs of watercolor paper pads) for my art journal covers. The towels are glued on with collage medium. They look like felt and nothing like the trash they were!
I have also used the towels to cover some really sturdy cardboard tags from something I purchased from champion some time ago. Those are being used to label my storage baskets.
Keep the good ideas coming! Once my art journal cover is finished I will try to post a picture.
A gorgeous pencil holder made from baby wipes that were used for clean-up in Gelli Plate printing, but any inky baby wipes would do: https://m.
I don't use baby wipes much any more, instead using a Stamp Shammy or large "inkie binkie" given out at a LSS workshop, and I don't sew, and my baby wipes never looked as colorful, but you could always add color, right? lol
A short time ago my husband found these round Kleenex boxes at the store. Not only were the designs really pretty, but the cardboard on the boxes was really sturdy. I saved all the boxes. I have one set up as a roller texture tool with bubble wrap taped on that I use all the time. I haven't used the others yet but they would make great pencil cups. I haven't seen them again, but I'm sure they were pretty pricy as the amount of Kleenex in each box was pretty small.
Love all these ideas on re-cycling. I use cardboard from cereal, packaged food boxes and make tags out of them...using gesso and covering with paint and collage materials. I use deli paper to clean off my brushes and brayers and re-use in my art journal as background papers..allows for some texture too. I save and use the netting bags as stencils for Gelli printing and as background on tags and cards. I save the prepared frosting containers (frosted plastic with lids) to store all sorts of items..I re-use coffee creamer bottles to store small items also; small paper/silk flowers, brads, etc. You can pop open the lids and pour out what you want. I also save them to store baking items..coconut, chopped nuts, raisins, etc. Take off the labels and you have a clear tall bottle with colorful pour out style lid. I save and use some junk mail for collage materials on canvas projects, cards, tags. I save large pickle jars with screw-on lids to store embellishments. There are so many ways to stretch and re-cycle. Love all the tips.
__________________ Have a creative day, every day.
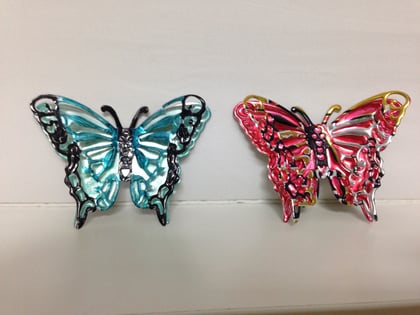
I use empty soda cans to make butterfly magnets. I cut the can from top to bottom and cut off the tops and bottoms so I just have a rectangle of tin. Then, I die cut them. I use matching die cuts with one plain and the other one fancy. I then either color them with alcohol markers or sometimes I will use the design from the outside of the can itself. I glue them together with the fancy cut on top and put a magnet on the back.
The red one on the right is from the design from the soda can. The one on the left was cut from the inside of the can and colored.