This card was made for a challenge that required it to be "tall", and have things that start with the letter "T" used on it.
I recently saw one of Jennifer McGuire's tutorial videos for a new technique called "Pop-Up Shadowbox Card". The link to her blog for this technique can be found here: https://www.jennifermcguireink.com/2...un-effect.html
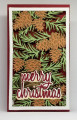
I don't own a lot of large "background" dies, so when I found the Stampin' Up! (SU) Christmas Pinecone" dies that layered, I knew I could use them to create a tall card. Since there is a 2-part frame that holds the die cuts sandwiched between them, I knew I could cut another 2" section of the pine needles and pinecones to add at the bottom inside the frame to achieve my targeted 6" height.
The two green colors were cut with separate dies in the set. The bottom layer is SU Garden Green cardstock, and the top layer is SU Pear Pizzazz. Since there are so many needles to be glued together, I opted to use E600 Spray adhesive on the back of the lighter die-cut needles, then adhere them over the darker ones. It worked surprisingly we11 since it gave me the time to position each branch before it dried, and where some of the spray oozed out onto the darker green needles, it didn't really show!
The pinecone shapes were part of the same die cut set. I cut the two sizes using SU Chocolate Chip for the bottom layers and SU Cinnamon Cider for the topmost layers.
To extend the height of the pine needles I cut another pair using only the bottom third of the die cuts, then assembled them as I did the full die cut needles. I ended up having to cut three more pinecones to complete the whole 6" high panel of needles.
The white frames were cut using the "extended die cut" technique since my frame die-cuts were too short to go around my 6" needles panel. A short video on how to cut extended frames can be found on YouTube in KWarner Studio channel. Here is the direct link to this very clearly explained technique (if you haven't already tried it):
The sentiment was cut two times and layered (using the E600 spray adhesive) using the Sizzix Tim Holtz "Seasons Greetings" script die cuts. After die cutting and gluing one set onto a piece of white cardstock, I scanned the sentiment arrangement using my Brother ScanNCut CM350 digital cutting machine. I then added a 0.04 border around the scanned sentiment and cut it out on the machine two times so I could add dimension to the white "mat". Before turning the machine off, I went back to the scanned image and changed the border to 0.08" and cut out the gold mat for the sentiment. I then glued the second white mat, the second red sentiment and the gold mat together and attached to the pine needle panel before going to the next step.
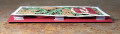
I created the six plastic "springs" that go behind the framed panel using heavy scrap plastic strips that I scored every 1/4" to help bend into the "W" shape needed to attach the panel to the card base. The "springs" were attached using Scor-Tape. My associated photo of the side of the assembled card shows these springs. Jennifer's video reference above does an excellent job explaining how to create these "springs"
I STRONGLY advise that you use heavy cardstock for the white frame, and that you also use 2-3 layers to make sure the panel stays stiff since it is suspended above the card base by the "springs".
I am rating the difficulty level of this card as a "4" because of all the special die cutting I had to do to create a panel that was "tall" and extending the frame die-cuts to glue the needle layer between.
Date: Saturday, October 23, 2021 GMT Views: 622
Favorited:3