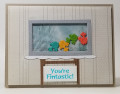
This card was made for a card challenge sketch that was a rectangle with a scallop underneath it. It reminded me of an aquarium sitting on a table, like when I was growing up. So I took the tank idea and made a shaker card out of it!
I started off using two Stampin' Up! (SU) "Rectangle Stitched" framelits dies and cut out a frame of gray cardstock so it looked like the metal parts of an aquarium. Then I used the smaller die and cut out the opening on the background paper (retired 2010 "Sweat Pea" Designer Series Paper) that I thought looked like wallpaper.
I then glued the frame over the opening on the front of the wallpaper panel. On the back of the wallpaper piece I glued a piece of clear acetate for the "glass" of the aquarium. Then put adhesive foam strips to form a "tray" around the opening. I used a powder bag usually used for removing static from sheets you are going to heat emboss as a way to remove stickiness on the inside edges of the foam tape so the fish would get stuck to it once I closed up the back.
The colorful fish are actually fish brads that was an impulse buy a couple years ago (I do a lot of that!). I used my tough rubber stamp scissors to cut off the brad ends, then pushed them flat to the back of the fishes. I then laid the four fish inside the tray making sure that the front of the fish were facing the front of the aquarium.
To form the "water" background to the aquarium, I cut a small piece of water pattern paper, and before adhering it to the foam tape, stamped seaweed (from SU "Magical Mermaid") and sand (from 1997 SU "Fish Frolics").
I then added adhesive foam tape all around the outside edges on the back of the wallpaper sheet (and a couple smaller pieces where there were large open areas between foam strips, to make it go thru the mail in better shape). After peeling off the protective strips of the foam tape, I stuck the wallpaper sheet to the SU Crumb Cake card base.
The table was cut from SU Kraft cardstock using a free SVG file I found on the internet using my digital cutting machine. After I cut it out, I stamped over it with the SU "Hardwood" background stamp to give the table woodgrain. This was glued as the support table for the aquarium. Since the sketch had a scallop under the rectangle, I used my cutting machine to create a "tablecloth" that was then glued over the top of the table.
The final step was to create the sentiment. I wasn't sure for what special occasion I wanted the card, so typed in a more generic aquarium-related sentiment into my digital cutter, and converted it internally to a "draw" file to draw. I then used an Artist's Loft gel pen to write out the sentiment on SU Whisper White cardstock. I used my stitched rectangles dies to cut out the sentiment. I didn't have just the right size rectangle, so I chose one that was the right width, then after die cutting the sentiment with the words at the top of the rectangle, I turned the sentiment around, aligned the "stitches" up with the die, and die cut it a second time some the bottom blank space was die cut off leaving a perfectly sized panel for the sentiment. It was adhered using a piece of foam tape.
I am rating the difficulty of this card as a "3" out of as possible "5" just because of the number of steps required. Each step in and of itself is very straightforward, but not a card I would recommend fr the very beginner. If you have experience making cards, then this should be pretty easy for you.
Date: Friday, February 28, 2020 GMT Views: 370
Favorited:3