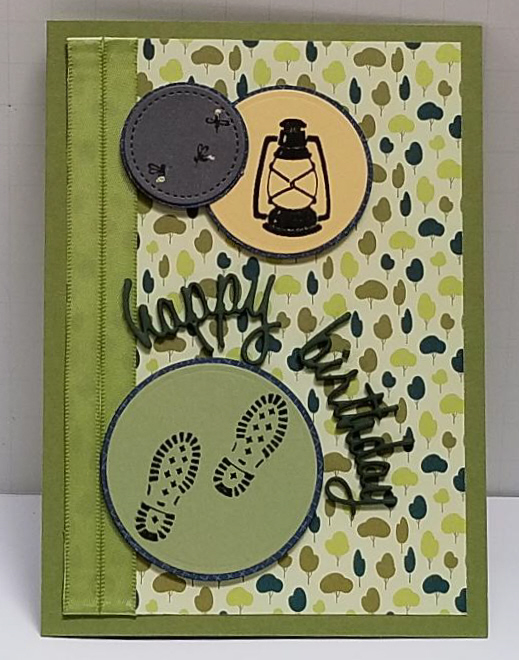
With the sketch and theme determined by the two challenges, all I needed was some "guy" stamps where there were multiples that would work together. I hadn't used my retired 1998 Stampin' Up! "Roughing It" stamps in quite some while - and this was the perfect time!
The card base is a 5"x7" SU Old Olive cardstock (10"x 7" folded in half). The main panel is SU specialty paper from the "Myths & Magic" pack that was cut 4.5" x 6.5" to leave extra wide matting around it.
I selected the 3 stamps based on their pre-determined location on the card, with the boot prints being at the bottom (the ground), the lantern held higher, and the lightning bugs flying around higher still on the card.
The boot prints were stamped using Memento Tuxedo Black onto SU Old Olive, and diecut with a 1-3/8" Spellbinders circle die. It was matted with a 1-1/2" circle Marvy punch using an SU Tranquil Tide paper from the "Myths & Magic" pack.
The lantern was stamped with black (using my MISTI to stamp multiple times for a solid black image) onto SU So Saffron cardstock. It was die cut using a 1-7/8" Spellbinders circle die. I cut the mat from the same blue pattern paper as the boot print circle using a 2" Marvy punch.
Finally, the lightning bugs were actually mosquitoes, but to make them look like lightning bugs, after I inked up the stamp, I used a small pen dauber to rub off the ink of their "beaks" before stamping. Then I used the tip of a SU Blender Pen tapped onto a Versamark ink pad to dab a small dot of ink, then dusted them with detailed gold embossing powder and heat set it to create the "lights" on the tails of the bugs. These lightning bugs were stamped on SU Basic Gray using Memento Tuxedo Black ink. The circle was cut out with a 1-7/16" SU "Stitched Shapes" framelits die, then matted with the same blue as the other two circles that was diecut with a Spellbinders 1-3/8" die.
All circles were glued to their just slightly larger circle mats using Tombow glue.
Two 7-1/2" pieces of Celebrate It lemon/lime ribbon were glued (using SU Snail Adhesive) to the left edge of the front patterned paper, then the paper was glued to the card base using Tombow glue. The matted circles were attached to the card front using adhesive foam strips.
The final step was to create the sentiment. I wanted this to be a guy birthday card, but with the layout, there isn't a lot of room to place the sentiment. So I decided to die cut "happy birthday" from a sheet of Sulky Puffy Foam whose color matched the SU Tranquil Tide patterned circle matting, then using a heat tool, shrink the foam words to better fit around the boot prints circle. An added benefit is that you can heat the foam in a way that causes the words to curve a bit, then they are pretty easy to glue with Tombow around the circle.
The card itself is pretty straightforward to create, once you figure out which dies or punches you have that fit the stamps and can serve for cutting the matting. So, since I have provided the sizes to help you along, I am rating the difficulty of this card as a "2" out of a possible "5". If you have to figure out your own dies and punches, it would be a "3". I'm sure any guy would appreciate this masculine birthday card!
Date: Friday, July 20, 2018 GMT Views: 653
Favorited:2