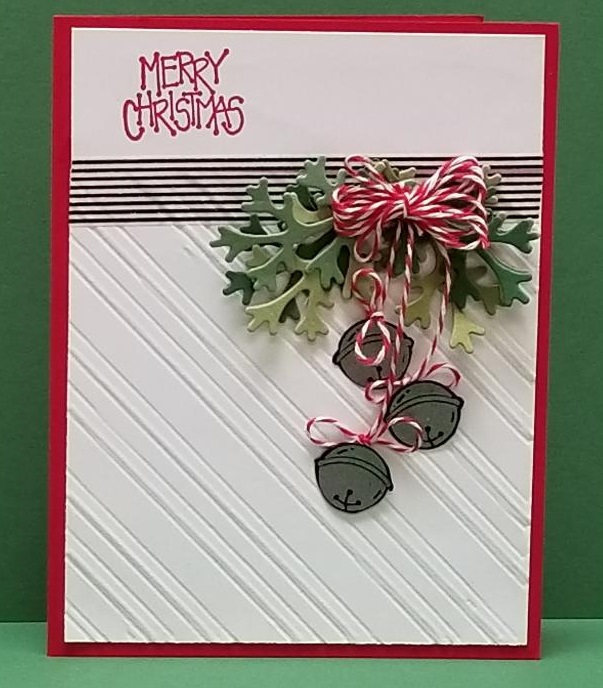
This card was made for Merry Monday Christmas Challenge #290 which had the theme of "I Hear Bells".
I was inspired by Design Team members Colleen and Maria by their jingle bell cards. The layout idea was inspired by Bonnie's blog StampingWithKlass.
I started with the standard 5-/1/2"x 8-1/2" size Stampin' Up Real Red cardstock, folded in half. I then cut a 5-1/4"x 4" piece of Whisper White cardstock, and trimmed the top 1-3/4" off for use later to stamp the sentiment.
The bottom part I put on my SU Simply Scored tool along with the diagonal plate. I used my scoring tool to score a pair of lines 1/2" apart diagonally with 3/4" between each pair. Then turned the panel over to the other side and scored a line 1/8" on both sides of each line I had scored on the other side. This gave me a pattern that kind of looked like a candy cane stripe.
I then glued this scored panel to the card front. I stamped the Christmas sentiment on the left side of the piece of white cardstock I had trimmed off using the "Merry Christmas" stamp from the 1995 SU "Button Bear" retired set. I then glued this piece back in place at the top of the card from where it had originally been trimmed off.
The horizontal black stripped Washi tape (no known brand) was attached across the seam of the two pieces.
The jingle bells are from the retired 1999 SU "Holiday Sampler" stamp set. I stamped the bells onto SU Basic Black cardstock using Versamark ink, then sprinkled them with silver embossing powder, and heat set to give them a metallic look. I hand cut the bells out using paper snips. I then used my Wink of Stella Brush to give each bell a sparkling look.
The pine bough was created by die cutting branches from SU Old Olive, Pear Pizzas, Garden Green and Wild Wasabi cardstock using a die from the Spellbinders Shapeabilities "Foliage" set. I die cut multiple branches from each color. These were then attached to the card using a Mini Glue Dot at the stem end of each branch to create a cluster of pine boughs.
Using SU Real Red Bakers Twine, I tied a small bow and attached it at the top of each bell, leaving a "tail" long enough to "hang" from the center of the pine bough. The bow was attached to each bell with a Mini Glue Dot, and to the bough with a Mini Glue Dot.
Finally, I used the Real Red Bakers Twine to tie a multi-looped bow using my trusty E-Z-Bow Maker (I will be the first to admit that I am "bow challenged" :-D This bow was attached to the bough using Mini Glue Dots as well.
I am giving this card a difficulty rating of "3" out of "5" because of all the steps required. No one step was difficult, but the card required lots of steps to complete (I think I counted 10 steps at least!). I like how it turned out, and look forward to sending it to one of my siblings this coming Christmas!
Date: Monday, May 14, 2018 GMT Views: 1061
Favorited:8
Paper: SU Real Red, Whisper White, Garden Green, Old Olive, Pear Pizzaz, Wild Wasabi, Basic Black
Paper Size: A2
Ink: SU Real Red
Accessories: Silver Embossing Powder, Spellbinders Shapeabilities Foliage Die Set, Heat Tool, Mini Glue Dots, Misc Washi Tape, SU Real Red Bakers Twine, Paper Snips, Tombow Multi Liquid Glue, SU Simply Scored