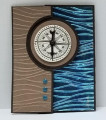
This card was made for Try Stampin' on Tuesday Challenge #354 using the additional optional metallic theme. The sketch was for two vertical panels, with a circle centered near the top. See challenge sketch and other samples here: http://trystampinontuesday.blogspot.com/
I used the Stampin' Up! Circle Card Thinlits Die to cut the folded card base. This clever die cuts the circle and pre-scores the fold lines for you. When I cut the card on my Big Shot I used a 5-1/2"x 8" Early Espresso card sheet and allowed the cardstock to overlap and extend beyond the die. This meant I had a nice extra flap that I could fold back under the circle so the card would open up and allow plenty of space to write my personalized greeting inside.
The beautiful blue waves was created by using a craft sponge to spread Tombow glue all over a scrap piece of cardstock. Then I use the direct to paper technique with my Stazon Azure alcohol ink pad to cover the foil. I allowed the ink to dry for about an hour (just to be safe), then ran it through my Big Shot inside the SU Seaside embossing folder. This gave me blue waves, but to accent the waves even more, I gently sanded the raised portion of the waves with a craft sanding block to allow the silver foil to peak out.
I glued this metallic panel onto the extra flap of my card base.
The left panel was created with the same embossing folder (to give the feel of a sandy beach) using Kraft cardstock. The trick is to cut out the half circle to allow the compass circle to open and close. I did this by die cutting the Kraft panel BEFORE embossing using the same Circle Thinlits die. Then trimmed it with a scissors to give a nice even mattug around the circle. Then after embossing, it was glued to the left panel of the card base.
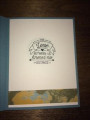
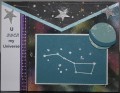
The compass was stamped using the SU Going Global stamp set with Early Espresso ink on SU Very Vanilla cardstock, then die cutting it with a circle die. It was matted with Kraft cardstock using a larger circle die. The compass was attached to the Kraft matting circle using adhesive foam strips to raise it up a bit for added interest. The matted compass was then glued to the card base.
The final touch was to attache the tree enamel dots on the left panel. I didn't have the exactly color I wanted, so dipped each dot into the Stazon Azure ink, and after they had dried, attached them per this week's challenge sketch.
It's always hard to come up with guy cards that aren't fishing, tools, or golf,,, so I'm pretty pleased with how this turned out. Since I didn't put a greeting on the front, I can use it for just about any occasion.
I'm rating this as a difficulty level 3 since it takes a bit of patience to get the Kraft panel on the left to fit the circle cutout, and the time you have to wait to let the alcohol ink dry thoroughly before you can go on to the next steps.
Date: Tuesday, January 9, 2018 GMT Views: 940
Favorited:8
Accessories: Aluminum Foil, SU Seaside Embossing Folder, SU Circle Card Thinlits Die, Recollections Enamal Dots, Craft Sanding Block, Tombow Multi Liquid Glue, Adhesive Foam Strips, Tim Holtz Game Spinners Embellishments, Circle Dies, Craft Sponge
Techniques: Dry Embossing, Tin Foil Alcohol Ink, Direct to Paper