Hi everyone this is my one and only card for the week and it is very late (home duties got in the way this week)
On Friday I went to our largest paper craft show here in Aus and at the Bellbird Paperart stand the owner Cathryn Greschke was demonstrating a number of different ways to use watercolours. She was using powdered watercolours of which I have a few but it was some of the hints and tips that were so obvious but I hadn't thought of that intrigued my.
Following on from that I loved the colour choices for this weeks colour challenge and so this card was born.
I completely saturated a piece of heavy duty watercolour paper and let the water soak in a little.
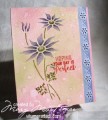
Instead of using powder paints I used my SU re-inkers by putting a few drops into a pan then diluting them with water and then pudding them onto the paper. I then spritzed the card stock with water again and moved the colour around letting it bleed into each other. Once I was happy with the effect I dried the card stock then spritzed it again with a normal spray bottle, dried off the spots this created then spritzed it again with a mini mister and dried this off. I then poured some water into a container and dipped my fingers in and flicked them over the card stock and then dried this off once again, finally I spritzed the whole thing with a mixture of Perfect Pearls - Biscotti and water to give the whole card shimmer.
Once this was all dry I placed the stencil onto the card and traced around the image. The only reason why I used the stencil was because I had bought it at the show and wanted to use it. Cathryn actually stamped her images with Versa Mark watermark and then used one of a number of embossing powders mainly black gold or white. You could also just stamp the image but you would need to use an ink like stays on that wasn't water soluble.
Now for one of the tips I learned. Once you have the image on the background you need to lift the background colour from the area you wish to paint, this is done by using your aqua brush and water covering the area with water (not too much) then blotting the water up this lifts the colour, I did it about three time before I was happy with the result, it doesn't lift the colour completely but lightens it enough for you to be able to colour the are with out it being compromised.
Once this was done I slowly built up the colour of the petals etc.
Once this was all dry I added some diamond glitter which is just beautiful and is made out of glass, finally I stamped the greeting in SU Blushing Bride then over stamped with Versa Mark and clear heat embossed, I punched the vellum with a Martha Stuart border punch an put it all together.
It did take a few hours to do but i really enjoyed it and will used these techniques again....soon.
Date: Saturday, June 10, 2017 GMT Views: 1114
Favorited:10
Registered: July 19, 2010 Location: Conway, MA Posts: 7513
Sun, Jun 11, 2017 @ 5:16 AM
Marg, this is beautiful! Though it took a long time to create, it was well worth the effort. Love how the background looks from the repeated spritzing and lifting. The stenciled flower is lovely and the punched vellum is just perfect as the edge border, it reminds me of eyelet lace.
------------------------------ Julie Proud Fan Club Member, CC595 Favorite, CC March 2017 Guest Designer, SC Winter 2018/19 Guest Designer
Registered: February 13, 2005 Location: Southern Ontario Posts: 26256
Sun, Jun 11, 2017 @ 7:40 AM
Holy Cow!! This is absolutely amazing Marg! Your colour choices and the mastering of this technique worked so well. Thanks for the detailed instructions too. Love it all!!
Registered: February 3, 2005 Location: Delray Beach, FL Posts: 34769
Sun, Jun 11, 2017 @ 7:17 PM
Oh, Marg, this is GORGEOUS! I know that Kathy Jones (Wattle) and Edna Morrisedie (Edna15) were also at that show and had such fun! But wow! What a wonderful technique, and I shall have to re-read this (when it's not so late) to learn more about the process. But it truly is a stunning card! I love it a lot! Hugs! xoxo
------------------------------ Cheryl
Proverbs 3:5-6 My blog
Registered: October 30, 2007 Location: Posts: 26718
Sun, Jun 18, 2017 @ 5:25 PM
Wow, Marg - this is so pretty - thanks for explaining the steps - it's amazing how you were able to get such rich color on your flowers after creating that lovely bg - gorgeous card!