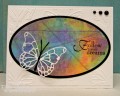
This technique for die cut masking should have been a simple & easy do - but today it turned into a comedy of errors for me - but even with that I like the results . .
I've only had my Big Shot a short while and the few dies I've collected are pretty delicate ( something more bold would be MUCH easier to work with I'm sure!) Following this tutorial I laid down the masking tape, placed my fairy & ran it through the machine - BIG OOPS - I had put the die onto the sticky side of tape so had quite a mess to clean up! Still I forged ahead and cut another mask the right way this time - it did take some time & patience to remove those delicate wings from the plate and transfer it to my cardstock. I used chalks applied with a cotton ball over my fairy mask, then randomly stamped the butterflies with watermark ink and brushed on more chalks. I set this with hairspray then carefully removed the mask - so far so good - Then a Small Oops with my greeting - although I like the general area of the greeting, if I had REALLY thought this through, I would either have stamped the sentiment in black OR stamped & embossed the sentiment first and then added the butterflies for better placement - but this card was definitely a learning experience and I'm sure a technique I'll be trying again.
Date: Monday, March 13, 2017 GMT Views: 475
Favorited:3
Registered: June 29, 2004 Location: Sugar Land. Texas Posts: 79591
Mon, Mar 13, 2017 @ 11:01 AM
Hey, neighbor, I love your white fairy and the soft colors you used with a sentiment that touches my heart.
------------------------------ LizThe joy of the LORD is my strength.Right Brain Madness --My blogProud member of the redDivasKSS certified multi-step stamperFan Club member since 2004


 - but even with that I like the results . .