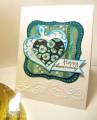
Hi! This card was made for today's Technique Lovers Challenge: Faux Tile. It also fits this week's Stampin' B's Challenge to use a banner on your card.
Well....I saw this technique and thought about Pansies. I haven't colored one yellow yet, so I decided today was the day! I used to have a set of tile trivets that had pansies, and I guess that is what triggered the inspiration to use this set...not quite sure. And, I'm sticking with my "at least one card a day" self imposed ME TIME, too! (Even though I'm really hurting again today. My SIL noted that I was "fussing with my hands" all through lunch. Yes, I was. What was worse, we had gone to see the new Green Hornet movie, (lots of swearing!), earlier in the day, and I was really cold. I was SITTING on my hands more than half the movie.
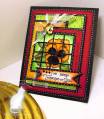
I have found that it is easier for me to make this type of faux tile by following these steps:
1. Stamp image.
2. Color in image with Copics, making sure the background is colored in.
3. Cut the image panel down to a SQUARE in increments on 1/2". This one is 2".
4. Score the square in 1/2" intervals.Turn 90 degrees and score in 1/2" intervals.(This makes little squares.)
5. Press a VersaMark pad onto the image and emboss in Clear.
6. Press in VersaMark pad again and emboss in Clear.
7. Let cool. Cut on score marks, laying small squares out so that it forms the image.
This worked great! And, it's REALLY shiny! And, it was a lot easier than using the gloss, etc.
Finshed card size: 4 1/4" x 5 1/2"
Total time to complete: 53 minutes
Registered: June 3, 2006 Location: In my "She Shed Tornado Shelter" Posts: 4010
Sun, Jan 23, 2011 @ 10:33 PM
Faith it's beautiful as usual. I just love looking at your work and am marveled at each one I view. Thank's for the info on faux tile technique. Keep up the wonderful work, I appreciate you sharing it.
Registered: March 11, 2007 Location: In my Garden in West Jefferson, Ohio Posts: 4278
Mon, Jan 24, 2011 @ 3:42 AM
Gorgeous card Faith..............and thanks for the VM/clear EP tip. I have both of those items and will give this a try.
Have you tried those little hand heat packs that are by the cash registers at Wal-Mart ? I buy them for the men in my family as they all are hunters. Very inexpensive and you can carry them in your purse for times that you need some heat on your hands. No mess and no electricity is required.
Just a thought.
------------------------------
GardenDiva AKA Tina DeLong
FS363 QFTD182
Fan Club Member & Tuesday Teapotter Hostess MMTPT222
Thyme began in a Garden. Jeremiah 29:11
Registered: March 5, 2007 Location: Coatesville, Pennsylvania Posts: 44975
Mon, Jan 24, 2011 @ 4:01 AM
Love the bold colors.....very pretty!
------------------------------ Lesley Proud Fan Club and RAK Member He is the GOD of the Impossible!!!! Kookzi the Rookzie Punchkateer It is by the grace of God that we take our next breath.
Registered: August 9, 2004 Location: Fort Collins, Colorado Posts: 33063
Mon, Jan 24, 2011 @ 4:16 AM
Really gorgeous and vibrant, Faith. Big hugs on the struggling. It will take time, sweetie. I'm curious about the clear emboss. I did a 'sample' tile using clear emboss (done 2x) and it came out with sort of a matte finish. Did yours come out shiny? Maybe my clear emboss is old? Anyway, I liked the UTEE and clear emboss methods, too, for the quickness factor. I also loved the result of the Gel, but it took forever to dry! Beautiful work as always, my friend.
------------------------------ ~* Holly *~ Gallery Blog


 TFS!
TFS!