Watercolor Lifting
by Wendy Cranford
Make a beautiful two-tone background with this reverse resist technique.
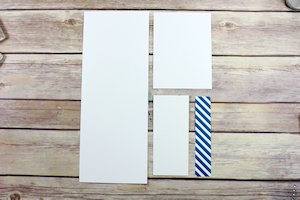
Supplies
- Watercolor paper (strathmore 140lb watercolor paper used here)
- Dye based markers or inks (Stampin’ Up! Emerald Envy, Cucumber Crush, and Dapper Denim Stampin' Write Markers used here)
- Solid image stamps (Seaside Shore set from Stampin' UP! used here)
- VersaMark ink
- Heat tool
- Clear embossing powder
- Wide paint brush and water
- Other supplies as needed to complete the card (used here: Memento Tuxedo Black ink, metallic enamel shapes, Stampin' Up! Fast Fuse adhesive, foam tape, Signo white gel pen, 2016-2018 In Color designer series paper, white embossing powder, Stampin’ Up! Whisper White thick cardstock)
Step-by-Step
-
Step 1
Prepare the card base, watercolor paper, and other layers for the card.
-
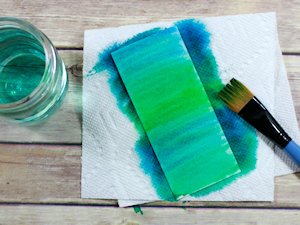
Step 2
Use water based markers or dye based inks to color your watercolor panel. Create wide strips of color for a gradient look.

-
Step 3
Use a flat, wide paint brush and clean water to blend the color in a side-to-side motion on the watercolor paper. Blend the ink colors back and forth until the lines from the marker begin to disappear. Use a heat tool to set the watercolor piece or allow it to air dry.
-
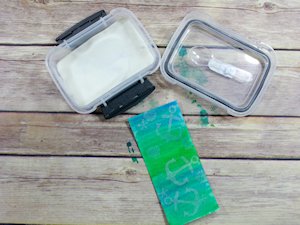
Step 4
Ink stamps with VersaMark Ink. Stamp randomly to fill the panel.
NOTE:
Solid image stamps work best for this technique.
-
Step 5
Use clear embossing powder to cover the images. Be sure to remove any excess embossing powder that is not on the stamped images. Heat set.
-
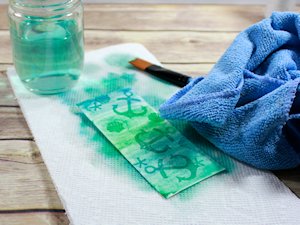
Step 6
Use the same brush from step 3 to lift the color from the watercolor piece. Paint with clear water back and forth to begin to remove the pigment from the paper. Use a towel or microfiber cloth to dry the excess water off the watercolor paper.
-
Step 7
Use the completed panel to embellish a card or other project.

Video!
Your Turn
You've seen the tutorial, now you try it! We've got a section of the gallery set aside for Watercolor Lifting. Try this technique, then upload your artwork to the gallery. Show us your creations!
***Please note - Internet Explorer/Edge is not a supported browser, and will not allow you to see the videos. Please use Chrome, Firefox or Safari to view our tutorial videos.

Questions and Comments
We'd love to get your feedback or questions. Leave your comment below.
Page 1 of 1 pages