Treat Cup Slider

by Cindy Elam

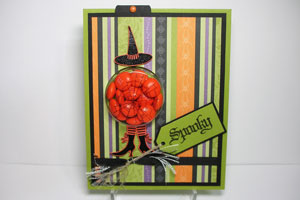
Create a card with a treat cup that slides to open.

Supplies

  • One 4 1/4" x 11" piece of cardstock for card base
  • One 4" x 5 1/4" piece of cardstock for mat
  • One 3 3/4" x 5"piece of pattern paper for background
  • One 2" x 4" piece of cardstock for slider
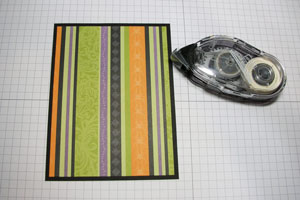
  • Scraps of cardstock to decorate card front and for pull-tab
  • Brad or ribbon for pull tab
  • Embellishments, as desired
  • Treat cup (Stampin’ Up!® round treat cup used here)
  • Adhesive
  • Stamps (Stampin' Up!® Wicked Cool used here) and acrylic block, if needed
  • Ink
  • Paper cutter with scoring blade
  • Scissors
  • 1 3/4" circle punch
  • Round tab punch
  • Corner rounder punch
  • Pencil

Step-by-Step

  1. Step 1

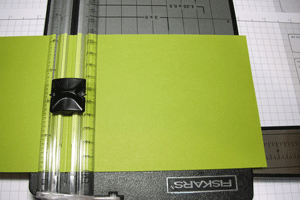
    Score the 4 1/4" x 11" cardstock at 5 1/2" and fold to form card base.

  2. Step 2

    Adhere 3 3/4" x 5" pattern paper to 4" x 5 1/4" cardstock mat.

  3. Step 3

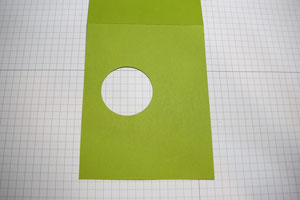
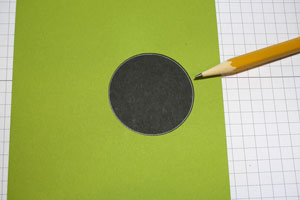
    On front of card base, determine treat cup placement and punch with 1 3/4" circle punch.

  4. Step 4

    Fasten background/mat to card front with temporary adhesive.

  5. On inside of card, trace punched circle onto back side of mat.

  6. Step 5

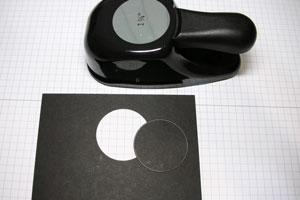
    Remove background/mat and punch with 1 3/4" circle punch, aligning with marked circle.

  7. Step 6

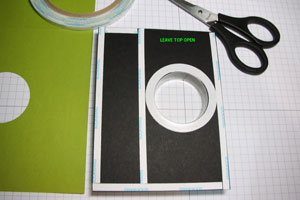
    Using 1/8" sticky tape around top of flange on treat cup, adhere to the underside of the background/mat. Only treat cup will poke through opening.

    Note:
    Don’t remove the backing from the adhesive on the treat cup.

  8. Step 7

    Apply 1/4" sticky tape to the underside of the mat, as shown (top to bottom on both sides of the treat cup, top to bottom along other long edge, across bottom, and short space between tapes at top). Be sure to leave the opening for the slider above the treat cup.

  9. Remove adhesive backing from sticky strips only (not treat cup), center and adhere to card front.

  10. Step 8

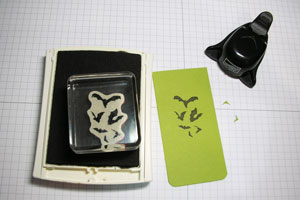
    Use corner rounder on two corners (short end) of 2" x 4" slider. Stamp image or greeting on slider, if desired
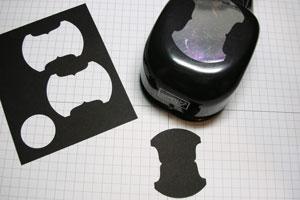
  11. Step 9

    Punch round tab from scrap cardstock.

  12. Fasten brad through one half of tab before folding and attaching to slider with sticky tape.

    Optional:
    Attach tab to slider first, then punch hole and tie ribbon through hole for pulling.
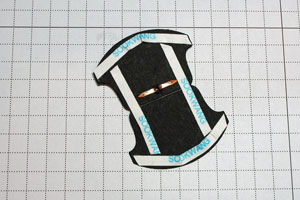
  13. Step 10

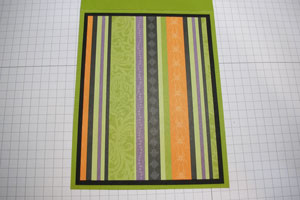
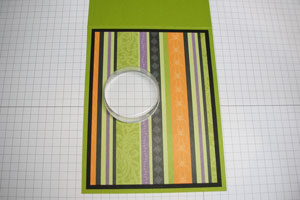
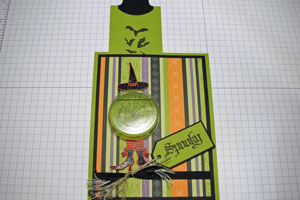
    Decorate front as desired, then slip slider into opening at top between card base and mat. Fill with goodies from inside and slide closed.

Video!

Your Turn

You've seen the tutorial, now you try it! We've got a section of the gallery set aside for Treat Cup Slider. Try this technique, then upload your artwork to the gallery. Show us your creations!

***Please note - Internet Explorer/Edge is not a supported browser, and will not allow you to see the videos. Please use Chrome, Firefox or Safari to view our tutorial videos.

Questions and Comments

We'd love to get your feedback or questions. Leave your comment below.

Adorable! Great Tutorial Lydia!
Susanne  |  Wed Sep 28, 2011 at 5:37 AM
This is a cute card. I love it. Love that idea of treat cup. Great tutorial. Thanks
Johanne L.  |  Wed Sep 28, 2011 at 6:25 AM
What a great tutorial....and it looks so easy! Will have to try this one. Thanks for all the clear and precise directions. Fabulous!
cdnoption  |  Wed Sep 28, 2011 at 6:36 AM
This is just perfect! I planned to make treat cards for my nieces & nephews but I hate to think about how they get ripped open to get at the candy. I can't wait to try this!!!
BellbrookMama  |  Wed Sep 28, 2011 at 6:38 AM
What a cute idea so that you don't have to destroy the card to get the candy. Thank you so much for sharing.
Carla  |  Wed Sep 28, 2011 at 6:49 AM
What a great tutorial....and such a fun creative card....will have to try this for sure....love it....tfs
Gloria Westerman  |  Wed Sep 28, 2011 at 8:15 AM
Wonderful idea! I, too, have been frustrated by the thought of having to destroy a card to get at the goodies inside the treat cup. Can't wait to try it. Thanks!
Linda Riesgraf (Doodledop)  |  Wed Sep 28, 2011 at 8:40 AM
That card is sooo cute and a great tutorial also thanks for sharing!
Pat  |  Wed Sep 28, 2011 at 8:43 AM
Thank you for the great tutorial! Can't wait to try this out.
Leanne  |  Wed Sep 28, 2011 at 8:44 AM
Your directions are really clear and helpful. You certainly do wonderful work. Thanks for the video. I can never get my cuts as precise as I want.
Jeanette  |  Wed Sep 28, 2011 at 8:53 AM
Wow, that is a beautiful card. Candy I have not thought of before. You make it look soooo easy. Your directions are so clear. Thank you so much for sharing. I can wait to get started.....
Tracy  |  Wed Sep 28, 2011 at 9:09 AM
What kind of envelope would you use for this & can it go through US mail? Do you make or buy the envelope? If you buy them, where do you get them?
Judy  |  Wed Sep 28, 2011 at 9:32 AM
I love the darling little stamps. I saw them at Michaels also but didn't quite know what to do with them and now thanks to you and your video I do and I can't wait to get started. Love them!
Sheila Moss  |  Wed Sep 28, 2011 at 9:34 AM
Hi Judy - Stampin' Up! sells a small padded envelope to go with the treat cups. They will not fit in a standard A2 envelope.

HTH! smile
Lydia  |  Wed Sep 28, 2011 at 9:42 AM
So cute! Who wouldn't want to receive this Halloween trat? The tutorial is so easy to follow. Thank you for sharing!
Pauline  |  Wed Sep 28, 2011 at 9:59 AM
Thanks, Lydia...that was what I suspected! I will have to check with my SU distributor!
Judy  |  Wed Sep 28, 2011 at 10:02 AM
Fantastic and totally clear tutorial - you make everything look like a 'piece of cake' even for some of my new customers!! Love this!
Sue  |  Wed Sep 28, 2011 at 10:04 AM
Lydia, this is the second video of yours I have watched and I just love how clearly you explain things, as well as your GREAT sense of humor. Looking forward to seeing more of your videos.
Lisa
[email protected]  |  Wed Sep 28, 2011 at 10:59 AM
I've never seen a slider card made before. Thank you for the great directions that are so easy to follow.
Mary Ann Huntington  |  Wed Sep 28, 2011 at 11:28 AM
Terrific job Lydia! I need an idea for "craft day" at my house. This is perfect and can be done any time of the year. Thanks!
Margaret  |  Wed Sep 28, 2011 at 11:45 AM

Page 1 of 3 pages  1 2 3 >

You need to be logged in to comment

GET OUR NEWSLETTER


Splitcoaststampers's privacy policy