Tile Coasters

by Gina Krupsky

Create a set of coasters or trivets for gift giving.

Supplies

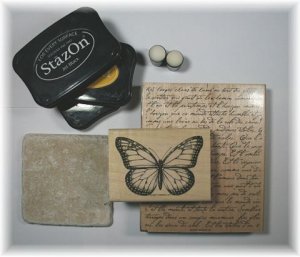
  • Stazon Ink© in black and colors of your choice

  • Background stamps

  • Main image stamps

  • Sponge daubers

  • Porous tiles from your home improvement store

  • Felt pads

Step-by-Step

  1. Step 1

    Begin by inking up your large background stamp with black Stazon™ ink and stamp your tile. Use a generous amount of pressure.

    Don’t worry if your result is somewhat blotchy. This will give your tile an antique worn look!
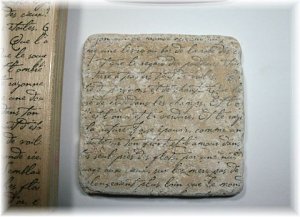
  2. Step 2

    Stamp your main image using black Stazon™ Ink. Again, make sure you use a considerable amount of pressure.

    Allow the image to dry for about 10 minutes.
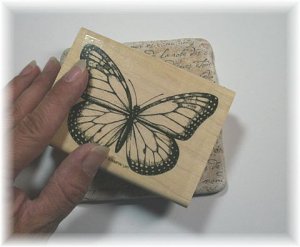
  3. Step 3

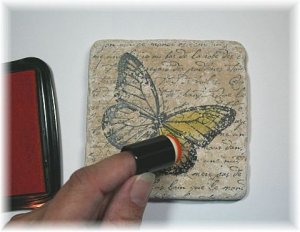
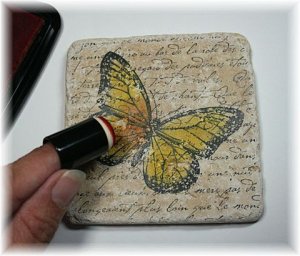
    Using colored Stazon™ ink and a sponge dauber, begin to dab color onto your image. Do not rub, just dab.

  4. Step 4

    Use a second color to add depth. Allow the coaster to dry for about 10 minutes.

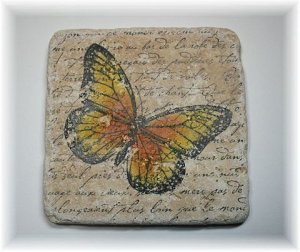
  5. Finished Front of coaster.

  6. Step 5

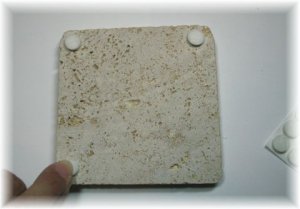
    Add four small or medium felt pads to the corners of the underside of each coaster to protect furniture during use. These felt pads are available at your home improvement store as well.

  7. Step 6

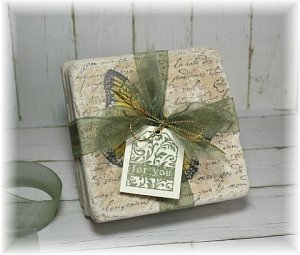
    Make these in sets of four and group them together to give as gifts.

Your Turn

You've seen the tutorial, now you try it! We've got a section of the gallery set aside for Tile Coasters. Try this technique, then upload your artwork to the gallery. Show us your creations!

***Please note - Internet Explorer/Edge is not a supported browser, and will not allow you to see the videos. Please use Chrome, Firefox or Safari to view our tutorial videos.

Questions and Comments

We'd love to get your feedback or questions. Leave your comment below.

How come I do not get any pictures on the tutorial. Making the double bag is really hard without pictures.
no pictures on the tile either and I had pictures before. Yvonne
Yvonne Bagley  |  Wed Jan 9, 2008 at 6:01 PM
Have you actually used these as coasters? I'm finding that that the ink rubs off with a hot cup of coffee. I've used 3different types of sealer on them and several coats and one spilled cup of hot liquid and it the ink (staz-on) comes off.

Any suggestions?
Sharon Floes  |  Sat Mar 29, 2008 at 11:49 AM
This is what I'll have to make....I need to pick up some of those porous tiles. Have you seen these before. Look how easy they are to make.

LY
ScrappingALL  |  Tue Apr 15, 2008 at 4:57 PM
Would "baking" the tiles help to keep the image on the tile?
Monica  |  Thu May 22, 2008 at 9:35 PM
Love them! What is the average cost of the tiles?
Christi  |  Fri Jun 20, 2008 at 8:05 PM
After stamping the tile, I set my oven to 300 degrees and put them on foil and let them go for about 20 minutes and took them out. I cooled them for about 45 minutes to make sure they didn't burn anything.

;0))
Gigi  |  Sat Jun 28, 2008 at 6:22 PM
I made a set of these and love them! I forgot about cooking them, though. I did spray them with a sealant and have already sent them to the recipient. I bought my tiles at Lowe's and they were .32 each.
Lori  |  Thu Jul 31, 2008 at 6:16 AM
Preciosa, idea genial y facil de realizar, enhorabuena
Monika  |  Thu Jul 31, 2008 at 11:38 PM
Does the baking work
shari  |  Thu Aug 28, 2008 at 9:07 AM
Another option to keep the images on the tiles is to seal them using an Acrylic Laquer or sealer. I've found 2 light coats (with 15 min drying time in between) works wonders, and the images don't transfer.
LadySarah  |  Wed Sep 17, 2008 at 8:06 AM
I wonder if we could use the modge podge as a sealant... has anyone tried it?
Gigi  |  Wed Sep 17, 2008 at 7:27 PM
Can you use craft ink on the tiles? I know it's wet, but it is permanent, isn't it? I have made several sets, but I just recently used craft ink and it doesn't seem to want to dry. Does baking in the oven really dry the ink?
Cher  |  Mon Sep 29, 2008 at 9:40 AM
I had difficulty with craft ink, too. The only thing that kind of worked was using embossing powder on it. But I still had some difficulty with smudging. I hadn't tried baking it in the oven to try drying it.
Lori A.  |  Mon Sep 29, 2008 at 10:48 AM
When I use a stamp with a lot of detail on the porous tile, the ink bleeds a little. Any ideas?
Sarah H  |  Wed Oct 1, 2008 at 1:05 PM
I have also did this project and it bleeds, what can I do?
Kimberly  |  Sun Oct 12, 2008 at 8:44 AM
Paint with crystal glaze after baking
Micki Antinone  |  Wed Dec 3, 2008 at 8:52 AM
I made some of these with StazOn, and "colored" a couple with craft ink just to see how it worked. I baked them for 30 minutes. Have had no bleeding or fading of the images. I did these months ago and have been using them with no problem for hot or cold drinks.

I would put them in the oven, then turn it on and bake for 30 minutes after it comes to temp. Then let them cool with the oven, or at least don't put them on anything cold or wet when removing from oven if still hot.
Melody  |  Sat Dec 20, 2008 at 9:29 AM
Forgot to mention--I wonder if sealing them with any type of sealer would remove their ability to absorb the sweat from cold drinks, and allow the glass to slide too much.
Melody  |  Sat Dec 20, 2008 at 9:34 AM
I received some coasters for christmas from my sister. they are very pretty but she used stickers on them-- nice quality stickers. does anyone know how to seal the stickers so i can use the coasters? she used the same type tile from lowes or some place like that. didn;t know whether to try spray acrylic or podge modge or just what to try. thank for your help! Cora
Cora Shrum  |  Sat Jan 10, 2009 at 7:18 AM
I had trouble with the ink smearing also. I found that you can use Sharpie markers and you don't have to heat set them. The colors stay nice and bright and you can scrub the image and the colors stay put. I did find out that heat setting the Sharpie markers makes the colors go all wonky, not a good idea.
Terri  |  Mon Jan 12, 2009 at 9:06 PM

Page 1 of 4 pages  1 2 3 >  Last »

You need to be logged in to comment

GET OUR NEWSLETTER


Splitcoaststampers's privacy policy