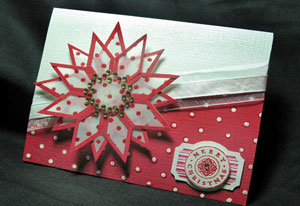
Tag Punch Star

by Donna Moore

Make a stellar focal point for any paper project with a few tools.

Supplies
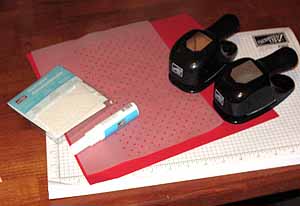
  • Large Tag Punch
  • Small Tag Punch
  • 2-way Glue Pen
  • Dimensionals
  • Cardstock for frame
  • Mulberry, Vellum or other light-weight paper for inner parts of the starburst
  • Detail Scissors

Step-by-Step

  1. Step 1

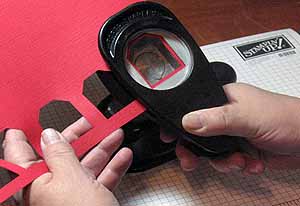
    Punch 16 small tags out of cardstock, leaving about 1/4" between each one.

    Using the large tag punch, go back over the holes made by the small punch.

    Line up the punch so that you can see an evenly spaced frame around each hole. Punch out 16 frames.
  2. Step 2

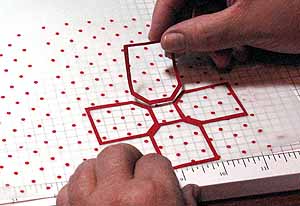
    Each layer of the star will consist of 4 frames. Apply two-way glue evenly over the back of a few frames at a time.

    Put the sheet of lighter weight paper face-side up and carefully apply your frames in a cross-shaped pattern.
  3. Step 3

    Follow the same process for attaching the next layer of 4 frames to the base layer.

    The second layer is attached to fill in the empty areas of the first cross-shaped layer.
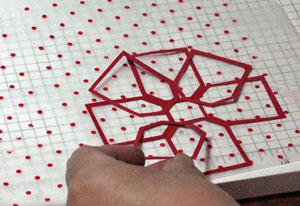
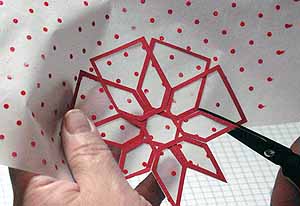
  4. Step 4

    The points of the star will be visible when the second layer is attached. Use paper snips to trim away the excess.
  5. Step 5

    Repeat Steps 2-5 to make another star. Use dimensionals to adhere the two stars.
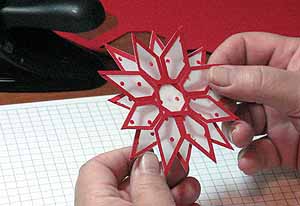
  6. Step 6

    Finish your project.

Variations

    Turn it into an ornament.

    Use blue cardstock to turn it into a snowflake.

    Use yellow toned cardstock to make stars.

Your Turn

You've seen the tutorial, now you try it! We've got a section of the gallery set aside for Tag Punch Star. Try this technique, then upload your artwork to the gallery. Show us your creations!

***Please note - Internet Explorer/Edge is not a supported browser, and will not allow you to see the videos. Please use Chrome, Firefox or Safari to view our tutorial videos.

Questions and Comments

We'd love to get your feedback or questions. Leave your comment below.

This is GORGEOUS!! I can't wait to try it!! Thanks for sharing!!
Starla (star)  |  Tue Nov 20, 2007 at 7:01 AM
Wow! Thanks Donna, this is really beautiful!
sleepyinseattle  |  Tue Nov 20, 2007 at 7:10 AM
OMG! This is awesome! I'm thinking of making them for all my gifts!! Love it!
Lydia  |  Tue Nov 20, 2007 at 7:14 AM
This is FABULOUS !!! I am off to my studio to do up a bunch.
Excellent idea.
Janine
Janine  |  Tue Nov 20, 2007 at 7:35 AM
This is Stunning!! What a beautiful Tutorial!!!!!
Vicki Garrett  |  Tue Nov 20, 2007 at 7:45 AM
Wow! this is really beautiful! Thank you for the wonderful tutorial!
Faith  |  Tue Nov 20, 2007 at 7:51 AM
So THAT's how they're done! I never could figure out the other instructions - thanks so much for this tutorial!!!
Heike  |  Tue Nov 20, 2007 at 7:52 AM
THese are GRET! Can't wait to try this with my daughters. Where did you get the pok-a-dotted paper?
Barb  |  Tue Nov 20, 2007 at 7:56 AM
You are so clever!!! I just added you to my favs!!! TFS

Sju
Susan Updike  |  Tue Nov 20, 2007 at 8:44 AM
Perfect explanation. You rock.
Joan B  |  Tue Nov 20, 2007 at 8:50 AM
LOVE your idea, thanks for the step by step instructions. Jennifer smile
Lovetostamp6  |  Tue Nov 20, 2007 at 9:12 AM
This will be perfect to top the nugget tins, I am giving teachers! You so Rock!!!
Patti  |  Tue Nov 20, 2007 at 9:24 AM
S W E E T !!!
What a cute idea. Thanks for sharing it with us! grin
Renee V. (happystamper05)  |  Tue Nov 20, 2007 at 9:39 AM
This is super - thanks for sharing!
Michelle Nadraszky  |  Tue Nov 20, 2007 at 9:52 AM
This is just way too cool! I can't wait to try it! Thank you for such a fun and beautiful idea!
Daphne D.  |  Tue Nov 20, 2007 at 9:52 AM
We just did this in class last week. It looked intimidating, but I was surprised how it wasn't that hard after we got into it. I will post the card later....Phyllis
Phyllis  |  Tue Nov 20, 2007 at 10:25 AM
Donna, I totally LOVE this...and have made a card with it from your forum post. This is so pretty and creative!! You rock!! Thanks for sharing this idea!
Rose Ann Reynolds  |  Tue Nov 20, 2007 at 10:42 AM
Wow - this is utterly beautiful !
Cal  |  Tue Nov 20, 2007 at 10:43 AM
This star is amazing and I have always appreciated your clear directions in color. I would love it if yu could move the directions over to the right margin leaving an inch or so on the left. When I print a project I put it into a binder and with more room on the left I will not be punching into the directions.

Thank You, Katie
Katie Barnett  |  Tue Nov 20, 2007 at 11:02 AM
I can't believe how easy that looks for such a wow factor! Thank you for sharing!!!!
Emily  |  Tue Nov 20, 2007 at 11:10 AM

Page 1 of 4 pages  1 2 3 >  Last »

You need to be logged in to comment

GET OUR NEWSLETTER


Splitcoaststampers's privacy policy