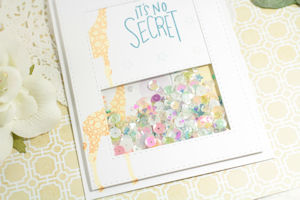
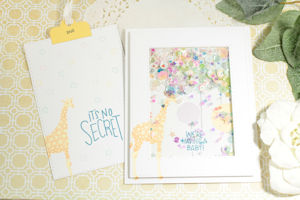
Surprise Shaker Card
by Rebecca Ednie
Hide a shaker element behind a sliding panel for a fun surprise.
Supplies

- Stamps (Altenew Baby Zoo, Simon Says Stamp It’s No Secret, Clear Dollar stamps used here)
- Nesting rectangle or square dies (3 largest Simon Says Stamp Stitched Rectangles used here)
- Ink (Altenew Blush, Soft Lilac, Dusk, Sea Glass, Buttercream, Caramel Toffee, Mountain Mist and Hero Arts Charcoal, Soft Granite used here)
- Stamp positioner (MISTI used here)
- Hole Punch (Cropadile used here)
- Scissors
- Tab die (Papertrey Ink die used here
- Die cutting machine
- Paper trimmer
- Acetate or clear packaging (Papertrey Ink Clear Cardstock used here)
- Medium to heavy-weight cardstock (Papertrey Ink cardstock used here)
- Scrap cardstock large enough for tab die (Papertrey ink Lemon Tart used here)
- 1/8” wide double-sided tape (Scor-Tape used here)
- Fun foam (Michaels brand used here)
- Sequins, beads, confetti, glitter (custom mix with bits from Lucy’s Little Things and various used here)
- Ribbon (Stampin’ Up! White taffeta used here)
- Pencil (2H pencil used to make erasing easy)
- White eraser (Staedtler brand used here)
- Washi or removable tape
Step-by-Step
-
Step 1
Use a paper trimmer to cut a full sheet of cardstock in half to create a card base. Cut the remaining piece into two 4.25” x 5.5” panels. Score the card base to form a 4.25” x 5.5” card. (Card base orientation doesn’t matter - your choice.)
-
Step 2
Stamp the card base with your choice of design, and repeat for the two 4.25" x 5.5” panels. They all need to match identically, so use your stamp positioner.
-
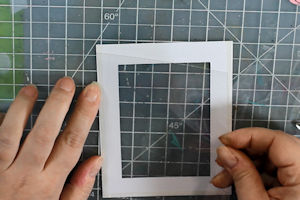
Step 3
To create the frame, choose three adjacent dies from a nesting set. There needs to be at least 1/2” between the largest and smallest dies. Tape the largest and smallest dies together, spaced them evenly. Center the dies on one of the 4.25” x 5.5” panels and cut. If you don’t have nesting dies, cut a centered frame from one of the panels. Be sure the frame is even and at least 1/2” wide on all sides.
-
Step 4
Keeping the dies taped together, cut the same frame from fun foam.
-
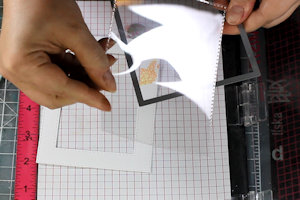
Step 5
Using only the largest die, cut a piece of acetate. If you don’t have dies, cut the acetate to the same size as the outer dimensions of your frame.
-
Step 6
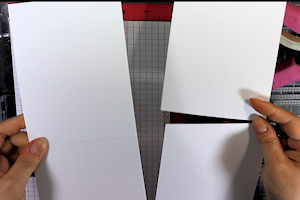
Create the pull-out panel. From the remaining 4.25” x 5.5” panel, partially die cut a rectangle with your medium sized die, centering it carefully. Do NOT cut all the way to the top of the panel - you want to extend the rectangle's height. The best way to do this is to leave the top of the die outside of your cutting plates.
-
Now move your die to the other end of the panel lining up any details like stitching. (You can see this best by cutting away the excess cardstock from the area already die cut.) Place the die up as close to the top as it will go. When you cut, be sure to leave the bottom of the die outside your cutting plates. (If you don’t have dies, cut a rectangle out of the center of your remaining panel on the sides and bottom and do not cut the top.)
NOTE:
This panel needs to be 1/4” smaller than the frame cut in step 3. but it must be larger than the inside of the frame.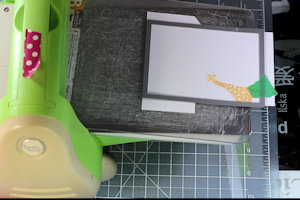
-
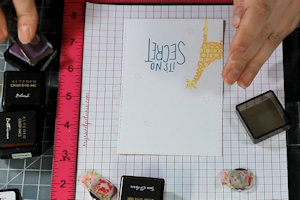
Step 7
Stamp the piece you cut in step 5. This will be the piece that is removed to show the surprise. The sample is stamped with a partial sentiment. Do not place any embellishments on this panel, not even thin ones. Set this panel aside.
-
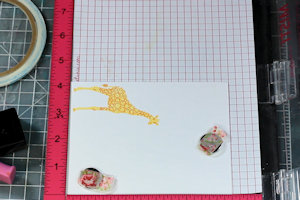
Step 8
Place the frame over the card base, lining up the stamping from step 2. Trace the inner part of the frame with a pencil so you know where to place your stamping so it will be seen.

-
Stamp this panel. If you wish to make this an added surprise, place your sentiment near the bottom so the sequins will cover it. The recipient will have to shake it to read it!
NOTES:
Do not allow any stamping to show beyond the frame.
Erase pencil marks.
Keep the eraser bits away from the acetate or they will stick!
-
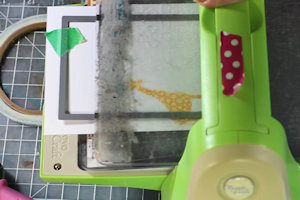
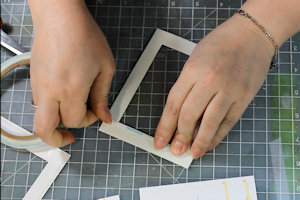
Step 9 (Optional)
Trim the fun foam and acetate slightly. It tends to stick out and look messy. A scant 1/16” is fine.
TIP:
A stitching line cut by the dies in the sample made a good cutting guide.
-
Step 10
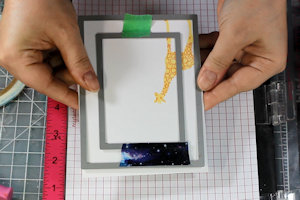
To assemble the shaker, carefully place double-sided tape on the OUTER edges of the frame on the sides and bottom ONLY.

-
Adhere the acetate behind the frame.
-
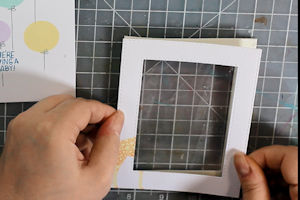
Step 11
Add double-sided tape to the fun foam. You can use wider tape for this step if you wish. Make sure the adhesive meets at the corners of the inner frame. Repeat on the other side.
-
Step 12
Adhere the fun foam to the back of the frame/acetate piece. Make sure the foam doesn’t show inside the frame.
-
Step 13
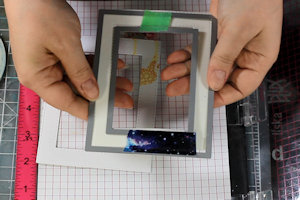
Add sequins or other shaker filler to the center of the card. If you use beads, be careful they don’t run away. Spread them out slightly.
-
Adhere the frame, making sure to line up the stamping with the other panel.

-
Step 14
Complete the pull-out panel. Create a tab using a punch, die, or a folded piece of cardstock. Stamp or write “PULL” on the tab. Adhere the tab to the top of the pull-out panel. Punch a hole near the top and thread with ribbon.

-
Step 15
To assemble the card, tuck the panel into the frame between the cardstock and the acetate. Because there is no adhesive here, you can slide the panel in and out.
-
NOTE:
It will be stiff at first but as it is used it will loosen slightly. The advantage to the snug fit is that the panel won’t fall out and get lost.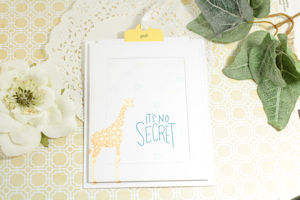
-
Step 16
Complete the project.
Video!
Your Turn
You've seen the tutorial, now you try it! We've got a section of the gallery set aside for Surprise Shaker Card. Try this technique, then upload your artwork to the gallery. Show us your creations!
***Please note - Internet Explorer/Edge is not a supported browser, and will not allow you to see the videos. Please use Chrome, Firefox or Safari to view our tutorial videos.

Questions and Comments
We'd love to get your feedback or questions. Leave your comment below.
Page 1 of 1 pages