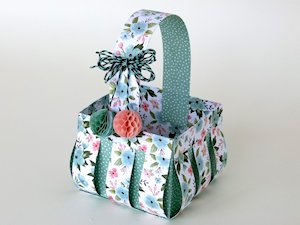
Slatted Basket
by Betty Traciak
This cute paper basket is perfect for spring.
Supplies
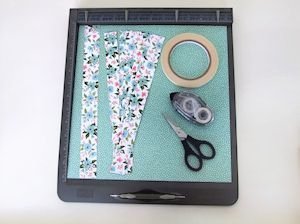
- Double-sided paper: one 12” X 12”, six 1” X 11”, one 1-1/4” X 12”, one 4” X 4” (optional)
- Scoring tool
- Scissors
- Adhesive
- Other supplies as needed to complete the project (Stampin' Up!® products used here: Birthday Bouquet Designer Series Paper, Baker’s Twine Combo Pack, Honeycomb Embellishments)
Step-by-Step
-
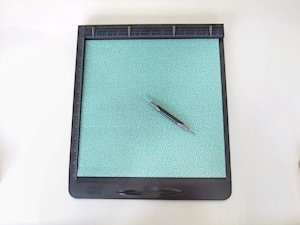
Step 1
Score a 12” X 12” piece of double-sided paper or cardstock at 3/4”, 4”, 8” and 11 1/4”. Rotate the paper 90 degrees and repeat.
-
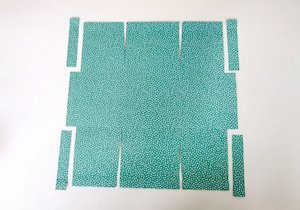
Step 2
Cutting on the score lines, cut away the corner rectangles. Cut in on the vertical score lines to where the score lines cross. Trim the tabs on a slight angle.
-
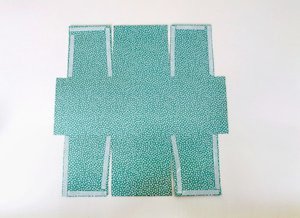
Step 3
Apply adhesive to the flaps.
-
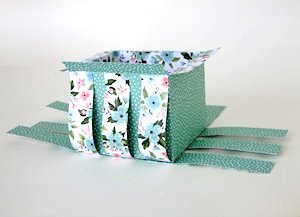
Step 4
Fold on the score lines and assemble into a box. Bend the top flaps down.

-
Step 5
Cut six strips of double sided paper, 1” X 11”. Make a score line 3-1/2” from each end. Apply adhesive to the center of three strips and adhere to the bottom of the box, spacing them evenly.
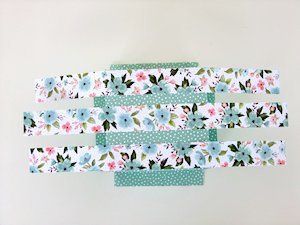
-
Step 6
Adhere the remaining three strips perpendicular to the first three as shown.
-
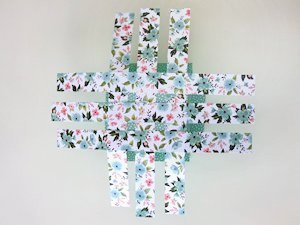
Step 7
Apply adhesive to the top of each strip and adhere them just below the score line under the top flap.
-
Step 8
Repeat on all sides.
(optional) For a finished look, cover the bottom of basket with a 4” X 4” piece of cardstock.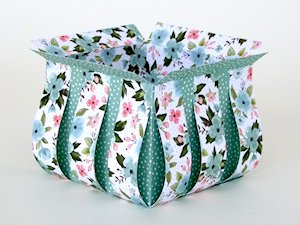
-
Step 9
Apply adhesive to the underside of the top flaps and secure. Cut a 1 1/4” X 12” piece of double-sided paper for the handle and attach to the inside of the basket. Decorate as desired to complete the project.
Video!
Variations
-
Here are the measurements for smaller baskets.
2 inch basket:
Score 6" X 6" paper at - 3/8", 2, 4, and 5-5/8"
Slats - 1/2" X 5-1/2"
Handle - 3/4" X 8-1/2"
3 inch basket:
Score 9" X 9" paper at - 1/2", 3", 6", and 8-1/2"
Slats - 3/4" X 8-1/2"
Handle - 1" X 12"
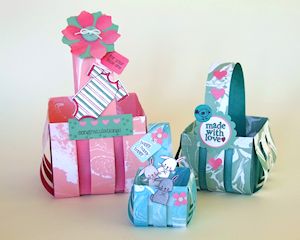
Your Turn
You've seen the tutorial, now you try it! We've got a section of the gallery set aside for Slatted Basket. Try this technique, then upload your artwork to the gallery. Show us your creations!
***Please note - Internet Explorer/Edge is not a supported browser, and will not allow you to see the videos. Please use Chrome, Firefox or Safari to view our tutorial videos.

Questions and Comments
We'd love to get your feedback or questions. Leave your comment below.
2 inch basket:
Score 6" X 6" paper at - 3/8", 2, 4, and 5-5/8"
Slats - 1/2" X 5-1/2"
Handle - 3/4" X 8-1/2"
3 inch basket:
Score 9" X 9" paper at - 1/2", 3", 6", and 8-1/2"
Slats - 3/4" X 8-1/2"
Handle - 1" X 12"
ADORABLE....
Page 1 of 2 pages 1 2 >