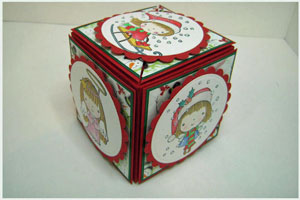
Secret Box
by Heather Perreaux
Create a box with secret trays inside.
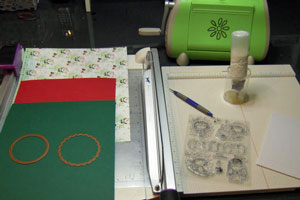
Supplies
- One 6" x 9" piece of colored cardstock for box (red used here)
- One 6" x 11" piece of colored cardstock for box (red used here)
- Three 4 5/8" squares of colored cardstock for trays (red used here)
- Four 3" squares of colored cardstock to cover box sides (red used here)
- Three 2 7/8" squares of complementary colored cardstock to layer on box sides (green used here
- Neutral cardstock to stamp your images
- Three 2 3/4" squares of Patterned Paper to decorate box sides
- Scoring Tool
- Adhesive
- Paper Cutter
- Stamps (images should be no larger than 2 1/2")
Step-by-Step
-
Step 1
Cut and score your 6" x 9" piece of colored cardstock (A) according to the diagram.
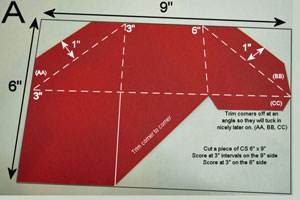
-
To create the 1" diagonal tab on the right hand side of the box base, line up the diagonal points of it and score. Score again 1" away from the first score line. Trim along the second score line.
Fold all score lines and set aside.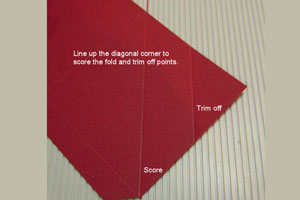
-
Step 2
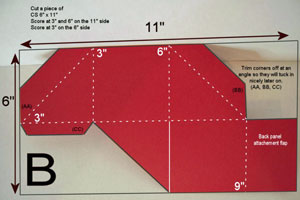
Score and cut the 6" x 11" (B) piece of colored cardstock according to the diagram score along all fold marks.
-
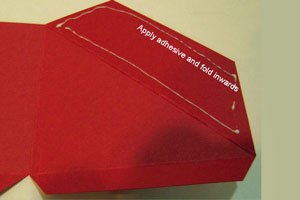
Step 3
Apply adhesive to the 45 degree corners on both pieces and fold inward.
-
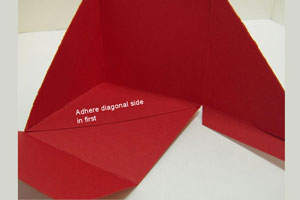
Step 4
Adhere the triangle portion inward on both pieces.
-
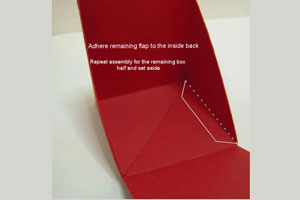
Step 5
Adhere the remaining flap on the inside to complete a half box.
-
-
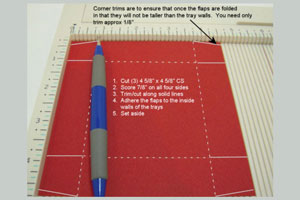
Step 6
Score 7/8"on all four sides of three of the 4 5/8" squares. These will become your box trays.
-
Trim/cut according to the solid lines in the diagram.
Fold along all score lines and adhere the corner flaps to the inside.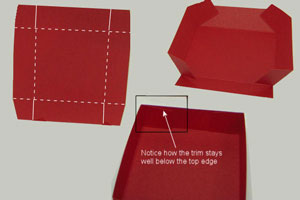
-
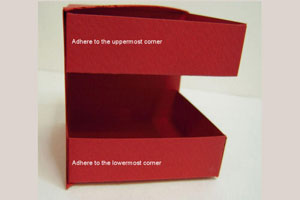
Step 7
Using piece (A) from Step 1, adhere one tray to the very bottom and one to the very top.
-
Step 8
Cut a piece of scrap cardstock measuring 1 7/8" x 5".
Using piece (B) from Step 2, place the piece in the uppermost corner and mark 2 small marks.
Repeat for the neighboring box side.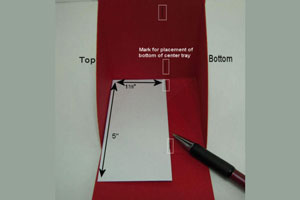
-
Step 9
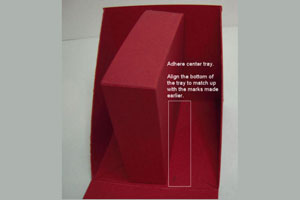
Using piece (B), adhere the remaining tray using the marks made in Step 8 as a guide for the box bottom
-
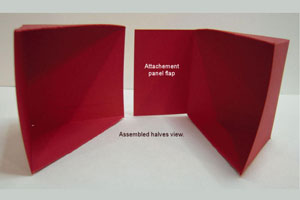
Step 10
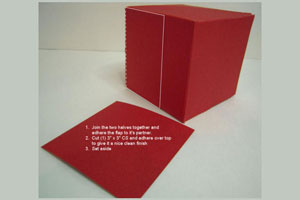
Stand pieces (A) and (B) together and adhere the back flap.
Adhere one of the 3” x 3” squares to the back to cover the half flap.
-
Step 11
Adhere your 3", 2 7/8" and 2 3/4" squares according to the diagram.
Cut one only diagonally.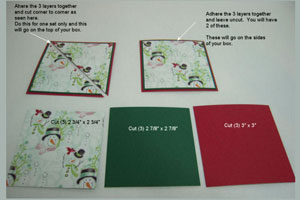
-
Step 12
Adhere layered squares and triangles to box base to decorate. Stamp, layer and adhere images to finish the box.
Hint:
Make sure you adhere the image that goes on the side with the triangles only on one triangle with dimensional. If you apply dimensionals on both triangles, the box won't open.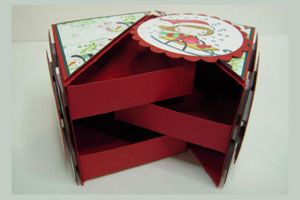
-
Video!
Your Turn
You've seen the tutorial, now you try it! We've got a section of the gallery set aside for Secret Box. Try this technique, then upload your artwork to the gallery. Show us your creations!
***Please note - Internet Explorer/Edge is not a supported browser, and will not allow you to see the videos. Please use Chrome, Firefox or Safari to view our tutorial videos.

Questions and Comments
We'd love to get your feedback or questions. Leave your comment below.
Gorgeous box, Heather!!! Thanks so much for the great tutorial.
Hugs and smiles
Thanks so much for sharing this tutorial with us.
Page 1 of 2 pages 1 2 >