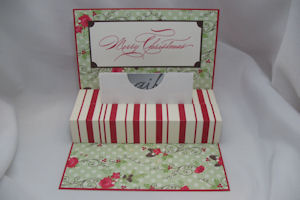
Pop-Up Gift Card Holder

by Kim Score

Create a card that has a gift card pop-up when you open the card.

Supplies
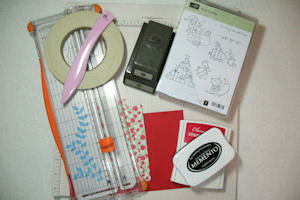
  • One 5 1/2" x 8 1/2" piece of cardstock or patterned paper for card base
  • Two 4" x 5 1/2" pieces of cardstock or patterned paper
  • One 1" x 11 1/4" piece of patterned paper for belly band
  • Scoring tool
  • Gift card with envelope
  • Strong adhesive
  • 3/4" Circle punch
  • 1 3/8" Circle punch
  • Bone folder
  • Stamps

Step-by-Step

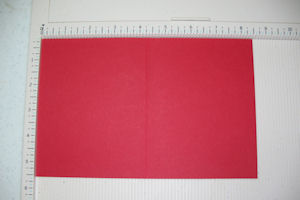
  1. Step 1

    Score the 5 1/2" x 8 1/2" piece of cardstock at 4 1/4" on the long side.
  2. Step 2

    Decorate inside of card with stamps or patterned paper.
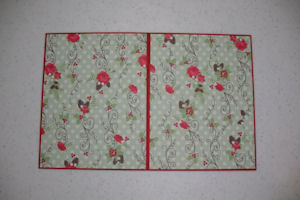
  3. Step 3

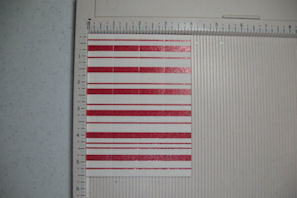
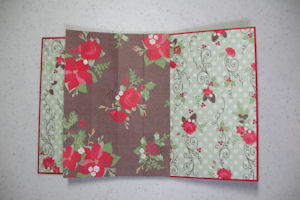
    Score each of the 4" x 5 1/2" pieces of cardstock or patterned paper at 1", 2" and 3" on short side.

    Hint:
    Using patterned paper will make it less bulky.
  4. Step 4

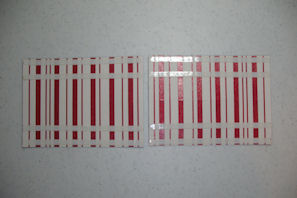
    Apply strong adhesive on the 1" sections of the top and bottom of each piece.
  5. Step 5

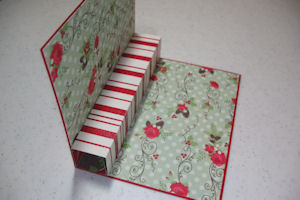
    Attach one scored piece to inside of card, aligning at center score line.

  6. Step 6

    Align other end of scored piece at center of card base and adhere to other half of card.
  7. Step 7

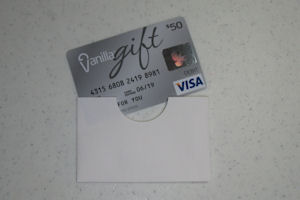
    Cut flap off gift card envelope. Punch a 1 3/8" semi-circle at top.
  8. Step 8

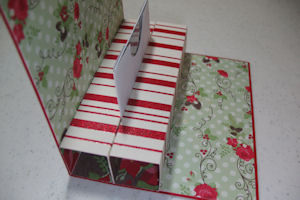
    Attach envelope to front of pop-up piece.

  9. Step 9

    Attach other scored section to front of first attached section, aligning at base
  10. Step 10

    Align end of scored piece at base of attached section and adhere to card.
  11. Step 11

    Decorate inside of card.

  12. Step 12

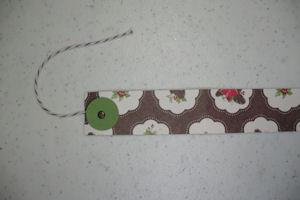
    Punch two 3/4' Circle and attach to each end of your 1" x 11 1/4" piece of patterned paper with mini brad. Tie a 5" length of baker's twine onto one end.
  13. Step 13

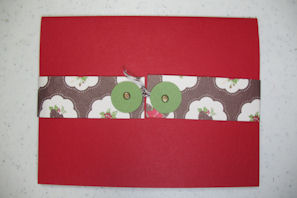
    Wrap band around card and secure in back by wrapping twine around both posts.
  14. Step 14

    Attach decorated front to card.
Video!

Variations

    For portrait style A2 card, cut the two pop up pieces for inside at 4 1/4" by 4" and score at 1", 2" and 3" on short side.

    Use a belly band that wraps around and is glued end to end in back. Attach card decorations to belly band only and slide band off to open card.

    Decorate front of card and use ribbon wrapped around entire card to keep closed.

Your Turn

You've seen the tutorial, now you try it! We've got a section of the gallery set aside for Pop-Up Gift Card Holder. Try this technique, then upload your artwork to the gallery. Show us your creations!

***Please note - Internet Explorer/Edge is not a supported browser, and will not allow you to see the videos. Please use Chrome, Firefox or Safari to view our tutorial videos.

Questions and Comments

We'd love to get your feedback or questions. Leave your comment below.

Awesome tutorial, Kim! Thanks so much for sharing it here with us
beate  |  Mon Nov 7, 2011 at 8:40 AM
Love the gift card idea..this is a great card for the holidays...thanks for sharing.
Charlotte Bernard  |  Mon Nov 7, 2011 at 8:50 AM
Thanks for a great idea.
Phyllis Rutherford  |  Mon Nov 7, 2011 at 9:22 AM
What a great tutorial Kim! This one will definitely get used a lot over the holidays. Thankyou!
loftlady  |  Mon Nov 7, 2011 at 9:35 AM
How very clever! I am going to make one right now!
Rebecca Ruediger  |  Mon Nov 7, 2011 at 10:14 AM
This is great! Always looking for new ideas for gift cards! I need one right now for a birthday. Thanks so much.
Margaret  |  Mon Nov 7, 2011 at 10:51 AM
Whoa! I'm all over it like a fat kid on a smartie! What a clever little project. Thanks so much for sharing the tutorial with us. I'm going to try it in a couple of days after I'm done insulating and vapor barriering my garage. LOL
Wenchie  |  Mon Nov 7, 2011 at 1:20 PM
Oh this is so darn clever. TFS.
Lisa Lara  |  Mon Nov 7, 2011 at 2:20 PM
This is wonderful. I give my nieces book store gift cards for every gift giving event and I am always looking for new ways to present them. Thank you!
Christi Hicks  |  Mon Nov 7, 2011 at 5:29 PM
This is such a great way to make a simple gift card a little more special and your timing is perfect. I think I'll make a bunch to have on hand for those emergency gifts. Thank you for the great tutorial!
Irene Rogers  |  Mon Nov 7, 2011 at 8:57 PM
Amazing card Kim, you are a genius! This idea will be used for my older grand kids! For some, a gift card, for others, banknotes will fit nicely in the little envelope! Viv xxx
Viv  |  Tue Nov 8, 2011 at 3:04 AM
OH KIM... I love love love your work and hearing your voice.. makes me miss you so much!! smile I am going to attempt this.. !! smile
kathy jakopovich  |  Tue Nov 8, 2011 at 7:44 AM
What a great gift card holder! I will definitely be making these for Christmas! Thanks so much for sharing!
Debbie King  |  Tue Nov 8, 2011 at 6:55 PM
Great project! I'm going to make a bunch of these to put with the gift card program at church!
Judi 'Stamparooni"  |  Tue Nov 8, 2011 at 11:08 PM
This is a wonderful tutorial - very easy to follow and fun to make. I've made two of them and plan to make 15 more for my daughter who is a teacher and uses lots of gift card holders for her volunteers. Thank you for much for this!
Sue Berker  |  Wed Nov 9, 2011 at 2:38 AM
Great idea what is the merry christmas stamp please?
lin  |  Wed Nov 9, 2011 at 5:25 AM
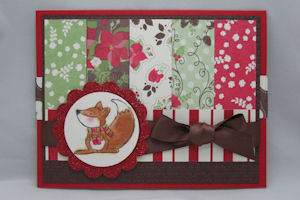
I used the Stampin' Up! Forest Festivities set for the fox and the Hand Penned Holidays set for the greeting. Both are in the current holiday mini catalog.
Kim Score  |  Wed Nov 9, 2011 at 11:47 AM
thanks
lin  |  Wed Nov 9, 2011 at 12:13 PM
GREAT tutorial, Kim! The only thing better is getting one of these tutorials in person! I really enjoyed getting a personal class from the best paper engineer I know!!!
Lorie Souther  |  Wed Nov 9, 2011 at 1:34 PM
Thanks so much for the inspiration. Sometimes I get myself in a rut and it's so refreshing to so your wonderful ideas and adapt them in a different way. Thanks for being so creative:)
Rachel Snethun  |  Wed Nov 9, 2011 at 9:23 PM

Page 1 of 2 pages  1 2 >

You need to be logged in to comment

GET OUR NEWSLETTER


Splitcoaststampers's privacy policy