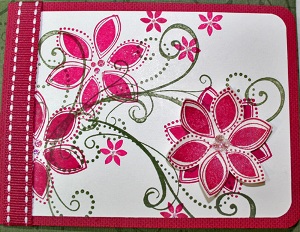
Photo Wallet
by Beverly Gerard
This is a great way to show off tons of pictures in a cute package.
Supplies
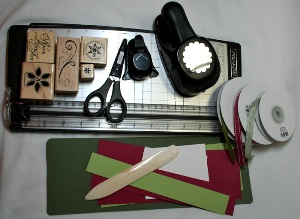
- Paper Cutter with Scoring Blade
- Corner Rounder
- Scallop Punch (optional)
- Stamps
- Ribbon of Choice
- Ink
- Sticky Strip™ adhesive
- Adhesive
- Bone Folder
- Paper Piercing tool, template, and piercing pad
- One 4 ¼" X 12" piece of cardstock for Wallet (here Always Artichoke)
- Three 3" X 8" pieces of cardstock for the Photo/Journal Covers (here Purely Pomegranate and Certainly Celery)
- Four 2 ¾" X 3 ¾" pieces of neutral cardstock for 3 (optional) Journaling Inserts and 1 Photo Cover Layer
- One 1 & 1/8" X 8 ½" strip of cardstock for the Belt layer (here Certainly Celery)
- One 1 & 5/8" X 8 ½" strip of cardstock for the Belt (here Purely Pomegranate)
Step-by-Step
-
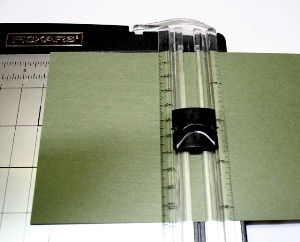
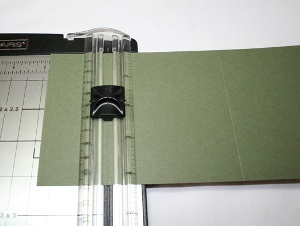
Step 1
Score wallet piece at 3 ¼" and 6 5/8".
-
-
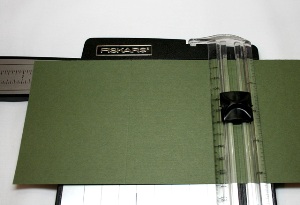
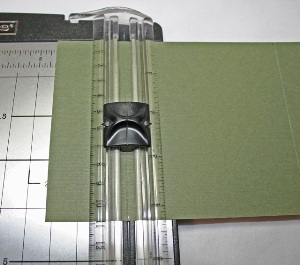
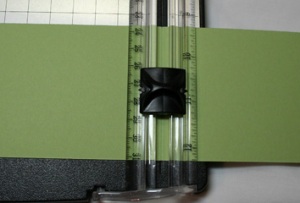
Step 2
Turn wallet piece to opposite end and score at 1 5/8" and 1 7/8".
-
-
Step 3
Use corner rounder to round all four corners of wallet.
-
Step 4
Stamp both sides of the wallet.
-
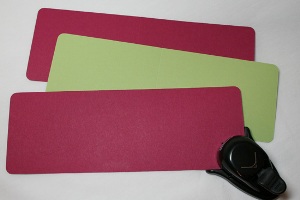
Step 5
Score each of the photo cover pieces at 4".
-
Step 6
Use corner rounder punch on all corners of the photo cover pieces.
-
Step 7
Stamp each of the photo covers, inside and out. One of these will include a neutral layer on the outside. Embellish each cover as desired.
-
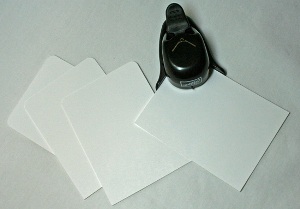
Step 8
Use corner rounder punch to round one end of each of the neutral cardstock pieces. One end will have two square corners, while the other end will have two rounded corners.
-
Step 9
Use one of the neutral pieces as the journaling area of each photo cover. Stamp to coordinate with each respective cover.
-
Step 10
Adhere to the inside top flap of each photo cover.
-
Step 11
The fourth neutral piece is used as the front layer on one of the photo covers. Stamp and embellish as desired, then adhere to the front of one photo cover.
-
Step 12
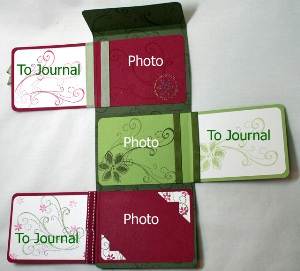
Adhere each finished photo cover to the inside of the wallet, alternating the direction of the opening edges, i.e. open right, open left, open right side.
-
Step 13
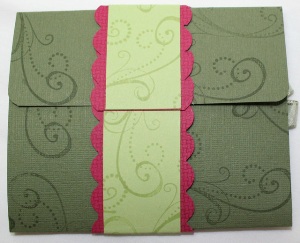
Score both belt pieces at 1 ¾", 2", and 5 ½". Stamp and embellish each as desired, then adhere the two belt layers together. Sharpen the scores with a Bone Folder.

-
Step 14
Place the belt around the folded wallet and determine the best fit to allow the belt to easily slip onto the folded wallet, yet keep it closed. Use Sticky Strip™ to adhere the shorter end of the belt layers on top of the longer end.
-
Step 15
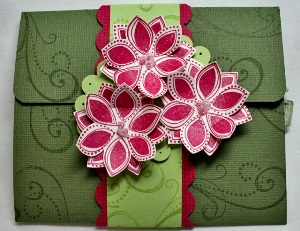
Use a punched or cut layer of cardstock on which to build or stamp the main focal point for the belt & wallet. Use Sticky Strip to adhere to the front of the belt.
Variations
Finishing
Now add your own photos to the inside of each photo cover, along with journaling on the inside top flaps of each cover. The journaling area is layered with neutral cardstock.
What a perfect gift for loved ones, Grammys, Grandpas, Aunts, Uncles, team parents, teachers, etc. Give them for the holidays or create special wallets to remember a special occasion. Enjoy creating and sharing!
Your Turn
You've seen the tutorial, now you try it! We've got a section of the gallery set aside for Photo Wallet. Try this technique, then upload your artwork to the gallery. Show us your creations!
***Please note - Internet Explorer/Edge is not a supported browser, and will not allow you to see the videos. Please use Chrome, Firefox or Safari to view our tutorial videos.

Questions and Comments
We'd love to get your feedback or questions. Leave your comment below.
Thank you so much!
I love this project. My problem is that I am having some difficulty with measurements and have ruined several pieces of card stock trying to get it right. Somewhere, I saw a page that showed a ruler offering help with that issue and wondered if you can help me locate that page again. I need help with the 1 & 1/8" and 1 & 5/8" 1 & 7/8" Your help will be greatly appreciated.
Thanks,
Pat Wafer
Thanks for this tutorial, I have it bookmarked. Plan to make many for some friends of mine at the next retreat i attend.
Thanks
Amy
Thanks
Graag had ik deze afmetingen gehad in cm.
Hartelijk dank
I saw the video once which was a gret help but I can not longer find it. Any helpwould be greatly appreciated
2 "= 5,1 cm 3/4 "= 1,9 cm
1 3/4 "= 4,5 cm 5/8 "= 1,6 cm
1 5/8 "= 4,2 cm 1/2 "= 1,3 cm
1 1/2 "= 3,9 cm 3/8 "= 1 cm
1 3/8 "= 3,5 cm 1/4 "= 7 mm
1 1/4 "= 3,2 cm 3/16 "= 5 mm
1 1/8 "= 2,9 cm 1/8 "= 4 mm
1 "= 2,6 cm 1/16 "= 2 mm
1-1/16" = 2,70 cm 2-1/16" = 5,24 cm 3-1/16" = 7,78 cm 4-1/16" = 10,32 cm 5-1/16" = 12,86 cm 6-1/16" = 15,40 cm 7-1/16" = 17,94 cm
1-1/8" = 2,86 cm 2-1/8" = 5,40 cm 3-1/8" = 7,94 cm 4-1/8" = 10,48 cm 5-1/8" = 13,02 cm 6-1/8" = 15,56 cm 7-1/8" = 18,10 cm
1-3/16" = 3,02 cm 2-3/16" = 5,56 cm 3-3/16" = 8,10 cm 4-3/16" = 10,64 cm 5-3/16" = 13,18 cm 6-3/16" = 15,72 cm 7-3/16" = 18,26 cm
1-1/4" = 3,18 cm 2-1/4" = 5,72 cm 3-1/4" = 8,26 cm 4-1/4" = 10,80 cm 5-1/4" = 13,34 cm 6-1/4" = 15,88 cm 7-1/4" = 18,42 cm
1-5/16" = 3,33 cm 2-5/16" = 5,87 cm 3-5/16" = 8,41 cm 4-5/16" = 10,95 cm 5-5/16" = 13,49 cm 6-5/16" = 16,03 cm 7-5/16" = 18,58 cm
1-3/8" = 3,49 cm 2-3/8" = 6,03 cm 3-3/8" = 8,57 cm 4-3/8" = 11,11 cm 5-3/8" = 13,65 cm 6-3/8" = 16,19 cm 7-3/8" = 18,73 cm
1-7/16" = 3,65 cm 2-7/16" = 6,19 cm 3-7/16" = 8,73 cm 4-7/16" = 11,27 cm 5-7/16" = 13,81 cm 6-7/16" = 16,35 cm 7-7/16" = 18,89 cm
1-1/2" = 3,81 cm 2-1/2" = 6,35 cm 3-1/2" = 8,89 cm 4-1/2" = 11,43 cm 5-1/2" = 13,97 cm 6-1/2" = 16,51 cm 7-1/2" = 19,05 cm
1-9/16" = 3,97 cm 2-9/16" = 6,51 cm 3-9/16" = 9,05 cm 4-9/16" = 11,59 cm 5-9/16" = 14,13 cm 6-9/16" = 16,67 cm 7-9/16" = 19,21 cm
1-5/8" = 4,13 cm 2-5/8" = 6,67 cm 3-5/8" = 9,21 cm 4-5/8" = 11,75 cm 5-5/8" = 14,29 cm 6-5/8" = 16,83 cm 7-5/8" = 19,37 cm
1-11/16" = 4,29 cm 2-11/16" = 6,83 cm 3-11/16" = 9,37 cm 4-11/16" = 11,91 cm 5-11/16" = 14,45 cm 6-11/16" = 16,99 cm 7-11/16" = 19,53 cm
1-3/4" = 4,45 cm 2-3/4" = 6,99 cm 3-3/4" = 9,53 cm 4-3/4" = 12,07 cm 5-3/4" = 14,61 cm 6-3/4" = 17,15 cm 7-3/4" = 19,69 cm
1-13/16" = 4,60 cm 2-13/16" = 7,14 cm 3-13/16" = 9,68 cm 4-13/16" = 12,22 cm 5-13/16" = 14,76 cm 6-13/16" = 17,30 cm 7-13/16" = 19,85 cm
1-7/8" = 4,76 cm 2-7/8" = 7,30 cm 3-7/8" = 9,84 cm 4-7/8" = 12,38 cm 5-7/8" = 14,92 cm 6-7/8" = 17,46 cm 7-7/8" = 20,00 cm
1-15/16" = 4,92 cm 2-15/16" = 7,46 cm 3-15/16" = 10,00 cm 4-15/16" = 12,54 cm 5-15/16" = 15,08 cm 6-15/16" = 17,62 cm 7-15/16" = 20,16 cm
Page 1 of 1 pages