Pencil Resist

by Dina Kowal

Use oil- or wax-based pencils to create a subtle resist effect with water-based mediums.

Supplies

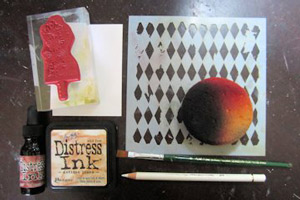
  • Cardstock or watercolor paper , Canson watercolor paper used here

  • Water-based medium, such as: dye inkpads or reinkers, Distress inkpads or reinkers, or watercolor paints (Distress pad and reinker used here)

  • Wax- or oil-based pencils , ivory Polychromos pencil (oil-based) used here

  • Stencil , Crafter’s Workshop stencil used here

  • Sponge or paintbrush, optional

  • Stamped image, optional

Step-by-Step

  1. Step 1

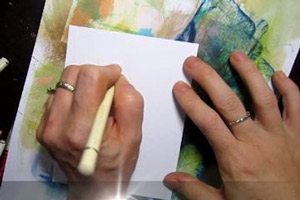
    Position stencil over a panel of cardstock or watercolor paper.

    The panel may be stamped with a focal image first, or you may choose to create a background panel instead.
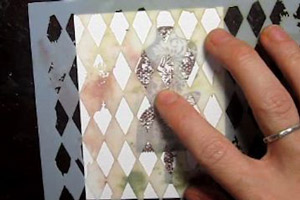
  2. Step 2

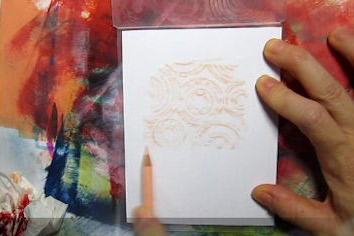
    Fill in the open areas of the stencil using a wax-based or oil-based pencil. If you have stamped an image, use the outline as another border for your coloring (don’t fill in the stencil openings where they overlap the image).

    Hint:
    --Your pencil strokes may show, so be sure to fill in the areas completely. It helps to color in a couple of different directions.
    --Keep your pencils sharp to get into the detailed angles of your stencil.
    --If you are working with wax-based pencils, brush off the ‘crumbs’ when you finish. You don’t want these embedded into your inkpad.
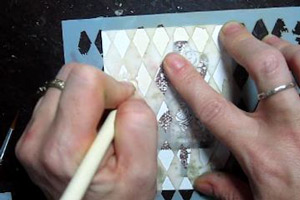
  3. Step 3

    Remove the stencil, and apply ink, spray, or watercolor paint to the stenciled areas. You may want to mask your stamped image if you are using a dark ink, or in case you want to leave it alone for coloring later.

    Hint:
    Buff the panel with a tissue after you apply the ink, to remove it from the penciled areas.
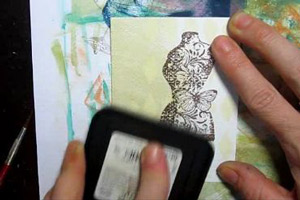
  4. Optional:
    Sponging can also add interest and a nice gradient to your background. The more and darker colors you add to the penciled areas, the more they will ‘pop.’
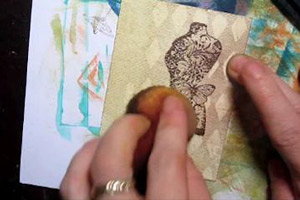
  5. Step 4

    Color in your stamped image if you wish.
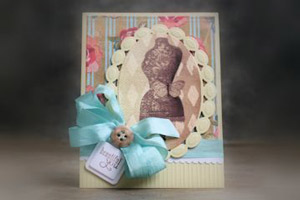
  6. Step 5

    Complete your card.

Video!

Variations

  1. Doodle, write, or add highlights to your image before applying ink or watercolor paint.

    You can also experiment with different colors of pencils and inks. Prismacolor metallic pencils work really well with this technique.

  2. Use an embossing folder or texture plate to create a rubbing with a pencil, a crayon, or an oil pastel, then apply ink, spray or watercolors over the rubbing.

Your Turn

You've seen the tutorial, now you try it! We've got a section of the gallery set aside for Pencil Resist. Try this technique, then upload your artwork to the gallery. Show us your creations!

***Please note - Internet Explorer/Edge is not a supported browser, and will not allow you to see the videos. Please use Chrome, Firefox or Safari to view our tutorial videos.

Questions and Comments

We'd love to get your feedback or questions. Leave your comment below.

great tutorial and thanks for the inspiration Dina!
greet Miranda
Miranda Degenaars  |  Wed Mar 6, 2013 at 3:42 AM
This is soooo cool, absolutely adore all of the techniques! Thanks for the inspiration and in some cases the reminder!
Astrid Maclean  |  Wed Mar 6, 2013 at 4:30 AM
Wonderful video! More please! I liked how Dina explained how/why the technique works and what doesn't work. She's a great teacher.
Kathy Harrison  |  Wed Mar 6, 2013 at 5:37 AM
Dina, love techniques using things that I already have on hand, and using them in a new way! Great video, excellent and easy to follow instructions. TFS
Kris  |  Wed Mar 6, 2013 at 6:12 AM
Inspiring! One of the best tutorial videos EVER. Thank you SO much!
Carol Henshaw  |  Wed Mar 6, 2013 at 7:01 AM
Thank you for such an amazing technique. I love to see things that I can actually accomplish...no fancy equipment but what great results! Thanks Dina:)
Kathy H  |  Wed Mar 6, 2013 at 7:11 AM
Thank you so much for sharing this ...I've just started playing with watercolors and forget to leave the white space...so this will so helpful....and I love your results using this technique...tfs
Gloria Westerman  |  Wed Mar 6, 2013 at 8:19 AM
Can't believe how much info you shared and demonstrated in just 5 minutes. This was awesome!! I loved how you explained the theory behind this upfront also. Great job!!!
Marcia Harrington  |  Wed Mar 6, 2013 at 8:47 AM
WOW! Thanks for all the wonderful ideas and inspiration.
kab  |  Wed Mar 6, 2013 at 9:09 AM
Wonderful tutorial! WTG, Dina! smile
Bev Rousch  |  Wed Mar 6, 2013 at 10:11 AM
This is the best video ever!! It's quick and colorful and the technique was explained clearly and demonstrated. This is certainly a keeper! Thank you!!
Sally Downes  |  Wed Mar 6, 2013 at 11:10 AM
Thanks Dina for a wonderful tutorial.
Linda Paider  |  Thu Mar 7, 2013 at 5:50 AM
Great tutorial Dina! Lots of ideas.. thanks so much for sharing!
Marie Taylor  |  Thu Mar 7, 2013 at 3:36 PM
Thank you so much! I'm fairly new at this and you gave me so many ideas and they were pretty simple too. I keep hitting my head thinking why didn't I think of this! -Carol
Carol Duckworth  |  Fri Mar 8, 2013 at 8:59 AM
What a great use for long-forgotten stencils! I haven't seen this technique before and it looks great (and easy). Thank you!
Mary Beth
Mary Beth  |  Fri Mar 8, 2013 at 8:29 PM
great tutorial..thanks
elisa silva  |  Sun Mar 10, 2013 at 1:02 PM
Wow! What an informative video! Thank you so much for so many ideas!
stampinatnight  |  Mon Mar 11, 2013 at 4:31 PM
thanks for sharing
T Summers  |  Tue Mar 12, 2013 at 5:21 AM
Thank you so much for this tutorial, so simple but still so elegant. I have everything on hand so I am going to try this before I go to bed tonight.. Thank you for your time to do this tutorial for us.. Really gives me inspiration.
Elizabeth Brewer-Philliips  |  Fri Mar 29, 2013 at 6:52 PM

Page 1 of 1 pages

You need to be logged in to comment

GET OUR NEWSLETTER


Splitcoaststampers's privacy policy