No Line Coloring
by Elaine Hughes
Stamp image with a light colored ink rather than the usual black. As you color your image, the lines start to disappear.
Supplies
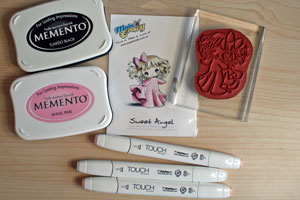
- Outline Image Stamp (Make it Crafty Sweet Angel used here)
- Black Ink (Memento Tuxedo Black used here)
- Light colored Ink (Memento Angel Pink used here)
- White cardstock (Make it Color Blending cardstock used here)
- Alcohol Based Markers(ShinHan Touch Twin Markers used here)
Step-by-Step
-
Step 1
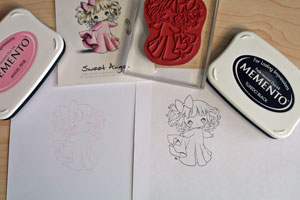
Stamp image in a light color and choose the direction of your light source. Stamp another copy of the image on scrap paper, this time in black ink. You will use this to refer to while coloring, it will be invaluable as the lines become difficult to see.
-
Step 1
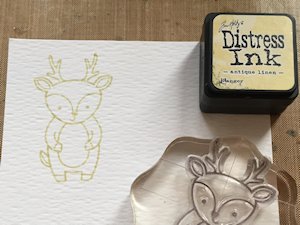
Stamp an outline image in a light colored ink onto watercolor cardstock. Antique Linen Distress Ink was used here.
-
Step 2
Start to color the image using your lightest shade, mapping out the areas where you want the shadows to be darkest. It is advisable to break the coloring down into stages, starting with one area and developing that first i.e. skin tones.
Don’t be tempted to lay down too much color at this stage. Leave lots of white space, and simply map out your coloring.
NOTE:
During the early stages of coloring the image may look quite strange. Keep going, as you develop the shading it will start to come together.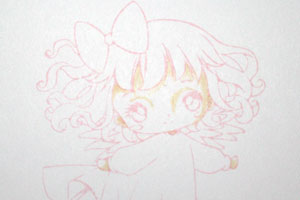
-
Step 3
Working from the base laid down in Step 2, continue building up color, working upwards from the lightest shade to the darkest. Move inward from the outline, blending out into your light areas and add depth to the shadow areas as needed.
You can also pick out some of the details, such as eyes – this can help you to “see” the image. Things will be starting to take shape, but may still look a little strange. Without black lines, colors may look a little darker than usual. This will change as you progress with the image and color other areas.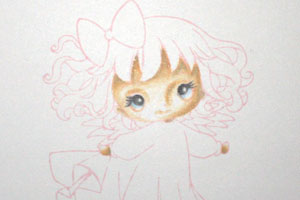
-
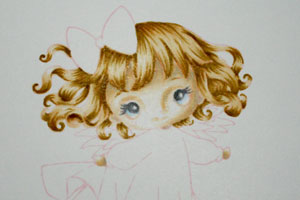
Step 4
Move on to another area i.e. hair, following steps 2 and 3, building up layers of color in much the same way.
NOTE:
Hair is an area where this technique can be really useful. Often the black outlines of a stamped image can prevent you from creating soft detail in hair. With this technique you have the flexibility to create beautiful detail and texture without feeling too restricted by the outline.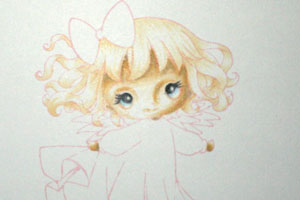
-
-
Step 5
Move on to the next section of the image i.e. clothing and again, follow steps 2 and 3, building layers of color moving from light shades to dark.
TIP:
Use grey tones to add depth in your shadow areas for a natural look.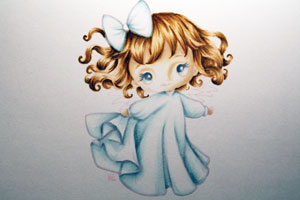
-
Step 6
Review the image, and identify any areas where you feel extra shading is needed, or details that still need to be picked out.
Optional:
Add any background shading.
-
Step 7
Finish your card.

Video!
Your Turn
You've seen the tutorial, now you try it! We've got a section of the gallery set aside for No Line Coloring. Try this technique, then upload your artwork to the gallery. Show us your creations!
***Please note - Internet Explorer/Edge is not a supported browser, and will not allow you to see the videos. Please use Chrome, Firefox or Safari to view our tutorial videos.

Questions and Comments
We'd love to get your feedback or questions. Leave your comment below.
Jessica
Amy, if you search YouTube for 'No Copics No Problem' you'll find a great tutorial by a lady who does watercolouring with SU markers and the aquapainter. Her secret is to use good quality watercolour paper because that allows for blending of water-based ink. So perhaps if you follow Elaine's tutorial but use watercolour paper instead of cardstock with your SU markers, it might work?
Elaine, you know how much I LOVE your coloring! You are amazing and so is this tutorial. Thanks a million for sharing it with us.
Hugs and smiles
I keep the image stamped in black next to me while I'm colouring the lightly stamped image, so I can use it as a reference when the lines get too difficult to see.
Generally speaking, before I colour an image I tend to have an idea of which colours I'm going to use. I use my lightest shade as a "base" and map out the areas where I think the shading should be darkest, then I work from there.
Hope that helps!
Page 1 of 2 pages 1 2 >