Mini Mixed Media Tiles
by Chrissie Stokes
Embellish masked tiles with a variety of products.
Supplies
- Cardstock (black and gold card, White Silkweave linen cardstock 250 gsm used here)
- Mylar sheet
- Square or other shape dies (Sizzix Triple Square die set 659647 used here)
- Temporary adhesive (Sticky Mat and Crafter’s Companion Stick & Spray Repositionable Adhesive used here)
- Stencil or mask (Lavinia Stamps Leaf Mask ST026 used here)
- Heavy bodied gel medium or texture medium (Indigo Blu Super Thick Slap It On used here)
- Palette knife
- Pigment powders and applicator (Indigo Blu Luscious Pigment Powder in Lime Spritzer & soft brush used here)
- Other mediums (Pretty Gets Gritty Pretty Metallic Spray (Bronze) used here)
- Other supplies as needed to complete the project (used here: Sizzix Foliage Die 664581 B, Flat backed self-adhesive pearls + Black permanent marker, Sentiment stamp, Versamark, Gold Embossing Powder, Sentiment panel dies, Low Tack Tape)
Step-by-Step
-
Step 1
Make a mask from Mylar (triple square die used here) and place on a sticky mat (or use another method to hold it in place).
-
Insert die cuts cut from black card into the apertures.
-
Step 2
Cover with the leaf mask (having sprayed lightly with the adhesive spray on the reverse).
-
Spread a texture medium through all openings using a palette knife. (Super Thick Slap It On medium was used here.)
-
Step 3
Tap on some pigment powders (Luscious Pigment Powder in Lime Spritzer here), using a soft brush.
-
Step 4
Spray with a metallic spray or apply another medium of choice.
-
Step 5
Remove the stencils and allow the tiles to dry completely.
-
Step 6
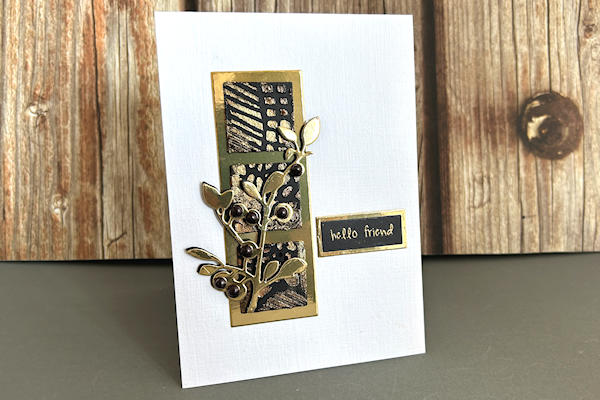
When dry, use the tiles to embellish a card or other project as desired. Here, the tiles were fixed onto a gold rectangular mount and layered with gold and black foliage die cuts.
-
Pearls were colored with alcohol markers to match the project, and attached to the card.
-
Step 7
Complete the project.


Video!
Your Turn
You've seen the tutorial, now you try it! We've got a section of the gallery set aside for Mini Mixed Media Tiles. Try this technique, then upload your artwork to the gallery. Show us your creations!
***Please note - Internet Explorer/Edge is not a supported browser, and will not allow you to see the videos. Please use Chrome, Firefox or Safari to view our tutorial videos.

Questions and Comments
We'd love to get your feedback or questions. Leave your comment below.
I love how you make stuff to your needs like the 3 square mask and the sticky mat base. And that Indigo product is a riot! I want some! I have to see if I can get in the states. I probably have the equivalent in another name but it cracks me up.
This is so pretty-black and gold! Very luxe! And I can see how a person could do a run with it to make several cards.
Thank you!
Page 1 of 1 pages