Keurig K-Cup Holder
by Joann Jamieson
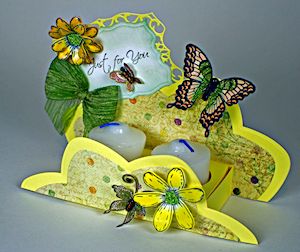
Give the gift of coffee in this custom Keurig® cup holder.
Supplies
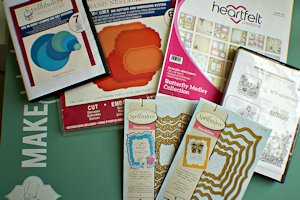
- Cardstock (solid color with coordinating patterned paper, Heartfelt Creations Butterfly Medley Paper Collection (HCDP1 251) used here)
- Die cutting machine
- Large label dies (Spellbinders Grand Labels Four used here)
- Circle punch or die (1 5/8", Spellbinders Standard Circles Small used here)
- Paper trimmer
- Scoring tool
- Scissors
- Adhesive
- Keurig® K-cups
- Other supplies as needed to complete the project (Heartfelt Creations Summer Song Cling Stamp Set (HCPC 3615), Spellbinders Labels Forty dies, and Spellbinders Labels 40 Decorative Elements used here)
Step-by-Step
-
Step 1
Cut a piece of solid cardstock using a large label die.
Cut the die cut piece in half. From one of the halves, cut another 1 1/2" off the straight side. The larger piece will be the back and the smaller piece will be the front.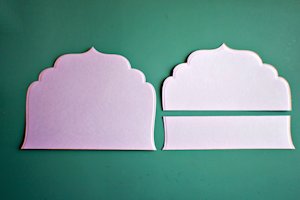
-
Step 2
Repeat the same steps using a piece of designer paper and the next smaller die.
NOTE:
If your designer paper has no obvious pattern that has a top and bottom, you can glue the full labels together first and then proceed with the cutting.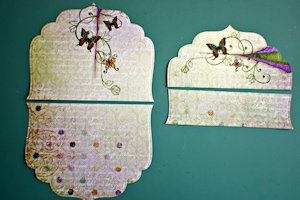
-
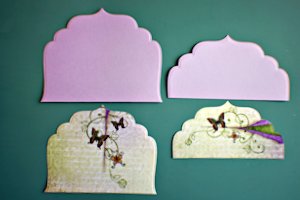
Step 3
Once the pieces have been cut you will be left with 2 pieces for the front and 2 pieces for the back. Glue the like pieces together and set aside to dry.
-
Step 4
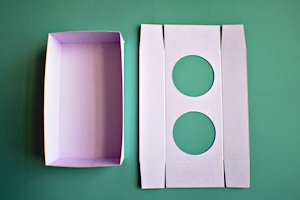
To make the tray, cut 2 pieces of cardstock:
The first piece is 4 1/2" x 6 1/2" and the second piece is 4 3/8" x 6 3/8".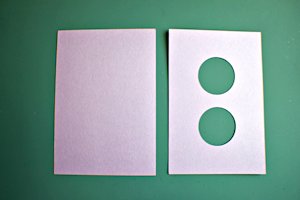
-
Step 5
Score the 4 sides of each piece at the 1" mark. Fold on the score lines, and make relief cuts at the corners as shown so the tabs can be folded over and adhered to form the tray and box.
-
Step 6
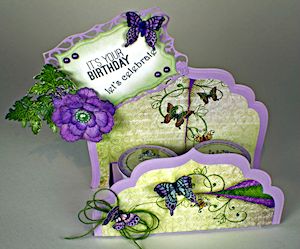
Embellish as desired.
HINT:
For the sentiment panel, glue the 2 sides and top together leaving an opening at the bottom. This will allow you to slip the 2 pieces over any piece of the back you desire.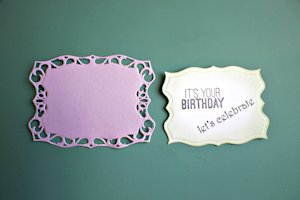
-
Step 7
Complete the project and finish off by inserting some of the recipient’s favorite coffee flavors.
Video!
Variations
-
If you would like to use votive candles, simply remove the tray with holes in it and there will be enough room for 3 votive candles.
Your Turn
You've seen the tutorial, now you try it! We've got a section of the gallery set aside for Keurig K-Cup Holder. Try this technique, then upload your artwork to the gallery. Show us your creations!
***Please note - Internet Explorer/Edge is not a supported browser, and will not allow you to see the videos. Please use Chrome, Firefox or Safari to view our tutorial videos.

Questions and Comments
We'd love to get your feedback or questions. Leave your comment below.
I wondered if you could provide a measurement in inches for the large die sizes? I don't have them, but I do have a cricut which can cut some labels. If I judge by the size of your trays, less the 2" for the scoring lines, I am guestimating that the approx label size would be 2 1/2" x 4 1/.2" for an edge to edge match. Otherwise, should I go with the 4 1/2 x 6 1/2 size as in your first part of the box? . If any one can help, I would appreciate it. I cannot wait to try to make one! I will try to insert a flameless tea light instead of the votive size, fitting to the size of the hole.
The approximate die template sizes are 3-3/8" x 5-1/4", 3-7/8" x 6", 4-3/8" x 6-7/8", 4-7/8" x 7-5/8", 5-1/2" x 8-1/2" and 6" x 9-3/8". You can really make this project any size by adjusting the size of your tray
Page 1 of 1 pages